Ga door naar hoofdinhoud

iMac G5 20" Model A1076 Optical Drive Replacement

Wat je nodig hebt

  1. iMac G5 20" Model A1076 Optical Drive Replacement, Rear Panel: stap 1, afbeelding 1 van 1
    • Lay the iMac display-side down on a flat surface.

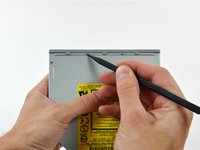
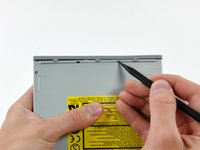
    • Loosen the three Phillips screws securing the rear panel to the iMac.

    • These screws are captive in the iMac. The center screw will stop turning after about 3.5 turns and the outer screws will stop turning after about 5.5 turns. Do not try to remove these screws from your iMac.

  2. iMac G5 20" Model A1076 Optical Drive Replacement: stap 2, afbeelding 1 van 2 iMac G5 20" Model A1076 Optical Drive Replacement: stap 2, afbeelding 2 van 2
    • Lift the rear panel slightly near the bottom of the iMac.

    • Pull the rear panel toward yourself and remove it from the iMac.

  3. iMac G5 20" Model A1076 Optical Drive Replacement, Optical Drive: stap 3, afbeelding 1 van 1
    • Remove the four 7 mm Phillips screws securing the optical drive to the midplane.

  4. iMac G5 20" Model A1076 Optical Drive Replacement: stap 4, afbeelding 1 van 2 iMac G5 20" Model A1076 Optical Drive Replacement: stap 4, afbeelding 2 van 2
    • Pull the optical drive up by its white pull tab to disconnect it from the logic board.

    • Lift the free end of the optical drive just enough to clear the fan cover. Lifting the free end of the optical drive too far may break the plastic positioning pins off the front bezel.

    • Lift the free end of the optical drive slightly, then pull it away from the edge of the rear case to clear the two plastic positioning pins.

    • Lift the optical drive out of your iMac.

    • When reinstalling your optical drive it may be necessary to set the bezel attached to the open end of the drive on the plastic positioning pins molded into the front bezel of the iMac and pull the connector side of the drive toward the edge of the rear case, bending it outward slightly, to properly seat the connector.

  5. iMac G5 20" Model A1076 Optical Drive Replacement, Optical Drive: stap 5, afbeelding 1 van 1
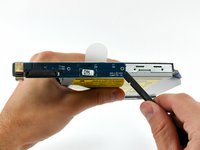
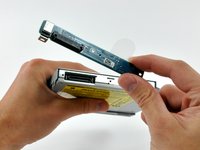
    • Remove the two 3.7 mm T6 Torx screws securing the optical drive connector board to the optical drive.

  6. iMac G5 20" Model A1076 Optical Drive Replacement: stap 6, afbeelding 1 van 2 iMac G5 20" Model A1076 Optical Drive Replacement: stap 6, afbeelding 2 van 2
    • Use a spudger to pry the optical drive connector board away from the optical drive.

    • Remove the optical drive connector board.

  7. iMac G5 20" Model A1076 Optical Drive Replacement: stap 7, afbeelding 1 van 2 iMac G5 20" Model A1076 Optical Drive Replacement: stap 7, afbeelding 2 van 2
    • Remove the two 4.5 mm shouldered T6 Torx screws from each side of the optical drive (four screws total).

  8. iMac G5 20" Model A1076 Optical Drive Replacement: stap 8, afbeelding 1 van 1
    • Insert a spudger into the gap between the optical drive and its cage near the optical drive connector.

    • Pry the optical drive away from the vibration isolating material along the inside of the cage.

  9. iMac G5 20" Model A1076 Optical Drive Replacement: stap 9, afbeelding 1 van 1
    • Pull the optical drive away from the cage by its open side.

    • It may be necessary to wiggle the optical drive as you pull it away from the cage to free it from the vibration isolating material.

  10. iMac G5 20" Model A1076 Optical Drive Replacement: stap 10, afbeelding 1 van 2 iMac G5 20" Model A1076 Optical Drive Replacement: stap 10, afbeelding 2 van 2
    • Use the tip of a spudger to push the two plastic bezel tabs away from their retaining slots on the top of the optical drive.

  11. iMac G5 20" Model A1076 Optical Drive Replacement: stap 11, afbeelding 1 van 1
    • Use the tip of a spudger to depress and release the bezel retaining tab on the side of the optical drive.

  12. iMac G5 20" Model A1076 Optical Drive Replacement: stap 12, afbeelding 1 van 1
    • If necessary, use the tip of a spudger to release the two plastic bezel tabs from their slots on the bottom of the optical drive.

  13. iMac G5 20" Model A1076 Optical Drive Replacement: stap 13, afbeelding 1 van 1
    • Remove the plastic bezel from the optical drive.

    • If you have a disk or anything else stuck inside your optical drive, we have a guide to fix it.

Conclusie

To reassemble your device, follow these instructions in reverse order.

8 andere personen hebben deze handleiding voltooid.

0 opmerkingen

Voeg opmerking toe

Weergavestatistieken:

Afgelopen 24 uren: 0

Afgelopen 7 dagen: 2

Afgelopen 30 dagen: 8

Altijd: 15,023