Ga door naar hoofdinhoud
Sony Alpha A350 Front Case Replacement

Sony Alpha A350 Front Case Replacement

Danielle Trivett

Danielle Trivett en 5 andere bijdragers

Voor het laatst geüpdatet op December 17, 2021

15 minuten
Eenvoudig

This guide will go through step by step on the removal of the front case of a Sony Alpha A350. These steps will include removal of all screws and the eye cup of the camera in order to safely pull the front case off of the main device. The function of this part is to protect all wires and parts such as the motherboard inside of the device. The front case will need replaced if there is a crack or hole in the case, which exposes the inside of the device. Replacing the front case will ensure no further damage comes to the camera.

Wat je nodig hebt

Gereedschap

  1. Sony Alpha A350 Front Case Replacement, Front Case: stap 1, afbeelding 1 van 2 Sony Alpha A350 Front Case Replacement, Front Case: stap 1, afbeelding 2 van 2
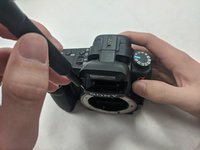
    • Using a Phillips #00 Screwdriver, remove the four 5.5mm screws from the bottom of the camera.

    • Using a Phillips #00 Screwdriver, remove the one 4.3mm screw.

  2. Sony Alpha A350 Front Case Replacement: stap 2, afbeelding 1 van 2 Sony Alpha A350 Front Case Replacement: stap 2, afbeelding 2 van 2
    • Using a Phillips #00 screwdriver, remove one 3.6mm screw on the left side of the camera.

    • Open the remote / DC under the rubber flap to reveal a screw.

    • Using the Phillips #00 screwdriver, remove one 4.3mm screw.

  3. Sony Alpha A350 Front Case Replacement: stap 3, afbeelding 1 van 2 Sony Alpha A350 Front Case Replacement: stap 3, afbeelding 2 van 2
    • Open the flash on the top of the camera and remove two 4.3mm screws with a Phillips #00 screwdriver.

    • If the spring guard falls out during deconstruction, gently place the guard over the spring during construction.

    • To open the flash, simply press the button on the left side.

  4. Sony Alpha A350 Front Case Replacement: stap 4, afbeelding 1 van 2 Sony Alpha A350 Front Case Replacement: stap 4, afbeelding 2 van 2
    • Open the plastic SD card door.

    • Using Phillips #00 screwdriver, remove two 4.4 mm screws outside and two 4.4mm screws inside the door.

  5. Sony Alpha A350 Front Case Replacement: stap 5, afbeelding 1 van 2 Sony Alpha A350 Front Case Replacement: stap 5, afbeelding 2 van 2
    • Gently pull the outer front case from the camera.

    • It should fall apart easily if all screws are removed.

Conclusie

To reassemble your device, follow these instructions in reverse order.

Danielle Trivett

Lid sinds: 11/04/19

337 Reputatie

3 handleidingen geschreven

Team

IUPUI, Team S1-G6, Henning Fall 2019 Lid van IUPUI, Team S1-G6, Henning Fall 2019

IUPUI-HENNING-F19S1G6

3 Leden

6 handleidingen geschreven

0 opmerkingen

Voeg opmerking toe

Weergavestatistieken:

Afgelopen 24 uren: 0

Afgelopen 7 dagen: 3

Afgelopen 30 dagen: 13

Altijd: 896