Ga door naar hoofdinhoud
Samsung Galaxy Tab 2 7.0 Camera Replacement

Samsung Galaxy Tab 2 7.0 Camera Replacement

Katija Tarailo

Katija Tarailo en 4 andere bijdragers

Voor het laatst geüpdatet op October 16, 2018

15 - 20 minuten
Eenvoudig
Heeft betere plaatjes nodig

Cameras can be damaged by water or by physical impact, but it is much easier to replace than you may think. Follow these few simple steps so that you can get back to capturing the world around you on your tablet.

Wat je nodig hebt

Onderdelen

Gereedschap

Toon meer…

iFixit krijgt commissie als je dingen koopt via deze links.
  1. Samsung Galaxy Tab 2 7.0 Camera Replacement, Camera: stap 1, afbeelding 1 van 1
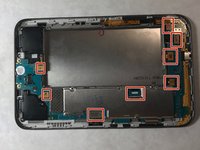
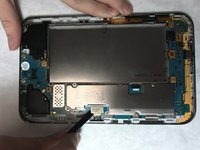
    • Using a nylon spudger or a flat plastic opening tool, pry open the back of the device.

    • It is easiest to begin this process by starting at the micro SD card insert, as shown in the pictures.

  2. Samsung Galaxy Tab 2 7.0 Camera Replacement: stap 2, afbeelding 1 van 1
    • Using a phillips head screwdriver, remove the 6 4mm screws holding the battery on the device.

    • Remove the battery, and set it aside.

  3. Samsung Galaxy Tab 2 7.0 Camera Replacement: stap 3, afbeelding 1 van 1
    • Using a phillips head screwdriver, remove the 6 4mm screws holding the motherboard in the device.

  4. Samsung Galaxy Tab 2 7.0 Camera Replacement: stap 4, afbeelding 1 van 3 Samsung Galaxy Tab 2 7.0 Camera Replacement: stap 4, afbeelding 2 van 3 Samsung Galaxy Tab 2 7.0 Camera Replacement: stap 4, afbeelding 3 van 3
    • Locate the 8 flex cables attached to the motherboard.

    • Using a nylon spudger, gently detach each flex cable from the motherboard.

    • Be careful when detaching flex cables. Excessive force and sharp objects have the potential to damage these components.

    • Lift the motherboard from the device and set it aside.

  5. Samsung Galaxy Tab 2 7.0 Camera Replacement: stap 5, afbeelding 1 van 1
    • Locate the camera towards the top of the device.

    • Use a nylon spudger to gently lift the camera and remove it from the device.

Conclusie

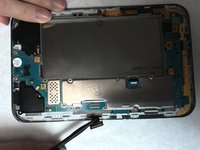
To reassemble your device, follow these instructions in reverse order.

2 andere personen hebben deze handleiding voltooid.

Katija Tarailo

Lid sinds: 03/02/17

460 Reputatie

3 handleidingen geschreven

Team

IUPUI, Team S3-G1, Harley Spring 2017 Lid van IUPUI, Team S3-G1, Harley Spring 2017

IUPUI-HARLEY-S17S3G1

4 Leden

3 handleidingen geschreven

0 opmerkingen

Voeg opmerking toe

Weergavestatistieken:

Afgelopen 24 uren: 0

Afgelopen 7 dagen: 2

Afgelopen 30 dagen: 9

Altijd: 702