Ga door naar hoofdinhoud
Rozia HQ242 Trimmer Spring Replacement

Rozia HQ242 Trimmer Spring Replacement

Jose Lucio

Jose Lucio en 2 andere bijdragers

Voor het laatst geüpdatet op July 16, 2024

10 - 20 minuten
Eenvoudig

Use this guide to replace or repair a broken spring in your Rozia HQ242 Hair Trimmer.

Over time, the spring that is located inside your trimmer may become loose due to vibrations caused by the motor. This can cause the device to shake abnormally, making it difficult to use or even render it inoperable.

Wat je nodig hebt

Gereedschap

Toon meer…

  1. Rozia HQ242 Trimmer Spring Replacement, Spring: stap 1, afbeelding 1 van 3 Rozia HQ242 Trimmer Spring Replacement, Spring: stap 1, afbeelding 2 van 3 Rozia HQ242 Trimmer Spring Replacement, Spring: stap 1, afbeelding 3 van 3
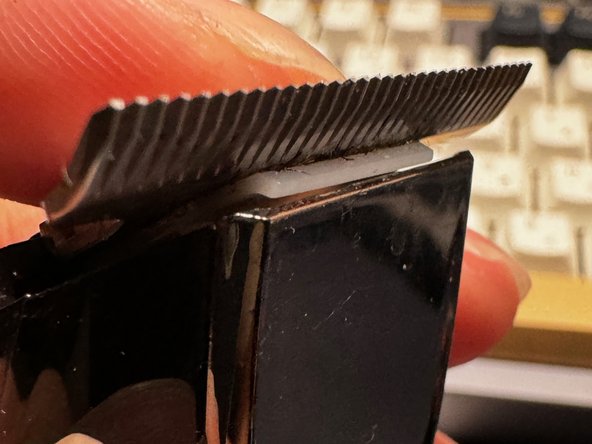
    • Use a Phillips #1 screwdriver to remove the two 6 mm screws securing the blade to the trimmer.

  2. Rozia HQ242 Trimmer Spring Replacement: stap 2, afbeelding 1 van 2 Rozia HQ242 Trimmer Spring Replacement: stap 2, afbeelding 2 van 2
    • Gently lift the inner blade straight up and away from the device.

    • With the blades removed, now is a good time to clean the trimmer using a small brush, dust blower, or q-tips.

  3. Rozia HQ242 Trimmer Spring Replacement: stap 3, afbeelding 1 van 3 Rozia HQ242 Trimmer Spring Replacement: stap 3, afbeelding 2 van 3 Rozia HQ242 Trimmer Spring Replacement: stap 3, afbeelding 3 van 3
    • Gently lift the spring away from the trimmer.

    • You may need to point the legs of the spring at a 45-degree angle before you can pull it out.

    • Take note of the shape of the spring. There is a flat U-shaped bend that rests on a notch in the trimmer. This information will be important when putting everything back together!

  4. Rozia HQ242 Trimmer Spring Replacement: stap 4, afbeelding 1 van 3 Rozia HQ242 Trimmer Spring Replacement: stap 4, afbeelding 2 van 3 Rozia HQ242 Trimmer Spring Replacement: stap 4, afbeelding 3 van 3
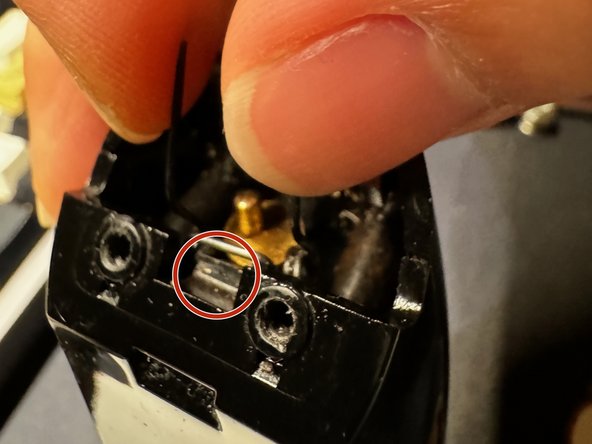
    • Align the flat U-shaped end of the spring to the notch on the trimmer.

    • Gently pinch the two legs of the spring with your thumb and index finger, aligning them to point towards the front of the trimmer at a 45-degree angle, then drop it into the slot.

    • Once it is successfully in, carefully let go. If it falls off the notch, you will have to wedge it out and try again. This may take multiple attempts.

    • Make sure that the spring is securely resting on the notch, or the trimmer may not function properly!

  5. Rozia HQ242 Trimmer Spring Replacement: stap 5, afbeelding 1 van 3 Rozia HQ242 Trimmer Spring Replacement: stap 5, afbeelding 2 van 3 Rozia HQ242 Trimmer Spring Replacement: stap 5, afbeelding 3 van 3
    • Reinstall the inner blade.

    • The notch located on the back of the blade must align with the gold-plated contact.

    • Gently push down so that the plate rests against the front of the trimmer.

    • Take extra caution not to dislodge the spring from its position, especially after pressing down on the blade.

  6. Rozia HQ242 Trimmer Spring Replacement: stap 6, afbeelding 1 van 3 Rozia HQ242 Trimmer Spring Replacement: stap 6, afbeelding 2 van 3 Rozia HQ242 Trimmer Spring Replacement: stap 6, afbeelding 3 van 3
    • Carefully reattach the outer blade.

    • The screw holes protrude just enough to allow the blade to 'click' into position.

    • Use a Phillips #1 screwdriver to replace the two 6 mm screws that secure the outer blade.

Conclusie

To reassemble your device, follow these instructions in reverse order.

3 andere personen hebben deze handleiding voltooid.

Jose Lucio

Lid sinds: 03/05/24

201 Reputatie

1 Handleiding geschreven

Team

CSU Los Angeles, Team 8-3, Grodsky Spring 2024 Lid van CSU Los Angeles, Team 8-3, Grodsky Spring 2024

CSULA-GRODSKY-S24S8G3

2 Leden

2 handleidingen geschreven

0 opmerkingen

Voeg opmerking toe

Weergavestatistieken:

Afgelopen 24 uren: 2

Afgelopen 7 dagen: 23

Afgelopen 30 dagen: 53

Altijd: 622