Ga door naar hoofdinhoud
Rival Mini Chopper MC-67BL Power Cord Replacement

Rival Mini Chopper MC-67BL Power Cord Replacement

Roxanne

Roxanne en 4 andere bijdragers

Voor het laatst geüpdatet op August 1, 2019

30 minuten
Moeilijk

This guide will help you remove the power cord and requires the use of a soldering iron. Check out this soldering guide for help if you don't know how to solder.

Wat je nodig hebt

iFixit krijgt commissie als je dingen koopt via deze links.
  1. Rival Mini Chopper MC-67BL Power Cord Replacement, Turning Gears: stap 1, afbeelding 1 van 2 Rival Mini Chopper MC-67BL Power Cord Replacement, Turning Gears: stap 1, afbeelding 2 van 2
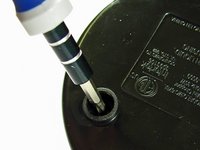
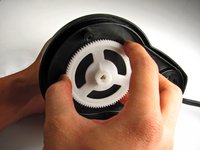
    • Twist the plastic lid counterclockwise to unlock it.

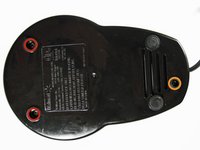
    • Lift the lid to remove it from the container.

  2. Rival Mini Chopper MC-67BL Power Cord Replacement: stap 2, afbeelding 1 van 1
    • Carefully remove the blade from the container.

    • For reassembly, the teeth on the metal shaft line up with slots on the inside of the plastic hole.

  3. Rival Mini Chopper MC-67BL Power Cord Replacement: stap 3, afbeelding 1 van 1
    • With your hand, twist the container counter-clockwise until it unlocks from the base. Remove the container by lifting it straight up.

  4. Rival Mini Chopper MC-67BL Power Cord Replacement: stap 4, afbeelding 1 van 1
    • Use your fingers to pry out the two rubber feet from the bottom cover of the base.

    • The two feet furthest from the button tower contain screws. The other two feet do not.

  5. Rival Mini Chopper MC-67BL Power Cord Replacement: stap 5, afbeelding 1 van 2 Rival Mini Chopper MC-67BL Power Cord Replacement: stap 5, afbeelding 2 van 2
    • Use the Phillips #2 screwdriver to unscrew the two 12.7-mm screws underneath the rubber feet.

    • Use the same screwdriver to unscrew the 15.88-mm screw from the back of the chopper.

  6. Rival Mini Chopper MC-67BL Power Cord Replacement: stap 6, afbeelding 1 van 1
    • Firmly lift the bottom cover off of the base.

  7. Rival Mini Chopper MC-67BL Power Cord Replacement: stap 7, afbeelding 1 van 1
    • Remove the smaller white gear by lifting it up with your hand.

  8. Rival Mini Chopper MC-67BL Power Cord Replacement: stap 8, afbeelding 1 van 3 Rival Mini Chopper MC-67BL Power Cord Replacement: stap 8, afbeelding 2 van 3 Rival Mini Chopper MC-67BL Power Cord Replacement: stap 8, afbeelding 3 van 3
    • Use a pair of pliers or any other clamping tool to securely hold the blade-shaft that sits above the base.

    • Grab the gear with your other hand and turn CLOCKWISE. Unlike most screws, the gear is reverse-threaded to allow the blade to spin.

    • Continue turning the gear until completely removed from the blade-shaft.

  9. Rival Mini Chopper MC-67BL Power Cord Replacement, Power Cord: stap 9, afbeelding 1 van 1
    • Use your hand to firmly pull the blade-shaft from the base.

  10. Rival Mini Chopper MC-67BL Power Cord Replacement: stap 10, afbeelding 1 van 1
    • Using Phillips #2 screwdriver, unscrew two 12.7-mm screws in the middle of the base.

  11. Rival Mini Chopper MC-67BL Power Cord Replacement: stap 11, afbeelding 1 van 1
    • Unwind power cord from the base pegs.

  12. Rival Mini Chopper MC-67BL Power Cord Replacement: stap 12, afbeelding 1 van 2 Rival Mini Chopper MC-67BL Power Cord Replacement: stap 12, afbeelding 2 van 2
    • Use the plastic opening tool to pry open the base from the main body.

    • These two plastic prongs are pressed fit into the base. It may take some effort to pry the base completely off.

    • Once freed, lift the base panel from the main body. The motor and power cable are connected to this panel.

  13. Rival Mini Chopper MC-67BL Power Cord Replacement: stap 13, afbeelding 1 van 1
    • Pull the power cord wires up from underneath the wire hook on the side of the motor.

  14. Rival Mini Chopper MC-67BL Power Cord Replacement: stap 14, afbeelding 1 van 2 Rival Mini Chopper MC-67BL Power Cord Replacement: stap 14, afbeelding 2 van 2
    • Carefully cut into black wire casing for both wires using a small knife and peel away the black casing.

    • Only cut deep enough to remove the casing.

    • For reassembly you will need black electrical tape to keep the wires from being exposed.

  15. Rival Mini Chopper MC-67BL Power Cord Replacement: stap 15, afbeelding 1 van 1
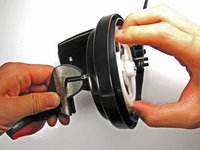
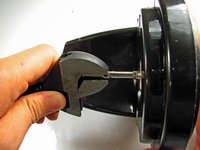
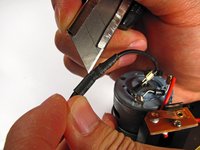
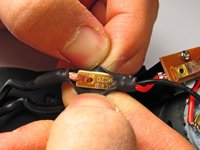
    • Using a soldering kit, remove the solder for the black power cord from the circuit board.

    • Follow this soldering guide if you need extra help!

  16. Rival Mini Chopper MC-67BL Power Cord Replacement: stap 16, afbeelding 1 van 1
    • Use a small knife to cut the copper wires from the bracket holding the black wire and power cord together.

    • For reassembly the copper wires will need to be soldered together.

Conclusie

To reassemble your device, follow these instructions in reverse order.

Roxanne

Lid sinds: 10/17/13

522 Reputatie

4 handleidingen geschreven

Team

Cal Poly, Team 4-29, Amido Fall 2013 Lid van Cal Poly, Team 4-29, Amido Fall 2013

CPSU-AMIDO-F13S4G29

4 Leden

5 handleidingen geschreven

0 opmerkingen

Voeg opmerking toe

Weergavestatistieken:

Afgelopen 24 uren: 0

Afgelopen 7 dagen: 2

Afgelopen 30 dagen: 3

Altijd: 416