
Replacement the hard disk on Dell XPS 12 9Q23

Inleiding
Ga naar stap 1Do you want to change your hard disk to increase its capacity or replace it, because it no longer works? Perfect, you've come to the right place, this tutorial is for you!
Wat je nodig hebt

-
-
Pop the center cover open on the bottom cover.
-
Remove the center screw with a #00 Phillips screwdriver.
-
Use a T5 Torx screwdriver for the remaining screws around the edge of the bottom cover.
-
-
-
-
Once all the screws have been removed the battery is now safe to extract
-
-
-
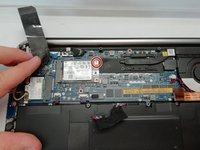
Remove the screw with a #00 Phillips screwdriver.
-
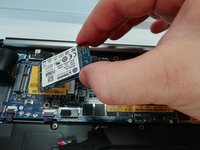
Remove the hard disk from its location.
-


To reassemble your device, follow the instructions in reverse order.
To reassemble your device, follow the instructions in reverse order.
Annuleren: ik heb deze handleiding niet afgemaakt.
2 andere personen hebben deze handleiding voltooid.
Met dank aan deze vertalers:
100%
Schwarzer helpt ons de wereld te herstellen! Wil je bijdragen?
Begin met vertalen ›

Team
