Ga door naar hoofdinhoud

Razer Blade 15" (2020) Right Fan Replacement

Wat je nodig hebt

  1. Razer Blade 15" (2020) Right Fan Replacement, Prepare your laptop for disassembly: stap 1, afbeelding 1 van 2 Razer Blade 15" (2020) Right Fan Replacement, Prepare your laptop for disassembly: stap 1, afbeelding 2 van 2
    • Allow your laptop's battery to drain below 25% before starting this repair—a charged battery may catch fire if damaged.

    • Unplug all cables and fully shut down your laptop.

    • Close the lid and flip your laptop over so the back cover faces up.

  2. Razer Blade 15" (2020) Right Fan Replacement, Unfasten the back cover: stap 2, afbeelding 1 van 1
    • Use a T5 Torx driver to remove the ten 3.7 mm-long screws securing the back cover.

  3. Razer Blade 15" (2020) Right Fan Replacement, Loosen the back cover: stap 3, afbeelding 1 van 3 Razer Blade 15" (2020) Right Fan Replacement, Loosen the back cover: stap 3, afbeelding 2 van 3 Razer Blade 15" (2020) Right Fan Replacement, Loosen the back cover: stap 3, afbeelding 3 van 3
    • The back cover is lightly secured to the motherboard by thermal pads. Depending on the age of your laptop, it may be easier or harder to remove.

    • Use a finger to pry up the right side of the back cover, starting at the Ethernet port cutout.

  4. Razer Blade 15" (2020) Right Fan Replacement, Remove the back cover: stap 4, afbeelding 1 van 3 Razer Blade 15" (2020) Right Fan Replacement, Remove the back cover: stap 4, afbeelding 2 van 3 Razer Blade 15" (2020) Right Fan Replacement, Remove the back cover: stap 4, afbeelding 3 van 3
    • Remove the back cover slowly, as to avoid tearing the thermal pads underneath.

    • Lay the back cover down on its rubber feet to avoid damaging the thermal pads on its underside.

  5. Razer Blade 15" (2020) Right Fan Replacement, Soften the battery cable tape adhesive: stap 5, afbeelding 1 van 2 Razer Blade 15" (2020) Right Fan Replacement, Soften the battery cable tape adhesive: stap 5, afbeelding 2 van 2
    • Apply a heated iOpener to the battery cable tape for one minute.

    • You can also use a hair dryer—but be careful, as overheating the battery may damage it or cause a fire.

  6. Razer Blade 15" (2020) Right Fan Replacement, Remove the battery cable tape: stap 6, afbeelding 1 van 3 Razer Blade 15" (2020) Right Fan Replacement, Remove the battery cable tape: stap 6, afbeelding 2 van 3 Razer Blade 15" (2020) Right Fan Replacement, Remove the battery cable tape: stap 6, afbeelding 3 van 3
    Gereedschap gebruikt in deze stap:
    Tweezers
    $4.99
    Koop
    • Be careful not to damage the battery with your tool.

    • Use blunt nose tweezers or your fingers to peel and remove the battery cable tape.

  7. Razer Blade 15" (2020) Right Fan Replacement, Disconnect the battery: stap 7, afbeelding 1 van 2 Razer Blade 15" (2020) Right Fan Replacement, Disconnect the battery: stap 7, afbeelding 2 van 2
    • Use the flat end of a spudger to push the square tab on the battery connector and slide it out of its socket.

  8. Razer Blade 15" (2020) Right Fan Replacement, Disconnect the left-side screen cable: stap 8, afbeelding 1 van 2 Razer Blade 15" (2020) Right Fan Replacement, Disconnect the left-side screen cable: stap 8, afbeelding 2 van 2
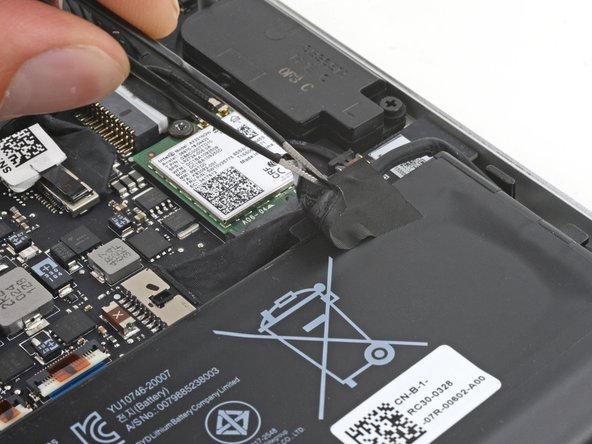
    • Grab the pull tab on the neck of the left-side screen connector and pull it straight out of its socket.

  9. Razer Blade 15" (2020) Right Fan Replacement, Unclip the screen cable: stap 9, afbeelding 1 van 3 Razer Blade 15" (2020) Right Fan Replacement, Unclip the screen cable: stap 9, afbeelding 2 van 3 Razer Blade 15" (2020) Right Fan Replacement, Unclip the screen cable: stap 9, afbeelding 3 van 3
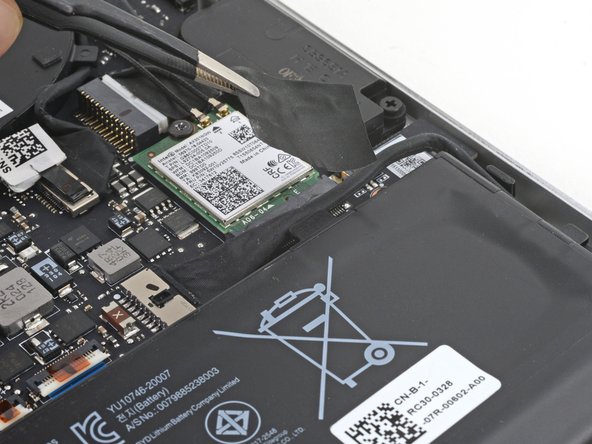
    • Pull the left-side screen cable out from the clips along the left edge of the fan.

  10. Razer Blade 15" (2020) Right Fan Replacement, Disconnect the right fan: stap 10, afbeelding 1 van 2 Razer Blade 15" (2020) Right Fan Replacement, Disconnect the right fan: stap 10, afbeelding 2 van 2
    Gereedschap gebruikt in deze stap:
    Tweezers
    $4.99
    Koop
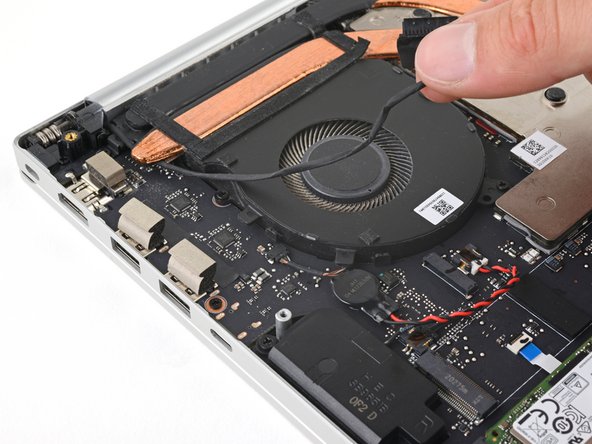
    • Use tweezers or your fingers to grab the rubber sleeve around the right fan cable and pull the connector straight out of its socket.

  11. Razer Blade 15" (2020) Right Fan Replacement, Peel up the fan tape: stap 11, afbeelding 1 van 3 Razer Blade 15" (2020) Right Fan Replacement, Peel up the fan tape: stap 11, afbeelding 2 van 3 Razer Blade 15" (2020) Right Fan Replacement, Peel up the fan tape: stap 11, afbeelding 3 van 3
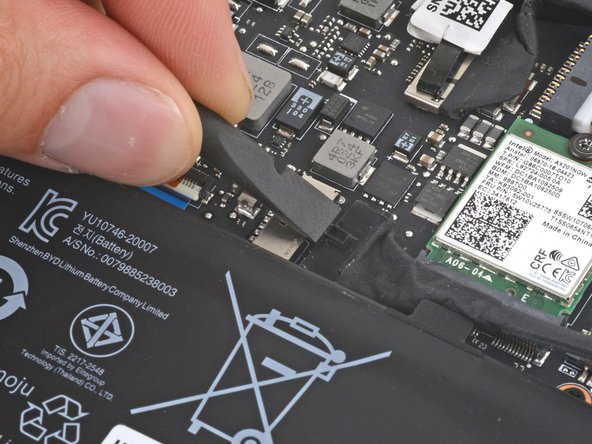
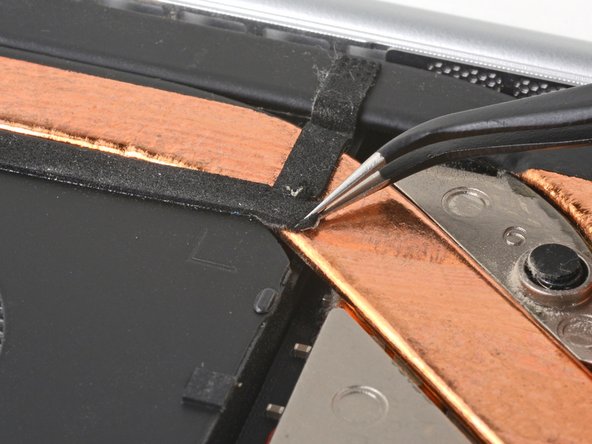
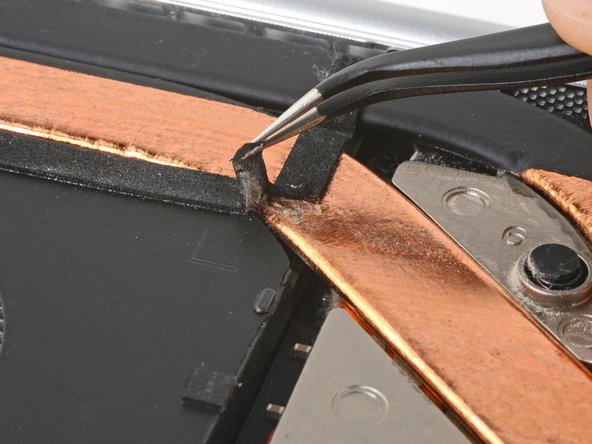
    • Use tweezers to peel the right side of the fan tape from the heatsink.

  12. Razer Blade 15" (2020) Right Fan Replacement, Unfasten the right fan: stap 12, afbeelding 1 van 1
    • Use a Phillips screwdriver to remove the two 6.7 mm screws securing the right fan.

  13. Razer Blade 15" (2020) Right Fan Replacement, Remove the right fan: stap 13, afbeelding 1 van 3 Razer Blade 15" (2020) Right Fan Replacement, Remove the right fan: stap 13, afbeelding 2 van 3 Razer Blade 15" (2020) Right Fan Replacement, Remove the right fan: stap 13, afbeelding 3 van 3
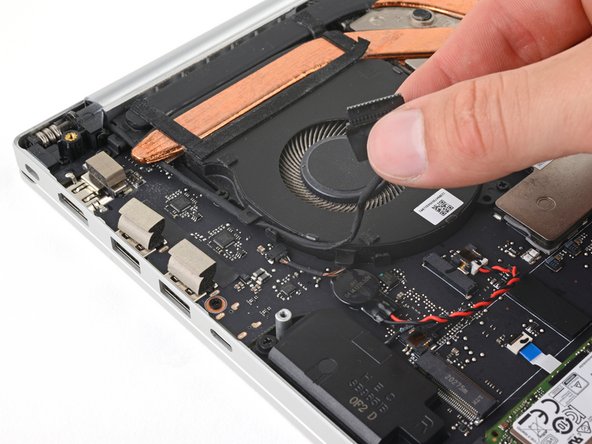
    • Lift the lower edge of the right fan and slide it away from the heatsink.

    • Remove the fan.

Conclusie

To reassemble your device, follow these instructions in reverse order.

Take your e-waste to an R2 or e-Stewards certified recycler.

Repair didn’t go as planned? Try some basic troubleshooting, or ask our Answers community for help.

Clay Eickemeyer

Lid sinds: 09/19/22

67.233 Reputatie

453 handleidingen geschreven

Team

iFixit Lid van iFixit

Staff

136 Leden

17.410 handleidingen geschreven

0 opmerkingen

Voeg opmerking toe

Weergavestatistieken:

Afgelopen 24 uren: 0

Afgelopen 7 dagen: 4

Afgelopen 30 dagen: 24

Altijd: 206