Inleiding
If your OnePlus 6T back cover is damaged or scratched, or you need to access the internal components of your phone, follow this simple guide to remove the back cover.
Before you begin, make sure that your phone is powered off and unplugged from the charger.
Wat je nodig hebt
-
-
Make sure the phone is powered off and placed with the back cover facing towards you on a stable surface.
 Vraag FixBot
-
-
-
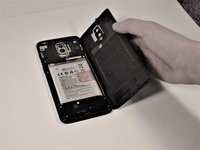
Pop open the SIM card tray by inserting a SIM card removal tool into a small hole on the upper-left side of the phone.
-
Carefully remove the SIM card from its tray.
-
-
-
-
Loosen the binding glue within the phone using a hairdryer or an iOpener.
-
-
Gereedschap gebruikt in deze stap:Plastic Cards$2.99
-
Insert a Jimmy under one of the heated corners of the phone to lift it slightly.
-
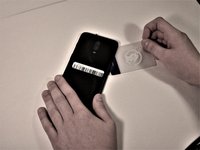
Insert a plastic card underneath the slightly lifted lip on the back cover and gently glide the card under the lifted phone casing.
-
Remove the back cover from the phone.
-


To reassemble your device, follow these instructions in reverse order.
Take your e-waste to an R2 or e-Stewards certified recycler.
Repair didn’t go as planned? Try some basic troubleshooting, or ask our Answers community for help.
Annuleren: ik heb deze handleiding niet afgemaakt.
19 andere personen hebben deze handleiding voltooid.

Team

Grand Valley State University, Team S4-G6, DeVasto Fall 2019 Lid van Grand Valley State University, Team S4-G6, DeVasto Fall 2019
GVSU-DEVASTO-F19S4G6
4 Leden
26 handleidingen geschreven
6Gids Commentaar
I wonder if this is the same for OnePlus 6 (6000/6003)?
Thanks for this guide. But is there something particular after removing the old piece to install the new one ? How the new one will be glued ?
Preciso de uma tela para o one plus 6t
Tela one plus 6t quem sabe onde ou se alguém vende