Ga door naar hoofdinhoud
Nikon Coolpix E5700 Rear LCD Replacement

Nikon Coolpix E5700 Rear LCD Replacement

Kyle Sitton

Kyle Sitton en 6 andere bijdragers

Voor het laatst geüpdatet op June 21, 2020

10 - 15 minuten
Eenvoudig

This guide will walk you through the necessary steps to access and remove the LCD screen in the Nikon Coolpix E5700.

Wat je nodig hebt

Gereedschap

  1. Nikon Coolpix E5700 Rear LCD Replacement, Battery: stap 1, afbeelding 1 van 2 Nikon Coolpix E5700 Rear LCD Replacement, Battery: stap 1, afbeelding 2 van 2
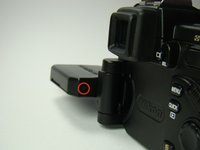
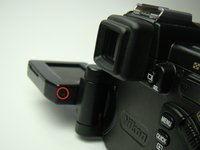
    • Use your finger tip to slide the battery release tab toward the battery symbol on the E5700.

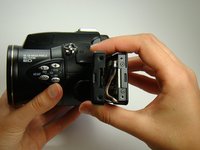
    • Open the battery door.

  2. Nikon Coolpix E5700 Rear LCD Replacement: stap 2, afbeelding 1 van 1
    • Pull the battery out of the E5700.

    • It may be necessary to wiggle the battery while pulling to free it from its pocket in the case.

  3. Nikon Coolpix E5700 Rear LCD Replacement, Rear LCD: stap 3, afbeelding 1 van 1
    • Remove two Phillips screws (3.4 mm) located on the left side of the screen.

  4. Nikon Coolpix E5700 Rear LCD Replacement: stap 4, afbeelding 1 van 2 Nikon Coolpix E5700 Rear LCD Replacement: stap 4, afbeelding 2 van 2
    • Remove two Phillips screws (3.4 mm) located on the right side of the screens.

  5. Nikon Coolpix E5700 Rear LCD Replacement: stap 5, afbeelding 1 van 2 Nikon Coolpix E5700 Rear LCD Replacement: stap 5, afbeelding 2 van 2
    • Remove back plastic monitor cover.

  6. Nikon Coolpix E5700 Rear LCD Replacement: stap 6, afbeelding 1 van 1
    • Remove the Phillips screw on the top right side of the screen.

  7. Nikon Coolpix E5700 Rear LCD Replacement: stap 7, afbeelding 1 van 1
    • Carefully unplug the grey bundle of wires in the white housing.

  8. Nikon Coolpix E5700 Rear LCD Replacement: stap 8, afbeelding 1 van 1
    • Carefully unplug the small pink and wires in the grey housing.

  9. Nikon Coolpix E5700 Rear LCD Replacement: stap 9, afbeelding 1 van 1
    • Remove the two Phillips screws on the left side of the screen.

  10. Nikon Coolpix E5700 Rear LCD Replacement: stap 10, afbeelding 1 van 1
    • Remove the metal bar on the left side of the screen.

    • Remove the screen from the front plastic housing.

Conclusie

To reassemble your device, follow these instructions in reverse order.

Één andere persoon heeft deze handleiding voltooid.

Kyle Sitton

Lid sinds: 04/17/11

351 Reputatie

7 handleidingen geschreven

Team

Cal Poly, Team 24-58, Amido Spring 2011 Lid van Cal Poly, Team 24-58, Amido Spring 2011

CPSU-AMIDO-S11S24G58

4 Leden

18 handleidingen geschreven

0 opmerkingen

Voeg opmerking toe

Weergavestatistieken:

Afgelopen 24 uren: 2

Afgelopen 7 dagen: 6

Afgelopen 30 dagen: 8

Altijd: 2,426