Ga door naar hoofdinhoud

Motorola Moto G 5G (2022) Main Camera Replacement

Wat je nodig hebt

  1. Motorola Moto G 5G (2022) Main Camera Replacement, Eject the SIM card tray: stap 1, afbeelding 1 van 2 Motorola Moto G 5G (2022) Main Camera Replacement, Eject the SIM card tray: stap 1, afbeelding 2 van 2
    • Insert a SIM card eject tool or a straightened paperclip into the hole adjacent to the SIM card tray.

    • Press firmly to eject the tray.

  2. Motorola Moto G 5G (2022) Main Camera Replacement, Remove the SIM card tray: stap 2, afbeelding 1 van 1
    • Remove the SIM card tray from the phone.

    • When reinserting the SIM card, make sure it's in the proper orientation inside the tray.

  3. Motorola Moto G 5G (2022) Main Camera Replacement, Back cover removal information: stap 3, afbeelding 1 van 2 Motorola Moto G 5G (2022) Main Camera Replacement, Back cover removal information: stap 3, afbeelding 2 van 2
    • Discharge your battery to 25% or less and completely power off your phone before you begin.

    • Take note of the following seams along the edge of the phone:

    • Screen seam: This seam separates the display panel from the frame. Don't pry at this seam.

    • Bezel seam: This is where the plastic back cover meets the rest of the phone. It's held in place by plastic clips. This is where you should pry.

  4. Motorola Moto G 5G (2022) Main Camera Replacement, Insert an opening pick: stap 4, afbeelding 1 van 3 Motorola Moto G 5G (2022) Main Camera Replacement, Insert an opening pick: stap 4, afbeelding 2 van 3 Motorola Moto G 5G (2022) Main Camera Replacement, Insert an opening pick: stap 4, afbeelding 3 van 3
    • Insert an opening tool in the bezel seam halfway between the bottom-right corner of the phone and the power button.

    • Insert an opening pick in the gap you just created.

  5. Motorola Moto G 5G (2022) Main Camera Replacement, Release the right clips: stap 5, afbeelding 1 van 2 Motorola Moto G 5G (2022) Main Camera Replacement, Release the right clips: stap 5, afbeelding 2 van 2
    • Slide your opening pick toward the bottom-right corner of the back cover and release the clips.

    • As each clip releases, you will hear and feel a pop.

    • Don't slide the opening pick near the power or volume buttons.

  6. Motorola Moto G 5G (2022) Main Camera Replacement, Release the bottom clips: stap 6, afbeelding 1 van 2 Motorola Moto G 5G (2022) Main Camera Replacement, Release the bottom clips: stap 6, afbeelding 2 van 2
    • Continue sliding your opening pick towards the bottom left corner to unclip the bottom edge of the back cover.

  7. Motorola Moto G 5G (2022) Main Camera Replacement, Release the left clips: stap 7, afbeelding 1 van 3 Motorola Moto G 5G (2022) Main Camera Replacement, Release the left clips: stap 7, afbeelding 2 van 3 Motorola Moto G 5G (2022) Main Camera Replacement, Release the left clips: stap 7, afbeelding 3 van 3
    • Slide your opening pick toward the top left corner to unclip the left side of the back cover.

  8. Motorola Moto G 5G (2022) Main Camera Replacement, Release the top clips: stap 8, afbeelding 1 van 2 Motorola Moto G 5G (2022) Main Camera Replacement, Release the top clips: stap 8, afbeelding 2 van 2
    • Slide your pick around the top left corner and along the top edge to release the clips.

  9. Motorola Moto G 5G (2022) Main Camera Replacement: stap 9, afbeelding 1 van 2 Motorola Moto G 5G (2022) Main Camera Replacement: stap 9, afbeelding 2 van 2
    • Slide your pick around the top right corner to release the last clips securing the back cover.

    • Stop before reaching the volume buttons. Your pick may damage their cables.

  10. Motorola Moto G 5G (2022) Main Camera Replacement, Remove the back cover: stap 10, afbeelding 1 van 3 Motorola Moto G 5G (2022) Main Camera Replacement, Remove the back cover: stap 10, afbeelding 2 van 3 Motorola Moto G 5G (2022) Main Camera Replacement, Remove the back cover: stap 10, afbeelding 3 van 3
    • Don't try to remove the back cover all the way yet, as it's still connected to the frame by the power button cable.

    • With SIM card slot facing you, swing the back cover open and away from you like you're opening a book.

    • Rest the cover parallel to the frame.

    • Don't twist the screen or move it too far away from the frame to avoid damaging the power button cable.

  11. Motorola Moto G 5G (2022) Main Camera Replacement, Remove the power button: stap 11, afbeelding 1 van 2 Motorola Moto G 5G (2022) Main Camera Replacement, Remove the power button: stap 11, afbeelding 2 van 2
    Gereedschap gebruikt in deze stap:
    Tweezers
    $4.99
    Koop
    • A small rubber arm connects the power button to its recess. Use caution to avoid tearing this piece.

    • Use tweezers or your fingers to unhook the power button's rubber arm from its recess and remove it.

  12. Motorola Moto G 5G (2022) Main Camera Replacement, Only the back cover remains: stap 12, afbeelding 1 van 1
    • You're now left with the back cover.

    • This is a good point to test your phone before sealing it up. Follow this guide to perform a hardware test. Be sure to power your phone back down completely before you continue working.

  13. Motorola Moto G 5G (2022) Main Camera Replacement, Unfasten the power button cable bracket: stap 13, afbeelding 1 van 2 Motorola Moto G 5G (2022) Main Camera Replacement, Unfasten the power button cable bracket: stap 13, afbeelding 2 van 2
    • Use a PH00 screwdriver to remove the two 3.9 mm-long screws securing the power button cable bracket.

  14. Motorola Moto G 5G (2022) Main Camera Replacement, Remove the power button cable bracket: stap 14, afbeelding 1 van 2 Motorola Moto G 5G (2022) Main Camera Replacement, Remove the power button cable bracket: stap 14, afbeelding 2 van 2
    Gereedschap gebruikt in deze stap:
    Tweezers
    $4.99
    Koop
    • Use your fingers or a pair of blunt nose tweezers to grab and remove the bracket from the power button cable.

  15. Motorola Moto G 5G (2022) Main Camera Replacement, Disconnect the power button: stap 15, afbeelding 1 van 2 Motorola Moto G 5G (2022) Main Camera Replacement, Disconnect the power button: stap 15, afbeelding 2 van 2
    • Use the pointed end of a spudger to pry up and disconnect the power button's press connector.

  16. Motorola Moto G 5G (2022) Main Camera Replacement, Remove the power button: stap 16, afbeelding 1 van 2 Motorola Moto G 5G (2022) Main Camera Replacement, Remove the power button: stap 16, afbeelding 2 van 2
    • Grab and remove the power button.

    • If you're using tweezers, take care not to puncture the battery—a punctured battery may leak dangerous chemicals or cause a fire.

  17. Motorola Moto G 5G (2022) Main Camera Replacement, Unfasten the motherboard cover: stap 17, afbeelding 1 van 2 Motorola Moto G 5G (2022) Main Camera Replacement, Unfasten the motherboard cover: stap 17, afbeelding 2 van 2
    • Use your Phillips screwdriver to remove the eight 3.9 mm-long screws securing the motherboard cover.

  18. Motorola Moto G 5G (2022) Main Camera Replacement, Pry the motherboard cover: stap 18, afbeelding 1 van 2 Motorola Moto G 5G (2022) Main Camera Replacement, Pry the motherboard cover: stap 18, afbeelding 2 van 2
    • Insert an opening pick between the bottom-left corner of the cover and the motherboard.

    • Pry up to release the cover's small clips securing it to the frame.

    • Don't pry against the battery. Use protrusions in the frame for leverage.

    • Work your way around the perimeter to free the cover if it feels stuck.

  19. Motorola Moto G 5G (2022) Main Camera Replacement, Remove the motherboard cover: stap 19, afbeelding 1 van 3 Motorola Moto G 5G (2022) Main Camera Replacement, Remove the motherboard cover: stap 19, afbeelding 2 van 3 Motorola Moto G 5G (2022) Main Camera Replacement, Remove the motherboard cover: stap 19, afbeelding 3 van 3
    Gereedschap gebruikt in deze stap:
    Tweezers
    $4.99
    Koop
    • Grab and remove the motherboard cover from the phone.

    • If you're using tweezers, take care not to puncture the battery—a punctured battery may leak dangerous chemicals or cause a fire.

  20. Motorola Moto G 5G (2022) Main Camera Replacement, Disconnect the battery: stap 20, afbeelding 1 van 2 Motorola Moto G 5G (2022) Main Camera Replacement, Disconnect the battery: stap 20, afbeelding 2 van 2
    • Use the pointed end of a spudger to pry and disconnect the battery's press connector.

    • To re-attach press connectors like this one, carefully align and press down on one side until it clicks into place, then repeat on the other side. Don't press down on the middle. If the connector is misaligned, the pins can bend, causing permanent damage.

  21. Motorola Moto G 5G (2022) Main Camera Replacement, Peel away the tape: stap 21, afbeelding 1 van 3 Motorola Moto G 5G (2022) Main Camera Replacement, Peel away the tape: stap 21, afbeelding 2 van 3 Motorola Moto G 5G (2022) Main Camera Replacement, Peel away the tape: stap 21, afbeelding 3 van 3
    Gereedschap gebruikt in deze stap:
    Tweezers
    $4.99
    Koop
    • Peel the tape from the display connector.

    • If you are using a pair of tweezers, use caution to avoid the battery.

    • If you're having trouble peeling the tape, heat an iOpener and apply it to the tape for 60 seconds.

  22. Motorola Moto G 5G (2022) Main Camera Replacement, Disconnect the display: stap 22, afbeelding 1 van 2 Motorola Moto G 5G (2022) Main Camera Replacement, Disconnect the display: stap 22, afbeelding 2 van 2
    • Use the pointed end of a spudger to pry and disconnect the screen's press connector.

  23. Motorola Moto G 5G (2022) Main Camera Replacement, Lift the graphite film: stap 23, afbeelding 1 van 3 Motorola Moto G 5G (2022) Main Camera Replacement, Lift the graphite film: stap 23, afbeelding 2 van 3 Motorola Moto G 5G (2022) Main Camera Replacement, Lift the graphite film: stap 23, afbeelding 3 van 3
    • Fold the graphite heat film away from the battery to expose the lower section of the motherboard.

  24. Motorola Moto G 5G (2022) Main Camera Replacement, Disconnect the board connector: stap 24, afbeelding 1 van 2 Motorola Moto G 5G (2022) Main Camera Replacement, Disconnect the board connector: stap 24, afbeelding 2 van 2
    • Use the pointed end of a spudger to pry and disconnect the board cable's press connector.

  25. Motorola Moto G 5G (2022) Main Camera Replacement, Disconnect the black antenna cable: stap 25, afbeelding 1 van 3 Motorola Moto G 5G (2022) Main Camera Replacement, Disconnect the black antenna cable: stap 25, afbeelding 2 van 3 Motorola Moto G 5G (2022) Main Camera Replacement, Disconnect the black antenna cable: stap 25, afbeelding 3 van 3
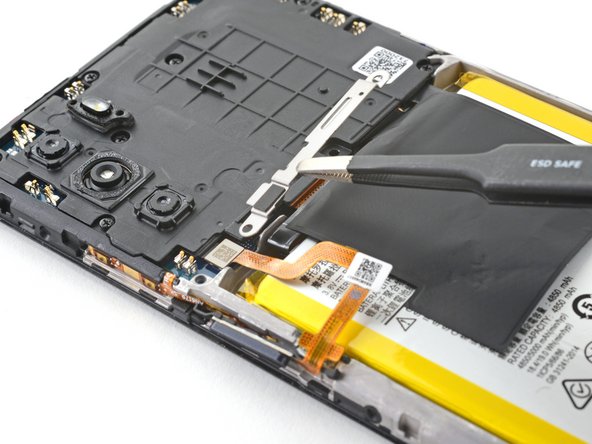
    • Use the pointed end of your spudger to pry and disconnect the head of the black antenna cable.

    • Pry on only the metal head of the connector. Avoid lifting the cable itself as much as possible.

    • Free the cable from the clip below the head of the connector.

    • During reassembly, these can be tricky to reconnect. Hold the connector in place over its socket and press down with the flat end of a spudger. The connector should snap into place.

    • During reassembly, make sure to secure the cable to the clip below the head of the connector.

  26. Motorola Moto G 5G (2022) Main Camera Replacement, Disconnect the white antenna cable: stap 26, afbeelding 1 van 2 Motorola Moto G 5G (2022) Main Camera Replacement, Disconnect the white antenna cable: stap 26, afbeelding 2 van 2
    • Repeat the previous step for the white antenna cable.

  27. Motorola Moto G 5G (2022) Main Camera Replacement, Unfasten the motherboard: stap 27, afbeelding 1 van 2 Motorola Moto G 5G (2022) Main Camera Replacement, Unfasten the motherboard: stap 27, afbeelding 2 van 2
    • Use your Phillips screwdriver to remove the 2.9 mm-long screw from the bottom-right corner of the motherboard.

  28. Motorola Moto G 5G (2022) Main Camera Replacement, Lift the motherboard: stap 28, afbeelding 1 van 3 Motorola Moto G 5G (2022) Main Camera Replacement, Lift the motherboard: stap 28, afbeelding 2 van 3 Motorola Moto G 5G (2022) Main Camera Replacement, Lift the motherboard: stap 28, afbeelding 3 van 3
    • Insert the pointed end of a spudger between the lower left of the motherboard and the frame.

    • Lift upward on this bottom edge to free the motherboard from the frame.

    • Don't pry against the battery. Use protrusions in the frame for leverage.

  29. Motorola Moto G 5G (2022) Main Camera Replacement, Remove the motherboard: stap 29, afbeelding 1 van 2 Motorola Moto G 5G (2022) Main Camera Replacement, Remove the motherboard: stap 29, afbeelding 2 van 2
    • Grab the motherboard from the bottom edge and lift it from its recess.

    • Be sure the loose cables don't catch on the motherboard as its removed.

  30. Motorola Moto G 5G (2022) Main Camera Replacement, Remove the main camera: stap 30, afbeelding 1 van 3 Motorola Moto G 5G (2022) Main Camera Replacement, Remove the main camera: stap 30, afbeelding 2 van 3 Motorola Moto G 5G (2022) Main Camera Replacement, Remove the main camera: stap 30, afbeelding 3 van 3
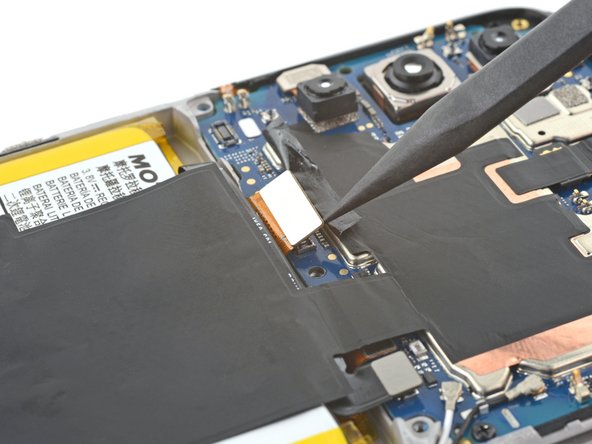
    • Flip the motherboard over so that the lens of the main camera is facing down.

    • Use the pointed end of your spudger to pry and disconnect the main camera's press connector.

    • Remove the main camera from the motherboard.

Conclusie

To reassemble your device, follow these instructions in reverse order.

Repair didn’t go as planned? Try some basic troubleshooting, or ask our Answers community for help.

Één andere persoon heeft deze handleiding voltooid.

Clay Eickemeyer

Lid sinds: 09/19/22

67.203 Reputatie

453 handleidingen geschreven

Team

iFixit Lid van iFixit

Staff

136 Leden

17.410 handleidingen geschreven

Één opmerking

Really enjoyed using your ifixit. This made it very easy to replace the camera in my Moto G. Great pictures and descriptions. My Moto G Power was a little different with a fingerprint scanner on the back and integrated side buttons in the frame. The back cover couldn't be folded out of the way until the scanner was disconnected, which couldn't be done until the MOBO cover was removed. Would like to send a pic to show.

Don W - Antwoord

Voeg opmerking toe

Weergavestatistieken:

Afgelopen 24 uren: 0

Afgelopen 7 dagen: 3

Afgelopen 30 dagen: 12

Altijd: 248