Ga door naar hoofdinhoud
Motorola Droid Pro Screen Replacement

Motorola Droid Pro Screen Replacement

Peter Cakounes

Peter Cakounes en 6 andere bijdragers

Voor het laatst geüpdatet op September 2, 2022

20 minuten
Moeilijk
Ontbrekende stappen
Heeft betere plaatjes nodig
Betere introductie

Before continuing through the replacement process make sure you power down your devices and work in a clean area free of dirt. Also use a static band so you don't damage your device.

Wat je nodig hebt

Gereedschap

  • T4 Torx Screwdriver
    T4 Torx Screwdriver
  • Spudger
    Spudger
  • T5 Torx Screwdriver
    T5 Torx Screwdriver

Toon meer…

  1. Motorola Droid Pro Screen Replacement, SD Card/SIM Card PCB Board: stap 1, afbeelding 1 van 2 Motorola Droid Pro Screen Replacement, SD Card/SIM Card PCB Board: stap 1, afbeelding 2 van 2
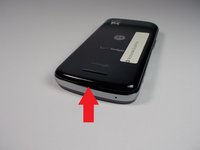
    • Remove the back cover and battery by using the thumb tabs.

  2. Motorola Droid Pro Screen Replacement: stap 2, afbeelding 1 van 1
    • Unscrew the 8 back panel screws using the T4 Torx screwdriver.

  3. Motorola Droid Pro Screen Replacement: stap 3, afbeelding 1 van 1
    • Use a spudger to open the phone along the sides between the back panel and the chrome trim.

    • It is held together by small clips that lock in. You may have to use a little force to unlock them.

    • Go around on all sides then pull the back panel off.

  4. Motorola Droid Pro Screen Replacement: stap 4, afbeelding 1 van 2 Motorola Droid Pro Screen Replacement: stap 4, afbeelding 2 van 2
    • Gently lift the SD & SIM card board (PCB) as shown in the following pictures.

    • This will expose the ribbon cable attached to the board and another ribbon cable for the mother board. Remove them both using the spudger.

    • Once the small one is removed the small board can be pulled off.

  5. Motorola Droid Pro Screen Replacement, Screen: stap 5, afbeelding 1 van 1
    • Unscrew the 6 screws using the T5 Torx screwdriver.

  6. Motorola Droid Pro Screen Replacement: stap 6, afbeelding 1 van 1
    • Unlock the ribbon cable and then you can pull the screen out.

    • When replacing screen make sure you lock the ribbon cable back in place.

Conclusie

To reassemble your device, follow these instructions in reverse order.

Peter Cakounes

Lid sinds: 10/21/14

19 Reputatie

4 handleidingen geschreven

Team

UMass Dartmouth, Team 5-8, Vijaybhaskar Fall 2014 Lid van UMass Dartmouth, Team 5-8, Vijaybhaskar Fall 2014

UMASSD-VIJAYBHASKAR-F14S5G8

4 Leden

8 handleidingen geschreven

0 opmerkingen

Voeg opmerking toe

Weergavestatistieken:

Afgelopen 24 uren: 1

Afgelopen 7 dagen: 1

Afgelopen 30 dagen: 5

Altijd: 298