Ga door naar hoofdinhoud

MacBook Air 15" 2023 Battery Replacement

Wat je nodig hebt

  1. MacBook Air 15" 2023 Battery Replacement, Prepare your Macbook Air for disassembly: stap 1, afbeelding 1 van 3 MacBook Air 15" 2023 Battery Replacement, Prepare your Macbook Air for disassembly: stap 1, afbeelding 2 van 3 MacBook Air 15" 2023 Battery Replacement, Prepare your Macbook Air for disassembly: stap 1, afbeelding 3 van 3
    • Allow your MacBook's battery to drain below 25% before starting this repair—a charged battery may catch fire if damaged.

    • Unplug all cables and fully power off your MacBook.

    • Close the display and lay your MacBook upside down. Keep your laptop closed until you've physically disconnected the battery.

  2. MacBook Air 15" 2023 Battery Replacement, Unfasten the lower case: stap 2, afbeelding 1 van 2 MacBook Air 15" 2023 Battery Replacement, Unfasten the lower case: stap 2, afbeelding 2 van 2
    Gereedschap gebruikt in deze stap:
    FixMat
    $36.95
    Koop
    • Throughout this repair, keep track of each screw and make sure it goes back exactly where it came from.

    • Use a P5 pentalobe screwdriver to remove the four 6.4 mm‑long screws securing the lower case.

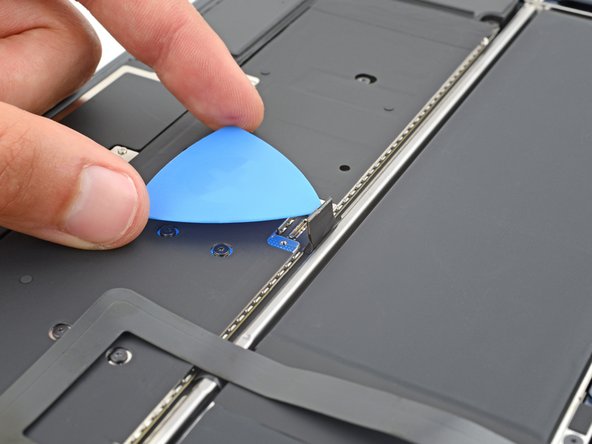
  3. MacBook Air 15" 2023 Battery Replacement, Insert an opening pick: stap 3, afbeelding 1 van 3 MacBook Air 15" 2023 Battery Replacement, Insert an opening pick: stap 3, afbeelding 2 van 3 MacBook Air 15" 2023 Battery Replacement, Insert an opening pick: stap 3, afbeelding 3 van 3
    • Apply a suction handle to the center of the lower case's front edge.

    • Pull up on the suction handle to create a gap between the lower case and the frame.

    • Insert an opening pick into the gap.

  4. MacBook Air 15" 2023 Battery Replacement, Release the snapping clips: stap 4, afbeelding 1 van 3 MacBook Air 15" 2023 Battery Replacement, Release the snapping clips: stap 4, afbeelding 2 van 3 MacBook Air 15" 2023 Battery Replacement, Release the snapping clips: stap 4, afbeelding 3 van 3
    • During the next two steps you'll feel and hear six snapping clips release. If a clip doesn't release, insert your opening pick farther and try again.

    • Slide the pick to the bottom right corner to release the first clip.

    • Slide the pick around the corner and up the right edge to release the next two clips.

  5. MacBook Air 15" 2023 Battery Replacement: stap 5, afbeelding 1 van 3 MacBook Air 15" 2023 Battery Replacement: stap 5, afbeelding 2 van 3 MacBook Air 15" 2023 Battery Replacement: stap 5, afbeelding 3 van 3
    • Insert the opening pick in the original gap created with the suction handle.

    • Slide the opening pick to the bottom left corner and up the left edge to release the three remaining snapping clips.

  6. MacBook Air 15" 2023 Battery Replacement, Release the sliding tabs: stap 6, afbeelding 1 van 3 MacBook Air 15" 2023 Battery Replacement, Release the sliding tabs: stap 6, afbeelding 2 van 3 MacBook Air 15" 2023 Battery Replacement, Release the sliding tabs: stap 6, afbeelding 3 van 3
    • Four sliding tabs along the back edge of the MacBook firmly secure the lower case. Separating these tabs requires a lot of force—consider using gloves to protect your hands from the sharp edges of the lower case.

    • Keep the lower case flat and firmly pull it straight away from the back edge, one corner at a time, to disengage the sliding tabs.

    • Don't pull up until the cover is completely separated.

  7. MacBook Air 15" 2023 Battery Replacement, Remove the lower case: stap 7, afbeelding 1 van 3 MacBook Air 15" 2023 Battery Replacement, Remove the lower case: stap 7, afbeelding 2 van 3 MacBook Air 15" 2023 Battery Replacement, Remove the lower case: stap 7, afbeelding 3 van 3
    • Remove the lower case.

    • During reassembly:

    • Set the lower case in place and align the sliding tabs with the screw heads they slide over. Press down and slide the lower case toward the back edge to engage the tabs—it'll stop sliding as the tabs engage.

    • When one side is engaged, it may push the other out of alignment. Check both sides as you push, there should be no gap along the back edge.

    • Once the lower case is flush with the frame, press down firmly along the perimeter to engage the six snapping clips.

    • You'll hear and feel a distinct click as each clip snaps into place.

  8. MacBook Air 15" 2023 Battery Replacement, Remove the battery connector cover tape: stap 8, afbeelding 1 van 3 MacBook Air 15" 2023 Battery Replacement, Remove the battery connector cover tape: stap 8, afbeelding 2 van 3 MacBook Air 15" 2023 Battery Replacement, Remove the battery connector cover tape: stap 8, afbeelding 3 van 3
    Gereedschap gebruikt in deze stap:
    Tweezers
    $4.99
    Koop
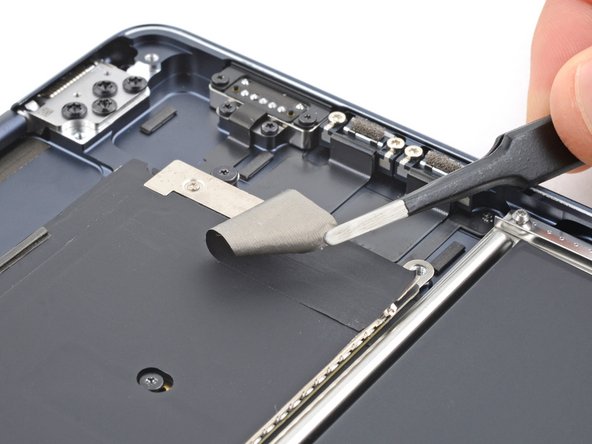
    • Use blunt nose tweezers or your fingers to remove the piece of tape covering the battery connector cover.

    • During reassembly, use the leftover adhesive to secure the tape to the cover.

  9. MacBook Air 15" 2023 Battery Replacement, Remove the battery connector cover: stap 9, afbeelding 1 van 3 MacBook Air 15" 2023 Battery Replacement, Remove the battery connector cover: stap 9, afbeelding 2 van 3 MacBook Air 15" 2023 Battery Replacement, Remove the battery connector cover: stap 9, afbeelding 3 van 3
    • Use a T3 Torx screwdriver to remove the two 1.5 mm‑long screws securing the battery connector cover.

    • Due to screw variances, you may need to use a T4 Torx instead. Keep this in mind whenever you encounter T3 Torx screws during this repair.

    • Remove the cover.

  10. MacBook Air 15" 2023 Battery Replacement, Disconnect the battery: stap 10, afbeelding 1 van 2 MacBook Air 15" 2023 Battery Replacement, Disconnect the battery: stap 10, afbeelding 2 van 2
    • Use an opening pick to pry up and disconnect the battery connector.

    • To reconnect a press connector, align it over the socket and gently press down on one side until it clicks into place, then press down on the other side. It might take a few tries to align the connector.

  11. MacBook Air 15" 2023 Battery Replacement, Unfasten the speaker cable and hinge covers: stap 11, afbeelding 1 van 2 MacBook Air 15" 2023 Battery Replacement, Unfasten the speaker cable and hinge covers: stap 11, afbeelding 2 van 2
    • The right speaker will be on your left-hand side when working on the MacBook, as it's laying upside down.

    • Use a T3 Torx screwdriver to remove the following screws:

    • Two 2.6 mm‑long screws securing the left hinge cover

    • Two 1.5 mm‑long screws securing the speaker cable cover

  12. MacBook Air 15" 2023 Battery Replacement, Remove the covers: stap 12, afbeelding 1 van 1
    • Remove the speaker cable cover.

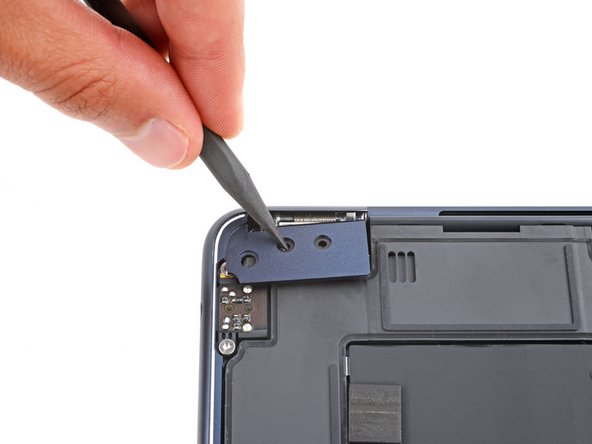
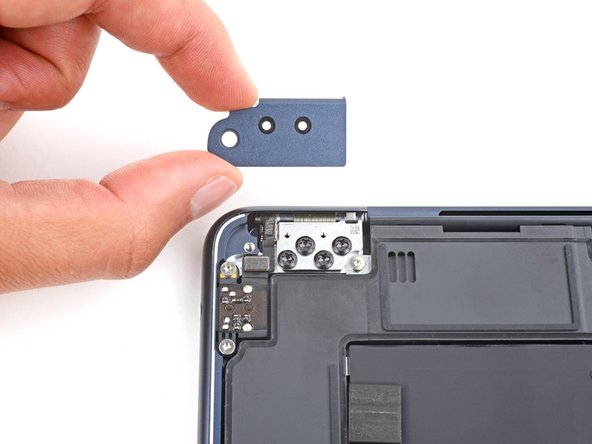
  13. MacBook Air 15" 2023 Battery Replacement: stap 13, afbeelding 1 van 3 MacBook Air 15" 2023 Battery Replacement: stap 13, afbeelding 2 van 3 MacBook Air 15" 2023 Battery Replacement: stap 13, afbeelding 3 van 3
    • Insert the point of a spudger into one of the left hinge cover's screw holes.

    • Push the hinge cover away from the back edge to dislodge it.

    • Remove the hinge cover.

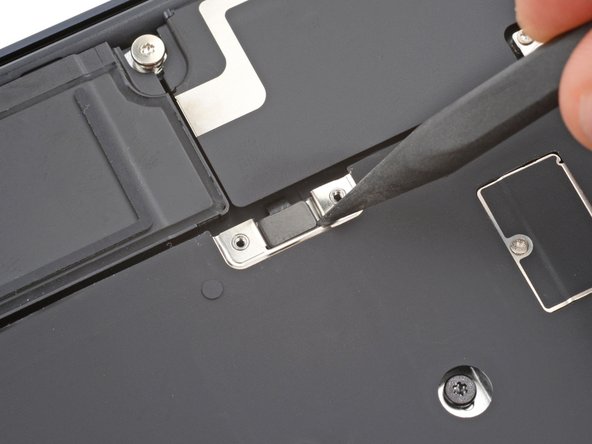
  14. MacBook Air 15" 2023 Battery Replacement, Disconnect the right speaker: stap 14, afbeelding 1 van 3 MacBook Air 15" 2023 Battery Replacement, Disconnect the right speaker: stap 14, afbeelding 2 van 3 MacBook Air 15" 2023 Battery Replacement, Disconnect the right speaker: stap 14, afbeelding 3 van 3
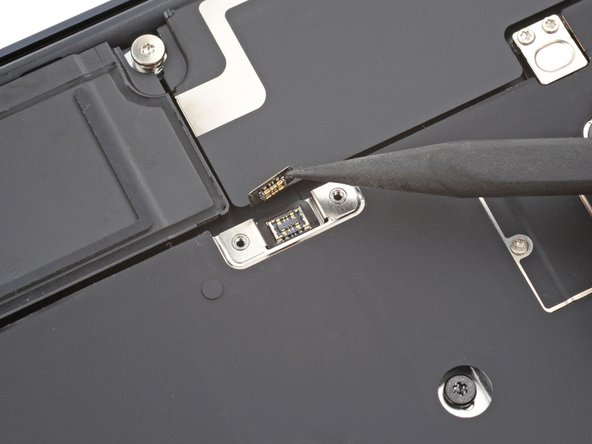
    • Use the point of a spudger to pry up and disconnect the right speaker press connector.

  15. MacBook Air 15" 2023 Battery Replacement, Unfasten the right speaker: stap 15, afbeelding 1 van 2 MacBook Air 15" 2023 Battery Replacement, Unfasten the right speaker: stap 15, afbeelding 2 van 2
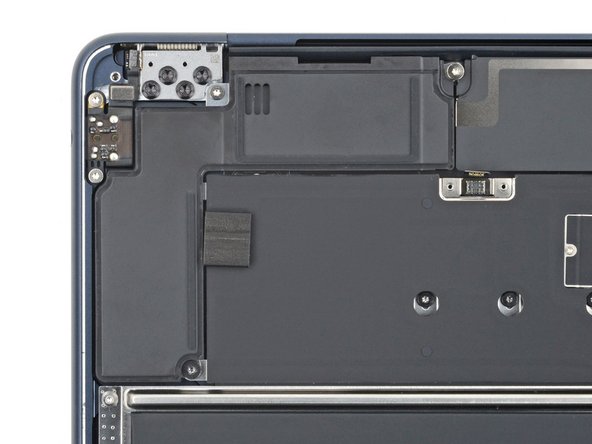
    • Use a T5 Torx screwdriver to remove the two screws securing the top edge of the right speaker:

    • One 2.7 mm‑long screw

    • One 5.5 mm‑long screw

    • Use a T6 Torx screwdriver to remove the 3.5 mm‑long screw securing the bottom edge of the speaker.

  16. MacBook Air 15" 2023 Battery Replacement, Remove the right speaker: stap 16, afbeelding 1 van 3 MacBook Air 15" 2023 Battery Replacement, Remove the right speaker: stap 16, afbeelding 2 van 3 MacBook Air 15" 2023 Battery Replacement, Remove the right speaker: stap 16, afbeelding 3 van 3
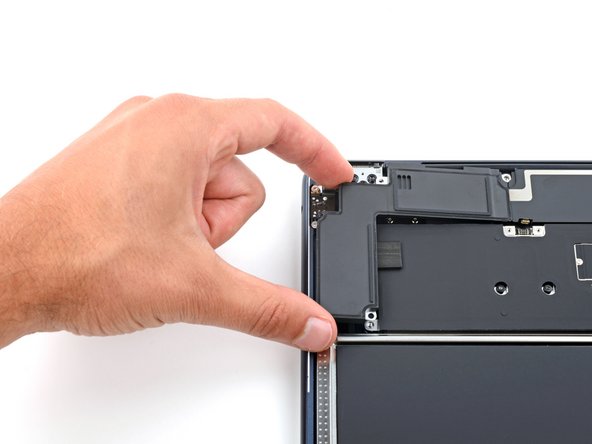
    • Make sure the cable on the top right edge of the speaker doesn't get caught on the logic board, as it may tear.

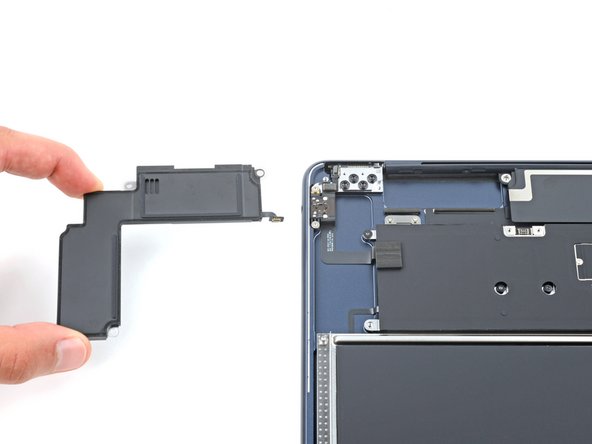
    • Lift the speaker's left edge over the frame and slide it to the left to remove it.

    • During reassembly, slide the speaker cable under the left edge of the antenna bar assembly before laying the speaker in its recess.

  17. MacBook Air 15" 2023 Battery Replacement, Unfasten the speaker cable and hinge covers: stap 17, afbeelding 1 van 2 MacBook Air 15" 2023 Battery Replacement, Unfasten the speaker cable and hinge covers: stap 17, afbeelding 2 van 2
    • The left speaker will be on your right-hand side when working on the MacBook, as it's laying upside down.

    • Use a T3 Torx screwdriver to remove the following screws:

    • Two 2.6 mm‑long screws securing the right hinge cover

    • Two 1.5 mm‑long screws securing the speaker cable cover

  18. MacBook Air 15" 2023 Battery Replacement, Remove the covers: stap 18, afbeelding 1 van 1
    • Remove the speaker cable cover.

  19. MacBook Air 15" 2023 Battery Replacement, Remove the right hinge cover: stap 19, afbeelding 1 van 3 MacBook Air 15" 2023 Battery Replacement, Remove the right hinge cover: stap 19, afbeelding 2 van 3 MacBook Air 15" 2023 Battery Replacement, Remove the right hinge cover: stap 19, afbeelding 3 van 3
    • Insert the point of a spudger into one of the right hinge cover's screw holes.

    • Push the hinge cover away from the back edge to dislodge it.

    • Remove the hinge cover.

  20. MacBook Air 15" 2023 Battery Replacement, Disconnect the left speaker: stap 20, afbeelding 1 van 3 MacBook Air 15" 2023 Battery Replacement, Disconnect the left speaker: stap 20, afbeelding 2 van 3 MacBook Air 15" 2023 Battery Replacement, Disconnect the left speaker: stap 20, afbeelding 3 van 3
    • Use the point of a spudger to pry up and disconnect the left speaker press connector.

  21. MacBook Air 15" 2023 Battery Replacement, Unfasten the left speaker: stap 21, afbeelding 1 van 2 MacBook Air 15" 2023 Battery Replacement, Unfasten the left speaker: stap 21, afbeelding 2 van 2
    • Use a T5 Torx screwdriver to remove the two screws securing the top edge of the left speaker:

    • One 2.7 mm‑long screw

    • One 5.5 mm‑long screw

    • Use a T6 Torx screwdriver to remove the 3.5 mm‑long screw securing the bottom edge of the speaker.

  22. MacBook Air 15" 2023 Battery Replacement, Remove the left speaker: stap 22, afbeelding 1 van 3 MacBook Air 15" 2023 Battery Replacement, Remove the left speaker: stap 22, afbeelding 2 van 3 MacBook Air 15" 2023 Battery Replacement, Remove the left speaker: stap 22, afbeelding 3 van 3
    • Make sure the cable on the top left edge of the speaker doesn't get caught on the logic board, as it may tear.

    • Lift the speaker's right edge over the frame and slide it to the right to remove it.

    • During reassembly, slide the speaker cable under the right edge of the antenna bar assembly before laying the speaker in its recess.

  23. MacBook Air 15" 2023 Battery Replacement, Remove the antenna cables cover: stap 23, afbeelding 1 van 3 MacBook Air 15" 2023 Battery Replacement, Remove the antenna cables cover: stap 23, afbeelding 2 van 3 MacBook Air 15" 2023 Battery Replacement, Remove the antenna cables cover: stap 23, afbeelding 3 van 3
    • Use a T3 Torx screwdriver to remove the two 1.5 mm‑long screws securing the antenna cables cover.

    • Remove the cover.

  24. MacBook Air 15" 2023 Battery Replacement, Disconnect the antenna bar: stap 24, afbeelding 1 van 3 MacBook Air 15" 2023 Battery Replacement, Disconnect the antenna bar: stap 24, afbeelding 2 van 3 MacBook Air 15" 2023 Battery Replacement, Disconnect the antenna bar: stap 24, afbeelding 3 van 3
    Gereedschap gebruikt in deze stap:
    Tweezers
    $3.99
    Koop
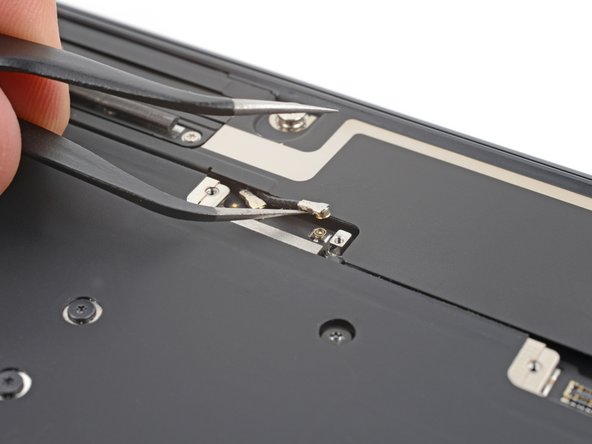
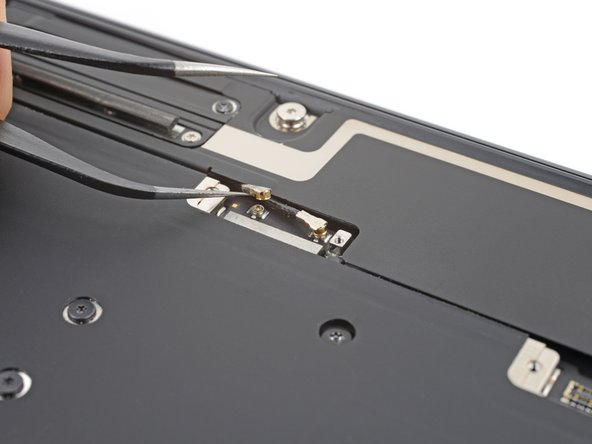
    • Insert one arm of a pair of angled tweezers under the metal neck of one of the antenna connectors and lift straight up to disconnect it.

    • Disconnect the other antenna.

    • To reconnect antenna connectors, hold each one in place over its socket and press down with the flat end of your spudger. The connector will snap into place.

  25. MacBook Air 15" 2023 Battery Replacement, Unfasten the antenna bar: stap 25, afbeelding 1 van 2 MacBook Air 15" 2023 Battery Replacement, Unfasten the antenna bar: stap 25, afbeelding 2 van 2
    • Use a T5 Torx screwdriver to remove the two 5.5 mm‑long screws securing the antenna bar.

  26. MacBook Air 15" 2023 Battery Replacement, Remove the antenna bar: stap 26, afbeelding 1 van 2 MacBook Air 15" 2023 Battery Replacement, Remove the antenna bar: stap 26, afbeelding 2 van 2
    • Remove the antenna bar.

  27. MacBook Air 15" 2023 Battery Replacement, Remove the foam pad: stap 27, afbeelding 1 van 2 MacBook Air 15" 2023 Battery Replacement, Remove the foam pad: stap 27, afbeelding 2 van 2
    Gereedschap gebruikt in deze stap:
    Tesa 61395 Tape
    $2.99
    Koop
    • A foam pad hides two screws securing the display and camera cables cover. It's secured with light adhesive.

    • Use tweezers or your fingers to remove the foam pad from the cover.

    • During reassembly, use the leftover adhesive to secure the pad. If the pad doesn't stick, use double-sided tape to secure it.

  28. MacBook Air 15" 2023 Battery Replacement, Unfasten the cables cover: stap 28, afbeelding 1 van 3 MacBook Air 15" 2023 Battery Replacement, Unfasten the cables cover: stap 28, afbeelding 2 van 3 MacBook Air 15" 2023 Battery Replacement, Unfasten the cables cover: stap 28, afbeelding 3 van 3
    • Use a T3 Torx screwdriver to remove the four 1.5 mm‑long screws securing the display and camera cables cover.

    • Remove the cover.

  29. MacBook Air 15" 2023 Battery Replacement, Disconnect the display and camera: stap 29, afbeelding 1 van 3 MacBook Air 15" 2023 Battery Replacement, Disconnect the display and camera: stap 29, afbeelding 2 van 3 MacBook Air 15" 2023 Battery Replacement, Disconnect the display and camera: stap 29, afbeelding 3 van 3
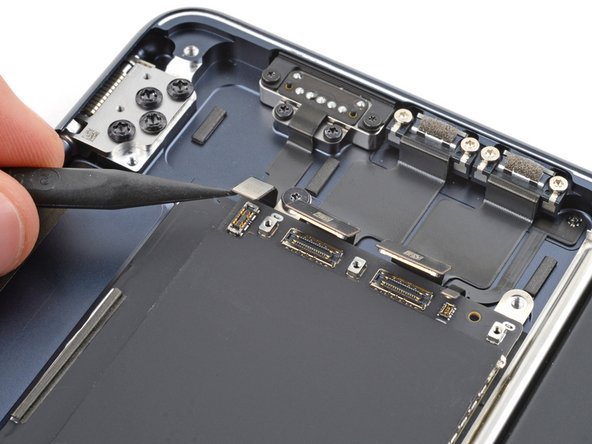
    • Use a spudger to pry up and disconnect the display and camera cable press connectors.

  30. MacBook Air 15" 2023 Battery Replacement, Reassembly information: stap 30, afbeelding 1 van 3 MacBook Air 15" 2023 Battery Replacement, Reassembly information: stap 30, afbeelding 2 van 3 MacBook Air 15" 2023 Battery Replacement, Reassembly information: stap 30, afbeelding 3 van 3
    • During reassembly, use the flat end of a spudger to gently push the display and camera cables under the logic board.

  31. MacBook Air 15" 2023 Battery Replacement, Unfasten the display and camera cables: stap 31, afbeelding 1 van 2 MacBook Air 15" 2023 Battery Replacement, Unfasten the display and camera cables: stap 31, afbeelding 2 van 2
    • Use a T3 Torx screwdriver to remove the two 2.8 mm‑long screws securing the display and camera cables to the frame.

  32. MacBook Air 15" 2023 Battery Replacement, Remove the cover tape: stap 32, afbeelding 1 van 3 MacBook Air 15" 2023 Battery Replacement, Remove the cover tape: stap 32, afbeelding 2 van 3 MacBook Air 15" 2023 Battery Replacement, Remove the cover tape: stap 32, afbeelding 3 van 3
    Gereedschap gebruikt in deze stap:
    Tweezers
    $4.99
    Koop
    • Use blunt nose tweezers or your fingers to remove the foam pad and two pieces of tape:

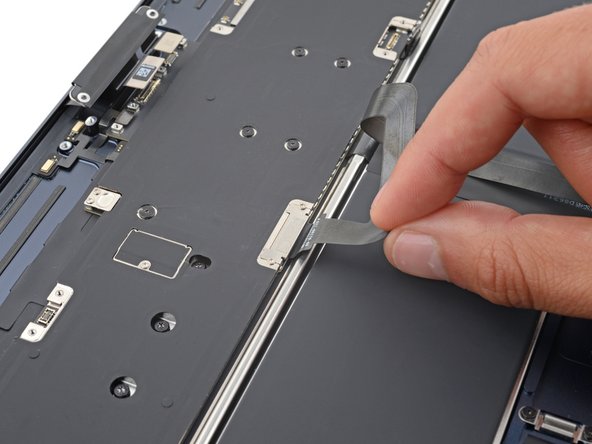
    • The headphone jack press connector cover's foam pad

    • The trackpad cable tape

    • The MagSafe and Thunderbolt connector cover tape

    • During reassembly, use the leftover adhesive to secure the foam pad and pieces of tape.

  33. MacBook Air 15" 2023 Battery Replacement, Separate the trackpad cable adhesive: stap 33, afbeelding 1 van 2 MacBook Air 15" 2023 Battery Replacement, Separate the trackpad cable adhesive: stap 33, afbeelding 2 van 2
    Gereedschap gebruikt in deze stap:
    Tesa 61395 Tape
    $2.99
    Koop
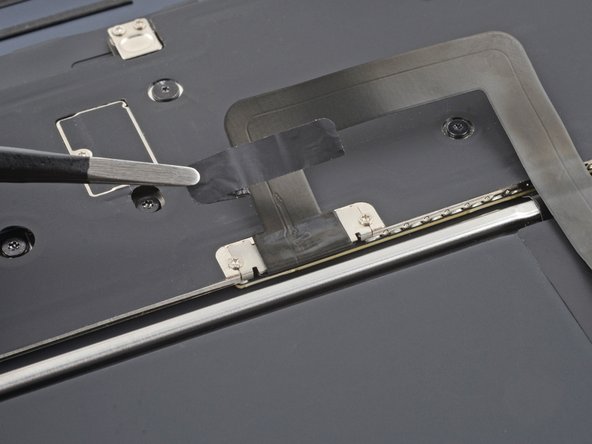
    • Light adhesive secures the trackpad cable to its metal cover.

    • Pull the trackpad cable away from its cover to separate the adhesive securing it.

    • During reassembly, use the leftover adhesive to secure the trackpad cable to the cover. If the cable doesn't stick, use double-sided tape to secure it.

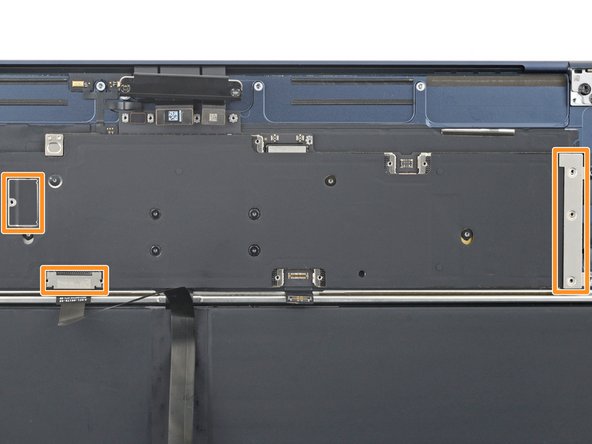
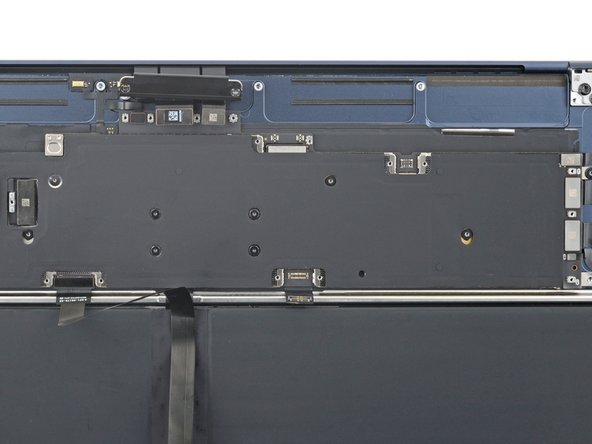
  34. MacBook Air 15" 2023 Battery Replacement, Remove the connector covers: stap 34, afbeelding 1 van 3 MacBook Air 15" 2023 Battery Replacement, Remove the connector covers: stap 34, afbeelding 2 van 3 MacBook Air 15" 2023 Battery Replacement, Remove the connector covers: stap 34, afbeelding 3 van 3
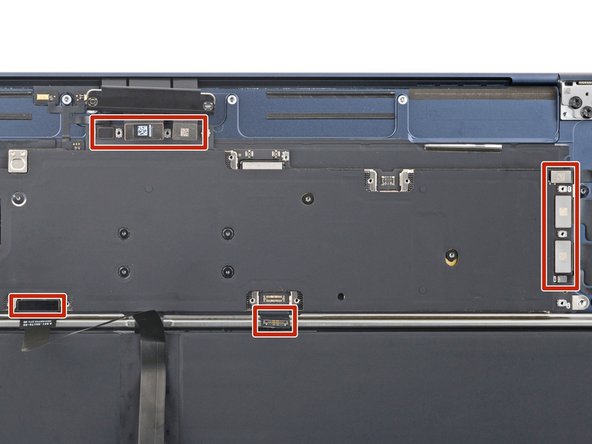
    • Use a T3 Torx screwdriver to remove the six 1.5 mm‑long screws securing the interconnect, trackpad, and MagSafe/Thunderbolt connector covers.

    • Remove the three connector covers.

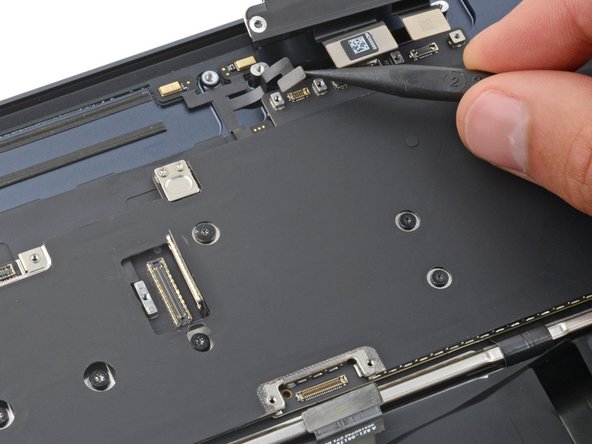
  35. MacBook Air 15" 2023 Battery Replacement, Disconnect the logic board cables: stap 35, afbeelding 1 van 3 MacBook Air 15" 2023 Battery Replacement, Disconnect the logic board cables: stap 35, afbeelding 2 van 3 MacBook Air 15" 2023 Battery Replacement, Disconnect the logic board cables: stap 35, afbeelding 3 van 3
    • Use a spudger to pry up and disconnect all seven press connectors from the logic board:

    • One for the interconnect cable

    • One for the trackpad cable

    • One for the microphone array cable

    • Four on the right side of the logic board for the MagSafe, Thunderbolt and Hall effect sensor cables

  36. MacBook Air 15" 2023 Battery Replacement, Unfasten the logic board: stap 36, afbeelding 1 van 2 MacBook Air 15" 2023 Battery Replacement, Unfasten the logic board: stap 36, afbeelding 2 van 2
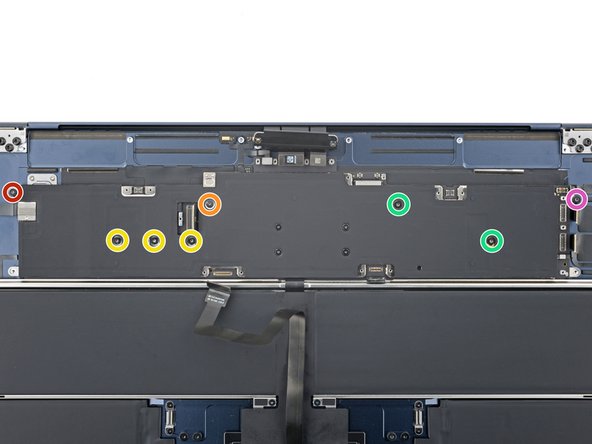
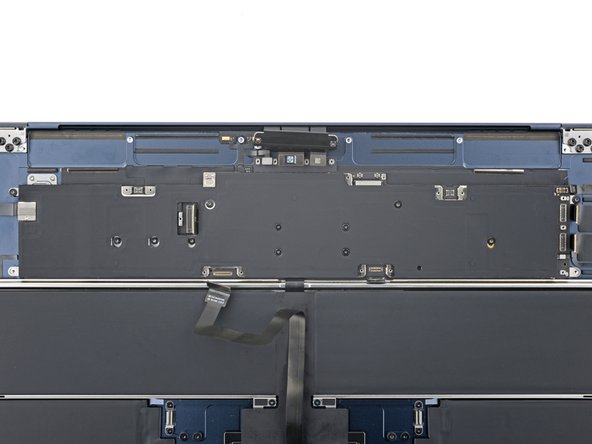
    • Use a T3 Torx screwdriver to remove the two screws on the upper left edge of the logic board:

    • One 2.6 mm‑long screw

    • One 4.7 mm‑long screw

    • Use a T5 Torx screwdriver to remove the six remaining screws securing the logic board:

    • Three 3.1 mm‑long screws

    • Two 3.8 mm‑long screws

    • One 3.6 mm‑long screw

  37. MacBook Air 15" 2023 Battery Replacement, Remove the logic board: stap 37, afbeelding 1 van 3 MacBook Air 15" 2023 Battery Replacement, Remove the logic board: stap 37, afbeelding 2 van 3 MacBook Air 15" 2023 Battery Replacement, Remove the logic board: stap 37, afbeelding 3 van 3
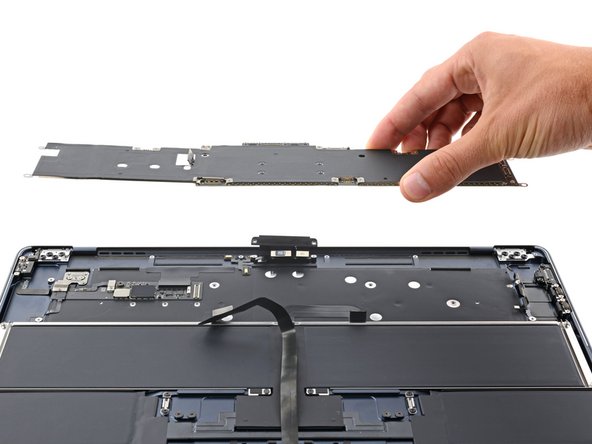
    • Grip the right side of the logic board and remove it.

    • During reassembly:

    • Lower the logic board into place, making sure no cables get stuck underneath.

    • Carefully check the edges of the logic board to see if any cables got stuck underneath. If any did, use the point of a spudger to gently pull them out.

  38. MacBook Air 15" 2023 Battery Replacement, Reposition the trackpad cable: stap 38, afbeelding 1 van 2 MacBook Air 15" 2023 Battery Replacement, Reposition the trackpad cable: stap 38, afbeelding 2 van 2
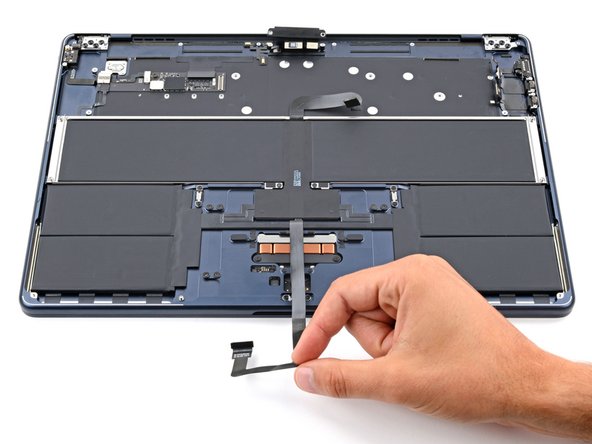
    • Move the trackpad cable over the bottom edge of the MacBook so it's out of the way of the battery.

  39. MacBook Air 15" 2023 Battery Replacement, Separate the battery cable adhesive: stap 39, afbeelding 1 van 2 MacBook Air 15" 2023 Battery Replacement, Separate the battery cable adhesive: stap 39, afbeelding 2 van 2
    Gereedschap gebruikt in deze stap:
    Tesa 61395 Tape
    $2.99
    Koop
    • Light adhesive secures the top of the battery cable to the frame.

    • Lift the battery cable from the frame to separate the adhesive securing it.

    • During reassembly:

    • If your battery cable comes with adhesive, remove the plastic liner and press the cable into place on the trackpad.

    • If the cable doesn't have adhesive, use a strip of double-sided tape to secure it to the trackpad.

  40. MacBook Air 15" 2023 Battery Replacement, Unfasten the battery tray: stap 40, afbeelding 1 van 2 MacBook Air 15" 2023 Battery Replacement, Unfasten the battery tray: stap 40, afbeelding 2 van 2
    • Use a T5 Torx screwdriver to remove the four 4.6 mm‑long screws securing the upper edges of the battery tray.

    • Use a T3 Torx screwdriver to remove the two 2.5 mm‑long screws securing the center of the battery tray.

  41. MacBook Air 15" 2023 Battery Replacement, Battery adhesive information: stap 41, afbeelding 1 van 3 MacBook Air 15" 2023 Battery Replacement, Battery adhesive information: stap 41, afbeelding 2 van 3 MacBook Air 15" 2023 Battery Replacement, Battery adhesive information: stap 41, afbeelding 3 van 3
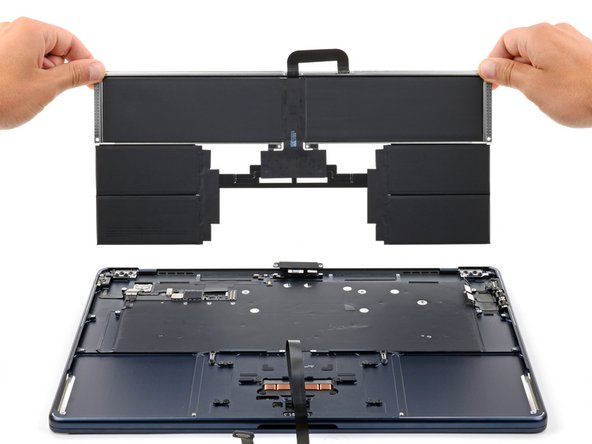
    • The MacBook's battery cells are adhered to a metal tray as a complete assembly.

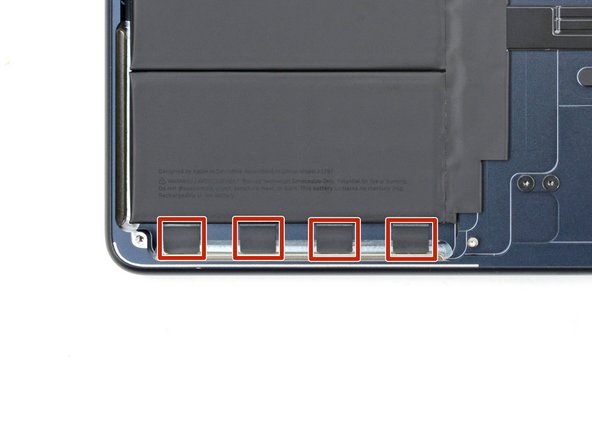
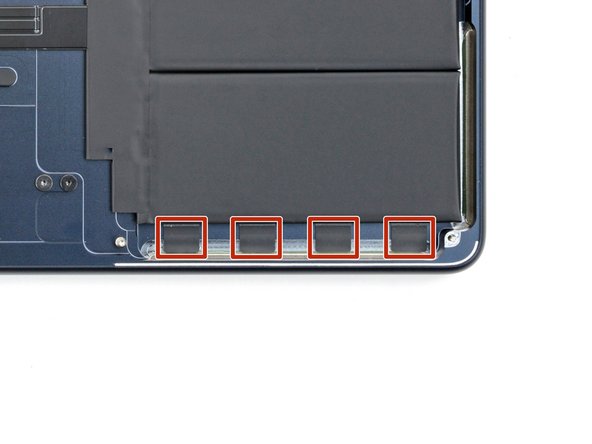
    • The metal battery tray—not the actual cells—is secured to the frame by eight stretch-release adhesive strips on the bottom left and right edges of the MacBook.

  42. MacBook Air 15" 2023 Battery Replacement, Peel up the stretch-release pull tabs: stap 42, afbeelding 1 van 3 MacBook Air 15" 2023 Battery Replacement, Peel up the stretch-release pull tabs: stap 42, afbeelding 2 van 3 MacBook Air 15" 2023 Battery Replacement, Peel up the stretch-release pull tabs: stap 42, afbeelding 3 van 3
    Gereedschap gebruikt in deze stap:
    Tweezers
    $4.99
    Koop
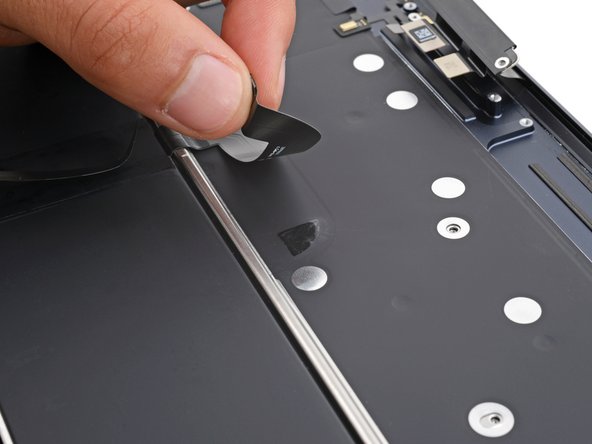
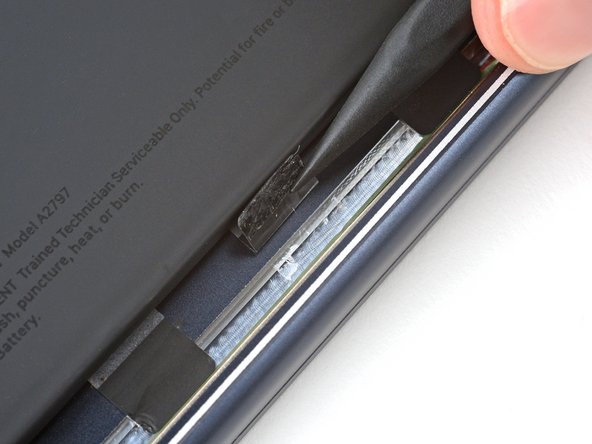
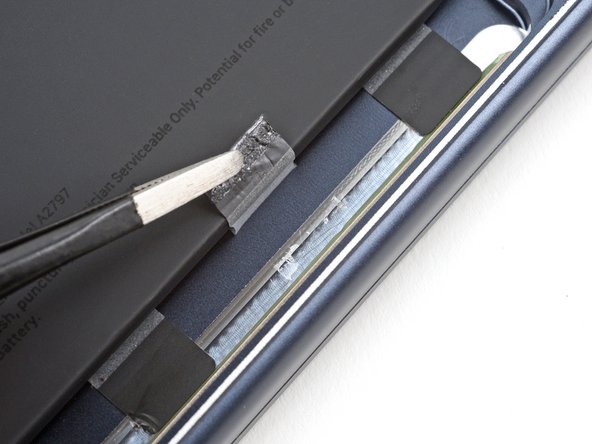
    • Use the point of a spudger and tweezers to separate and peel up the eight pull tabs.

    • Don't pull on the tabs yet.

  43. MacBook Air 15" 2023 Battery Replacement, Remove the stretch-release adhesive: stap 43, afbeelding 1 van 3 MacBook Air 15" 2023 Battery Replacement, Remove the stretch-release adhesive: stap 43, afbeelding 2 van 3 MacBook Air 15" 2023 Battery Replacement, Remove the stretch-release adhesive: stap 43, afbeelding 3 van 3
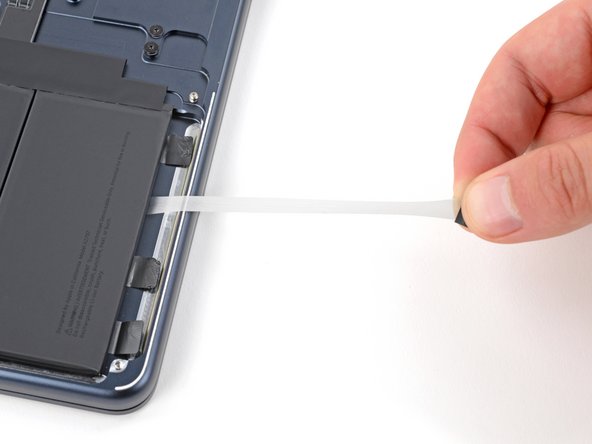
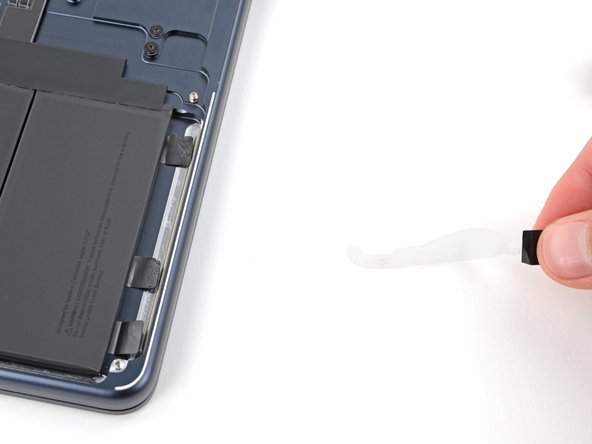
    • It takes time and constant tension to release the adhesive strips. Be patient and don't yank on them.

    • Don't let the strips touch the bottom edge of the frame—it's sharp and can easily cut them.

    • Use your fingers to slowly pull each strip out at a low angle, giving the adhesive plenty of time to stretch and detach.

    • Re-grip the strip closer to the battery as necessary and continue pulling—the adhesive will stretch a lot.

    • If a strip or its pull tab breaks off, use blunt nose tweezers to try to retrieve it from under the tray. If you can't reach it, move onto the next tab.

  44. MacBook Air 15" 2023 Battery Replacement, Separate any remaining adhesive: stap 44, afbeelding 1 van 2 MacBook Air 15" 2023 Battery Replacement, Separate any remaining adhesive: stap 44, afbeelding 2 van 2
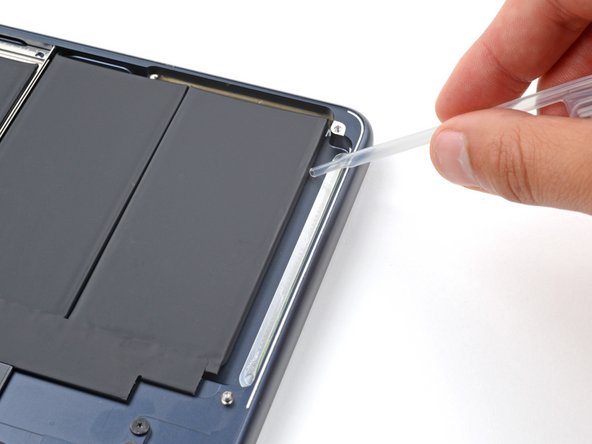
    • If you successfully removed all eight strips of adhesive, congratulations! Skip down two steps. If any of the strips broke and you weren't able to retrieve them, follow the next two steps to separate the remaining adhesive.

    • Apply a few drops of highly-concentrated isopropyl alcohol (over 90%) under the battery tray near the broken adhesive strips.

    • Wait one minute for the alcohol to soften the adhesive.

  45. MacBook Air 15" 2023 Battery Replacement: stap 45, afbeelding 1 van 3 MacBook Air 15" 2023 Battery Replacement: stap 45, afbeelding 2 van 3 MacBook Air 15" 2023 Battery Replacement: stap 45, afbeelding 3 van 3
    Gereedschap gebruikt in deze stap:
    Plastic Cards
    $2.99
    Koop
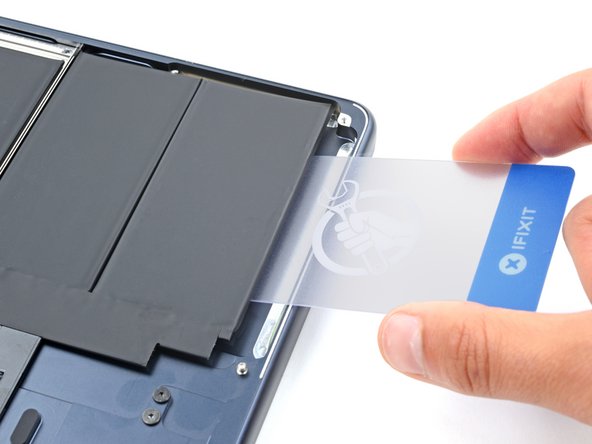
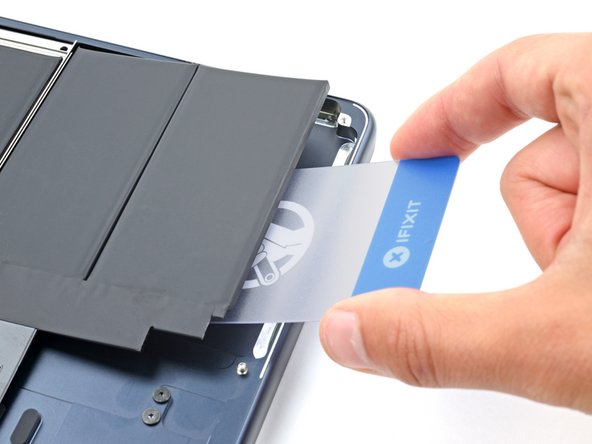
    • Make sure your plastic card is underneath the battery tray itself, and not between a battery cell and the tray. Don’t attempt to remove any battery cells from the metal tray.

    • Insert a plastic card underneath the battery's metal tray where the adhesive strip broke off.

    • Slide the plastic card completely under the battery tray and lift to separate any remaining adhesive.

  46. MacBook Air 15" 2023 Battery Replacement, Remove the battery: stap 46, afbeelding 1 van 2 MacBook Air 15" 2023 Battery Replacement, Remove the battery: stap 46, afbeelding 2 van 2
    Gereedschap gebruikt in deze stap:
    Stretch Release Battery Adhesive
    $3.99
    Koop
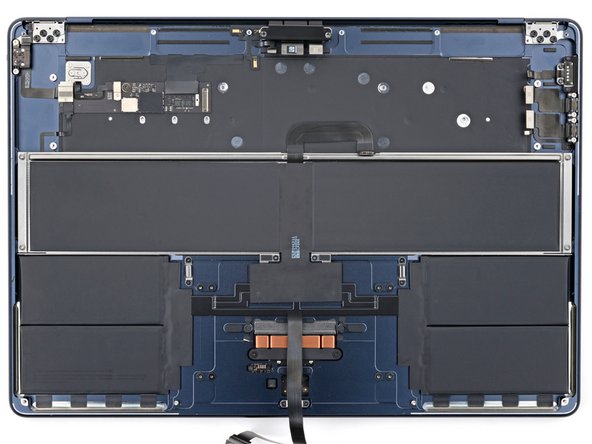
    • Remove the battery.

    • During reassembly:

    • Remove any remaining adhesive strips with tweezers or your fingers.

    • Clean up the adhesive residue with a few drops of isopropyl alcohol and a lint-free or microfiber cloth.

    • Before removing any adhesive liners, place the battery in its recess and make sure it fits.

    • If your replacement battery comes with adhesive, remove the plastic liners and firmly press each cell into place.

    • If your replacement battery doesn't come with adhesive, secure it with stretch-release adhesive.

    • Alternatively, you can use strong double-sided tape to secure the battery.

Conclusie

To reassemble your device, follow these instructions in reverse order.

For optimal performance, calibrate your newly installed battery after completing this guide.

If you notice any unusual behavior or problems after installing your new battery, you may need to reset your MacBook's SMC.

Take your e-waste to an R2 or e-Stewards certified recycler.

Repair didn’t go as planned? Try some basic troubleshooting, or ask our Answers community for help.

2 andere personen hebben deze handleiding voltooid.

Spencer Day

Lid sinds: 09/14/22

61.610 Reputatie

445 handleidingen geschreven

Team

iFixit Lid van iFixit

Staff

140 Leden

18.077 handleidingen geschreven

0 opmerkingen

Voeg opmerking toe

Weergavestatistieken:

Afgelopen 24 uren: 10

Afgelopen 7 dagen: 55

Afgelopen 30 dagen: 232

Altijd: 4,107