Ga door naar hoofdinhoud

Lenovo ThinkPad T480s Wi-Fi Card Replacement

Wat je nodig hebt

  1. Lenovo ThinkPad T480s Wi-Fi Card Replacement, Bottom Cover: stap 1, afbeelding 1 van 2 Lenovo ThinkPad T480s Wi-Fi Card Replacement, Bottom Cover: stap 1, afbeelding 2 van 2
    • Disable the battery, power down the device, and unplug the power adapter from your device before proceeding/beginning the guide.

    • Loosen the six captive screws with a Phillips #1 screwdriver.

  2. Lenovo ThinkPad T480s Wi-Fi Card Replacement: stap 2, afbeelding 1 van 3 Lenovo ThinkPad T480s Wi-Fi Card Replacement: stap 2, afbeelding 2 van 3 Lenovo ThinkPad T480s Wi-Fi Card Replacement: stap 2, afbeelding 3 van 3
    • Remove the bottom cover with an opening tool.

    • Start from the top edge near the hinge and work your way along the edge until all of the clips are unsnapped.

  3. Lenovo ThinkPad T480s Wi-Fi Card Replacement: stap 3, afbeelding 1 van 2 Lenovo ThinkPad T480s Wi-Fi Card Replacement: stap 3, afbeelding 2 van 2
    • Lift the bottom cover off.

  4. Lenovo ThinkPad T480s Wi-Fi Card Replacement, Wi-Fi Card: stap 4, afbeelding 1 van 3 Lenovo ThinkPad T480s Wi-Fi Card Replacement, Wi-Fi Card: stap 4, afbeelding 2 van 3 Lenovo ThinkPad T480s Wi-Fi Card Replacement, Wi-Fi Card: stap 4, afbeelding 3 van 3
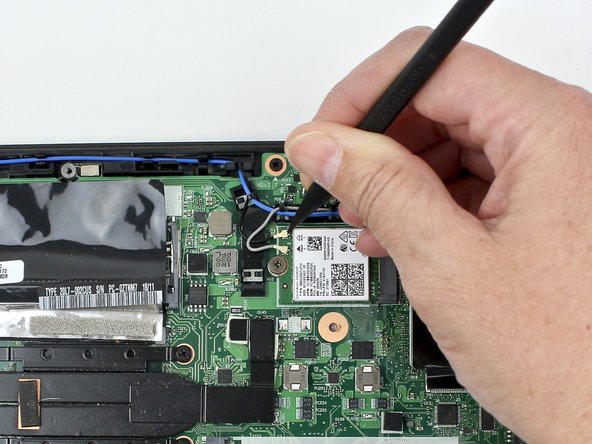
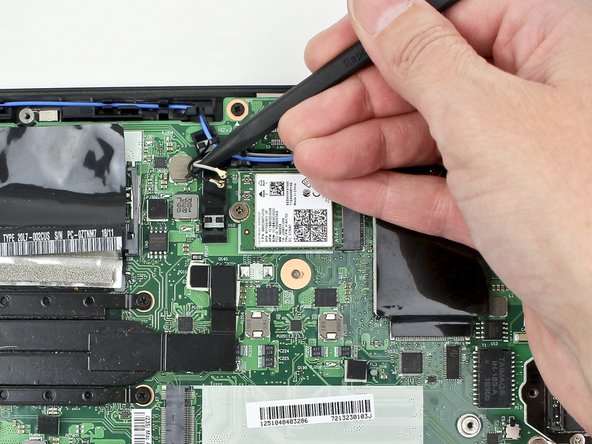
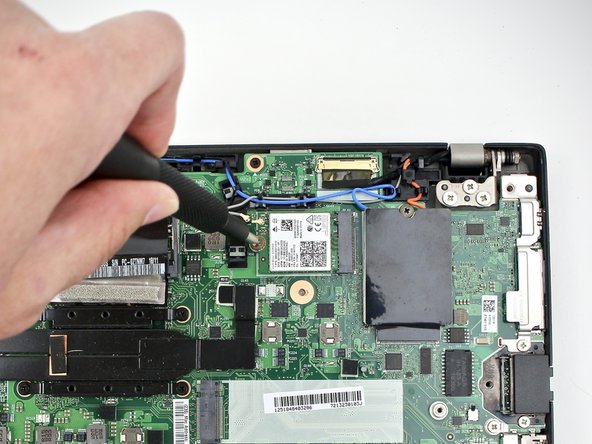
    • Using the nylon spudger, pop the coaxial antenna wires off the Wi-Fi card.

    • When reassembling, reattach the gray wire closest to the screw and the black wire on the other side of the gray wire.

  5. Lenovo ThinkPad T480s Wi-Fi Card Replacement: stap 5, afbeelding 1 van 2 Lenovo ThinkPad T480s Wi-Fi Card Replacement: stap 5, afbeelding 2 van 2
    • Use the Phillips #1 screwdriver to remove one 2.8mm screw holding the Wi-Fi card down to the motherboard.

  6. Lenovo ThinkPad T480s Wi-Fi Card Replacement: stap 6, afbeelding 1 van 3 Lenovo ThinkPad T480s Wi-Fi Card Replacement: stap 6, afbeelding 2 van 3 Lenovo ThinkPad T480s Wi-Fi Card Replacement: stap 6, afbeelding 3 van 3
    • Slide the Wi-Fi card out from the slot.

Conclusie

To reassemble your device, follow these instructions in reverse order.

Take your e-waste to an R2 or e-Stewards certified recycler.

Repair didn’t go as planned? Try some basic troubleshooting, or ask our Answers community for help.

Sarah Westberg

Lid sinds: 03/11/19

23.213 Reputatie

70 handleidingen geschreven

Team

iFixit Lid van iFixit

Staff

135 Leden

17.198 handleidingen geschreven

0 opmerkingen

Voeg opmerking toe

Weergavestatistieken:

Afgelopen 24 uren: 3

Afgelopen 7 dagen: 32

Afgelopen 30 dagen: 114

Altijd: 1,889