Ga door naar hoofdinhoud

Lenovo ThinkPad T480s Power Button Board Replacement

Wat je nodig hebt

  1. Lenovo ThinkPad T480s Power Button Board Replacement, Bottom Cover: stap 1, afbeelding 1 van 2 Lenovo ThinkPad T480s Power Button Board Replacement, Bottom Cover: stap 1, afbeelding 2 van 2
    • Disable the battery, power down the device, and unplug the power adapter from your device before proceeding/beginning the guide.

    • Loosen the six captive screws with a Phillips #1 screwdriver.

  2. Lenovo ThinkPad T480s Power Button Board Replacement: stap 2, afbeelding 1 van 3 Lenovo ThinkPad T480s Power Button Board Replacement: stap 2, afbeelding 2 van 3 Lenovo ThinkPad T480s Power Button Board Replacement: stap 2, afbeelding 3 van 3
    • Remove the bottom cover with an opening tool.

    • Start from the top edge near the hinge and work your way along the edge until all of the clips are unsnapped.

  3. Lenovo ThinkPad T480s Power Button Board Replacement: stap 3, afbeelding 1 van 2 Lenovo ThinkPad T480s Power Button Board Replacement: stap 3, afbeelding 2 van 2
    • Lift the bottom cover off.

  4. Lenovo ThinkPad T480s Power Button Board Replacement, Battery: stap 4, afbeelding 1 van 2 Lenovo ThinkPad T480s Power Button Board Replacement, Battery: stap 4, afbeelding 2 van 2
    • Use the Phillips #1 screwdriver to remove four 4.5mm screws that hold the battery down to the mid frame.

  5. Lenovo ThinkPad T480s Power Button Board Replacement: stap 5, afbeelding 1 van 3 Lenovo ThinkPad T480s Power Button Board Replacement: stap 5, afbeelding 2 van 3 Lenovo ThinkPad T480s Power Button Board Replacement: stap 5, afbeelding 3 van 3
    • Lift the battery near the connector and remove it from the system.

  6. Lenovo ThinkPad T480s Power Button Board Replacement, Keyboard: stap 6, afbeelding 1 van 3 Lenovo ThinkPad T480s Power Button Board Replacement, Keyboard: stap 6, afbeelding 2 van 3 Lenovo ThinkPad T480s Power Button Board Replacement, Keyboard: stap 6, afbeelding 3 van 3
    • Disable the battery, power down, and unplug your device before you begin.

    • Pry the left and right trackpad buttons up with a spudger.

  7. Lenovo ThinkPad T480s Power Button Board Replacement: stap 7, afbeelding 1 van 2 Lenovo ThinkPad T480s Power Button Board Replacement: stap 7, afbeelding 2 van 2
    • With a Phillips #0 screwdriver, loosen the two captive screws underneath the left and right trackpad buttons.

  8. Lenovo ThinkPad T480s Power Button Board Replacement: stap 8, afbeelding 1 van 3 Lenovo ThinkPad T480s Power Button Board Replacement: stap 8, afbeelding 2 van 3 Lenovo ThinkPad T480s Power Button Board Replacement: stap 8, afbeelding 3 van 3
    • Wedge the spudger under the front edge of the keyboard to push the keyboard toward the back of the system.

    • Lift the front edge of the keyboard up by a few millimeters.

  9. Lenovo ThinkPad T480s Power Button Board Replacement: stap 9, afbeelding 1 van 2 Lenovo ThinkPad T480s Power Button Board Replacement: stap 9, afbeelding 2 van 2
    • Gently, pull the keyboard out from the bezel and flip it over.

    • It is connected to to the keyboard and trackpad cables so be sure not to yank it over to avoid tearing them.

  10. Lenovo ThinkPad T480s Power Button Board Replacement: stap 10, afbeelding 1 van 3 Lenovo ThinkPad T480s Power Button Board Replacement: stap 10, afbeelding 2 van 3 Lenovo ThinkPad T480s Power Button Board Replacement: stap 10, afbeelding 3 van 3
    • Use the spudger to disconnect the trackpad cable from the system.

    • For more information on types of connectors, check out this guide.

  11. Lenovo ThinkPad T480s Power Button Board Replacement: stap 11, afbeelding 1 van 3 Lenovo ThinkPad T480s Power Button Board Replacement: stap 11, afbeelding 2 van 3 Lenovo ThinkPad T480s Power Button Board Replacement: stap 11, afbeelding 3 van 3
    • Use the spudger to disconnect the keyboard cable from the system.

  12. Lenovo ThinkPad T480s Power Button Board Replacement: stap 12, afbeelding 1 van 2 Lenovo ThinkPad T480s Power Button Board Replacement: stap 12, afbeelding 2 van 2
    • Lift the keyboard off of the palm rest.

  13. Lenovo ThinkPad T480s Power Button Board Replacement, SSD: stap 13, afbeelding 1 van 2 Lenovo ThinkPad T480s Power Button Board Replacement, SSD: stap 13, afbeelding 2 van 2
    • Use the Phillips #1 screwdriver to remove one 2.8 mm screw securing the SSD.

  14. Lenovo ThinkPad T480s Power Button Board Replacement: stap 14, afbeelding 1 van 3 Lenovo ThinkPad T480s Power Button Board Replacement: stap 14, afbeelding 2 van 3 Lenovo ThinkPad T480s Power Button Board Replacement: stap 14, afbeelding 3 van 3
    • Pull the SSD out of the socket.

  15. Lenovo ThinkPad T480s Power Button Board Replacement, RAM: stap 15, afbeelding 1 van 3 Lenovo ThinkPad T480s Power Button Board Replacement, RAM: stap 15, afbeelding 2 van 3 Lenovo ThinkPad T480s Power Button Board Replacement, RAM: stap 15, afbeelding 3 van 3
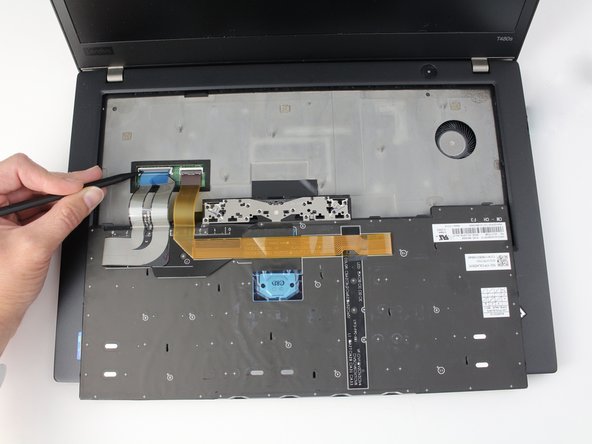
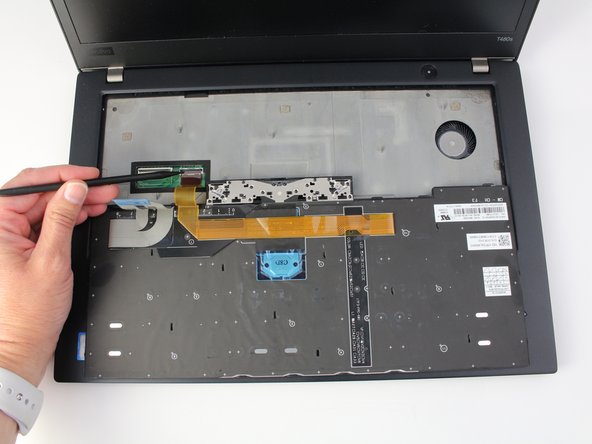
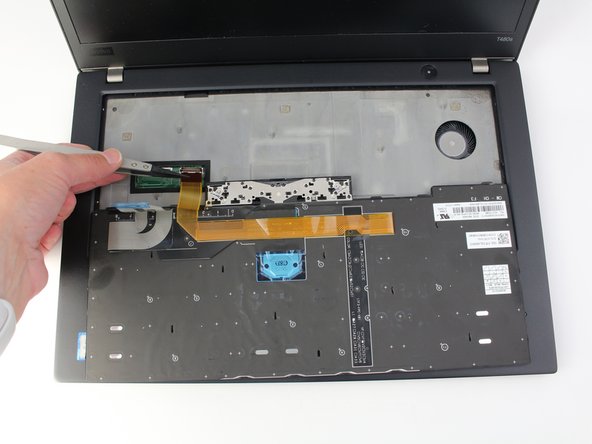
    • Pull the plastic film back.

    • Push the clips outward to release the RAM stick.

    • My device doesn't have RAM so you don't see it.

    • The RAM stick will pop out at an angle. Pull the RAM stick out at the same angle.

  16. Lenovo ThinkPad T480s Power Button Board Replacement, Wi-Fi Card: stap 16, afbeelding 1 van 3 Lenovo ThinkPad T480s Power Button Board Replacement, Wi-Fi Card: stap 16, afbeelding 2 van 3 Lenovo ThinkPad T480s Power Button Board Replacement, Wi-Fi Card: stap 16, afbeelding 3 van 3
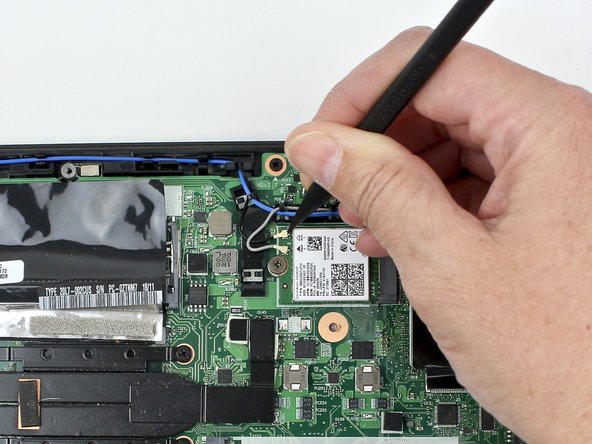
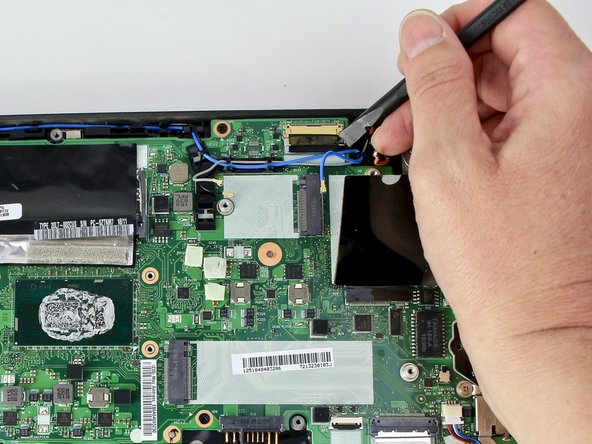
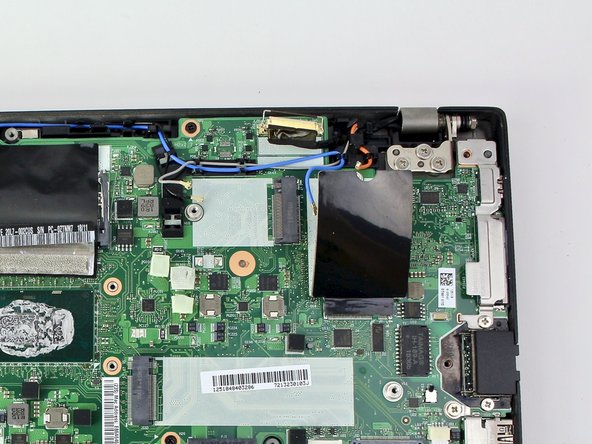
    • Using the nylon spudger, pop the coaxial antenna wires off the Wi-Fi card.

    • When reassembling, reattach the gray wire closest to the screw and the black wire on the other side of the gray wire.

  17. Lenovo ThinkPad T480s Power Button Board Replacement: stap 17, afbeelding 1 van 2 Lenovo ThinkPad T480s Power Button Board Replacement: stap 17, afbeelding 2 van 2
    • Use the Phillips #1 screwdriver to remove one 2.8mm screw holding the Wi-Fi card down to the motherboard.

  18. Lenovo ThinkPad T480s Power Button Board Replacement: stap 18, afbeelding 1 van 3 Lenovo ThinkPad T480s Power Button Board Replacement: stap 18, afbeelding 2 van 3 Lenovo ThinkPad T480s Power Button Board Replacement: stap 18, afbeelding 3 van 3
    • Slide the Wi-Fi card out from the slot.

  19. Lenovo ThinkPad T480s Power Button Board Replacement, WWAN Card: stap 19, afbeelding 1 van 3 Lenovo ThinkPad T480s Power Button Board Replacement, WWAN Card: stap 19, afbeelding 2 van 3 Lenovo ThinkPad T480s Power Button Board Replacement, WWAN Card: stap 19, afbeelding 3 van 3
    • Flip the cardboard cover off of the WWAN card.

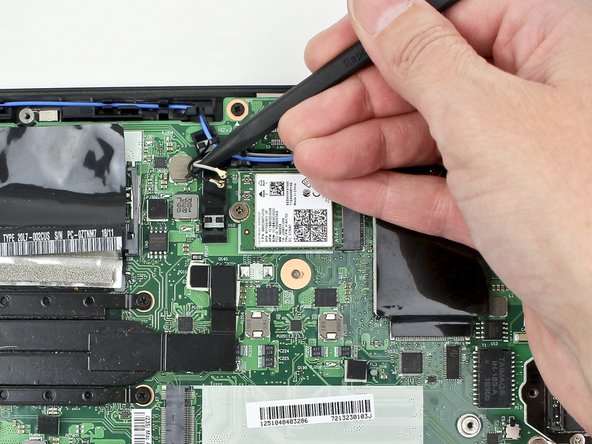
    • Using the spudger, release the coaxial antenna wires from the WWAN card.

    • When reassembling, reattach the blue wire on the left and the orange wire on the right.

  20. Lenovo ThinkPad T480s Power Button Board Replacement: stap 20, afbeelding 1 van 2 Lenovo ThinkPad T480s Power Button Board Replacement: stap 20, afbeelding 2 van 2
    • Use a Phillips #1 screwdriver to remove one 2.8mm screw.

  21. Lenovo ThinkPad T480s Power Button Board Replacement: stap 21, afbeelding 1 van 3 Lenovo ThinkPad T480s Power Button Board Replacement: stap 21, afbeelding 2 van 3 Lenovo ThinkPad T480s Power Button Board Replacement: stap 21, afbeelding 3 van 3
    • Slide the WWAN card out from the slot.

  22. Lenovo ThinkPad T480s Power Button Board Replacement, Fan Assembly: stap 22, afbeelding 1 van 2 Lenovo ThinkPad T480s Power Button Board Replacement, Fan Assembly: stap 22, afbeelding 2 van 2
    • Use the spudger to disconnect the fan cable from the motherboard.

  23. Lenovo ThinkPad T480s Power Button Board Replacement: stap 23, afbeelding 1 van 2 Lenovo ThinkPad T480s Power Button Board Replacement: stap 23, afbeelding 2 van 2
    • Loosen the six captive screws attaching the fan assembly to the motherboard.

    • This system was missing the two screws by the fan but I have highlighted them to show where they are located.

  24. Lenovo ThinkPad T480s Power Button Board Replacement: stap 24, afbeelding 1 van 3 Lenovo ThinkPad T480s Power Button Board Replacement: stap 24, afbeelding 2 van 3 Lenovo ThinkPad T480s Power Button Board Replacement: stap 24, afbeelding 3 van 3
    • Lift the thermal fan assembly from the system and remove it.

  25. Lenovo ThinkPad T480s Power Button Board Replacement, SIM Card Tray: stap 25, afbeelding 1 van 2 Lenovo ThinkPad T480s Power Button Board Replacement, SIM Card Tray: stap 25, afbeelding 2 van 2
    • Insert the SIM eject bit or a paper clip in the hole of the SIM tray to eject it.

    • Remove the SIM tray.

  26. Lenovo ThinkPad T480s Power Button Board Replacement, Motherboard: stap 26, afbeelding 1 van 3 Lenovo ThinkPad T480s Power Button Board Replacement, Motherboard: stap 26, afbeelding 2 van 3 Lenovo ThinkPad T480s Power Button Board Replacement, Motherboard: stap 26, afbeelding 3 van 3
    • Use the spudger to disconnect the LCD cable from the motherboard.

  27. Lenovo ThinkPad T480s Power Button Board Replacement: stap 27, afbeelding 1 van 3 Lenovo ThinkPad T480s Power Button Board Replacement: stap 27, afbeelding 2 van 3 Lenovo ThinkPad T480s Power Button Board Replacement: stap 27, afbeelding 3 van 3
    • Use the spudger to disconnect the camera cable from the motherboard.

  28. Lenovo ThinkPad T480s Power Button Board Replacement: stap 28, afbeelding 1 van 3 Lenovo ThinkPad T480s Power Button Board Replacement: stap 28, afbeelding 2 van 3 Lenovo ThinkPad T480s Power Button Board Replacement: stap 28, afbeelding 3 van 3
    • Remove all antenna cables from their routing.

  29. Lenovo ThinkPad T480s Power Button Board Replacement: stap 29, afbeelding 1 van 3 Lenovo ThinkPad T480s Power Button Board Replacement: stap 29, afbeelding 2 van 3 Lenovo ThinkPad T480s Power Button Board Replacement: stap 29, afbeelding 3 van 3
    • Use the spudger to disconnect the SD card reader/audio card cable from the board.

    • The cable is attached to the board with adhesive so you will need to peel the cable up.

  30. Lenovo ThinkPad T480s Power Button Board Replacement: stap 30, afbeelding 1 van 3 Lenovo ThinkPad T480s Power Button Board Replacement: stap 30, afbeelding 2 van 3 Lenovo ThinkPad T480s Power Button Board Replacement: stap 30, afbeelding 3 van 3
    • Use a connector puller or spudger to disconnect the coin cell battery from the board and pull the cable from the notch.

  31. Lenovo ThinkPad T480s Power Button Board Replacement: stap 31, afbeelding 1 van 3 Lenovo ThinkPad T480s Power Button Board Replacement: stap 31, afbeelding 2 van 3 Lenovo ThinkPad T480s Power Button Board Replacement: stap 31, afbeelding 3 van 3
    • Use the spudger to disconnect the trackpad cable, the Hall sensor cable, and the smart card reader cable from the motherboard.

  32. Lenovo ThinkPad T480s Power Button Board Replacement: stap 32, afbeelding 1 van 3 Lenovo ThinkPad T480s Power Button Board Replacement: stap 32, afbeelding 2 van 3 Lenovo ThinkPad T480s Power Button Board Replacement: stap 32, afbeelding 3 van 3
    • Disconnect the USB Card cable from the motherboard using the spudger.

  33. Lenovo ThinkPad T480s Power Button Board Replacement: stap 33, afbeelding 1 van 2 Lenovo ThinkPad T480s Power Button Board Replacement: stap 33, afbeelding 2 van 2
    • Use the spudger to disconnect the power button cable from the motherboard.

  34. Lenovo ThinkPad T480s Power Button Board Replacement: stap 34, afbeelding 1 van 2 Lenovo ThinkPad T480s Power Button Board Replacement: stap 34, afbeelding 2 van 2
    • Use the Phillips #1 screwdriver to remove the 4.6 mm screw from the USB-C bracket.

  35. Lenovo ThinkPad T480s Power Button Board Replacement: stap 35, afbeelding 1 van 2 Lenovo ThinkPad T480s Power Button Board Replacement: stap 35, afbeelding 2 van 2
    • Lift the USB-C bracket from the system.

  36. Lenovo ThinkPad T480s Power Button Board Replacement: stap 36, afbeelding 1 van 2 Lenovo ThinkPad T480s Power Button Board Replacement: stap 36, afbeelding 2 van 2
    • Use the Phillips #1 screwdriver to remove the 4.7 mm screw from the trap door.

  37. Lenovo ThinkPad T480s Power Button Board Replacement: stap 37, afbeelding 1 van 2 Lenovo ThinkPad T480s Power Button Board Replacement: stap 37, afbeelding 2 van 2
    • Lift the trap door out.

  38. Lenovo ThinkPad T480s Power Button Board Replacement: stap 38, afbeelding 1 van 2 Lenovo ThinkPad T480s Power Button Board Replacement: stap 38, afbeelding 2 van 2
    • Remove the 4.4 mm screw from the HDMI bracket using the Phillips #1 screwdriver.

  39. Lenovo ThinkPad T480s Power Button Board Replacement: stap 39, afbeelding 1 van 3 Lenovo ThinkPad T480s Power Button Board Replacement: stap 39, afbeelding 2 van 3 Lenovo ThinkPad T480s Power Button Board Replacement: stap 39, afbeelding 3 van 3
    • Remove the HDMI bracket from the motherboard using your fingers.

  40. Lenovo ThinkPad T480s Power Button Board Replacement: stap 40, afbeelding 1 van 3 Lenovo ThinkPad T480s Power Button Board Replacement: stap 40, afbeelding 2 van 3 Lenovo ThinkPad T480s Power Button Board Replacement: stap 40, afbeelding 3 van 3
    • Using the Phillips #1 screwdriver, remove four 3.1 mm screws from the motherboard.

  41. Lenovo ThinkPad T480s Power Button Board Replacement: stap 41, afbeelding 1 van 2 Lenovo ThinkPad T480s Power Button Board Replacement: stap 41, afbeelding 2 van 2
    • Lift the motherboard from the chassis to remove it from the device.

  42. Lenovo ThinkPad T480s Power Button Board Replacement, Power Button Board: stap 42, afbeelding 1 van 2 Lenovo ThinkPad T480s Power Button Board Replacement, Power Button Board: stap 42, afbeelding 2 van 2
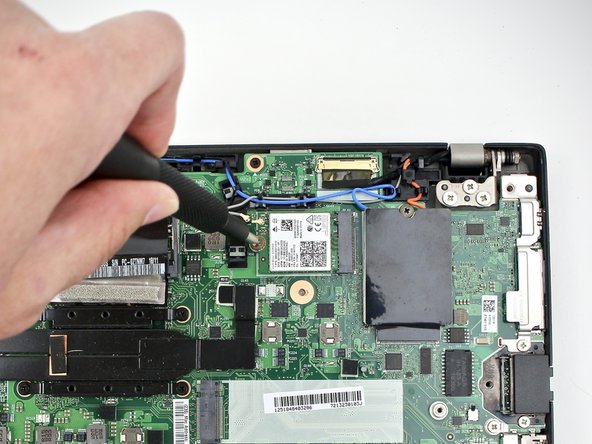
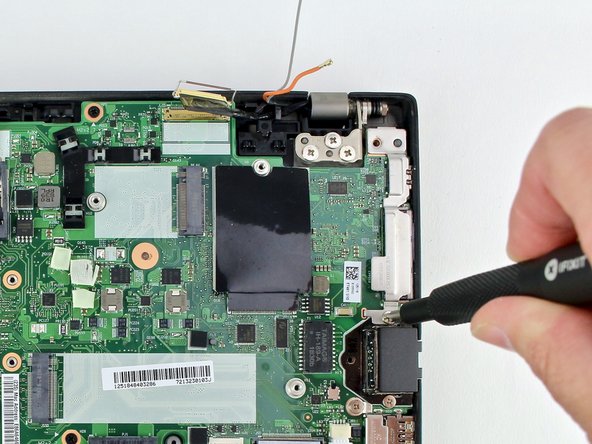
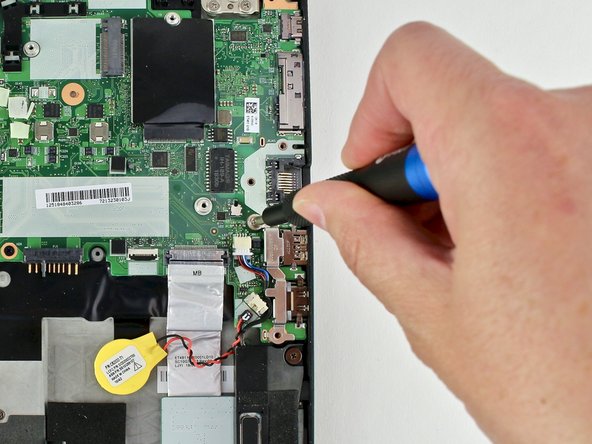
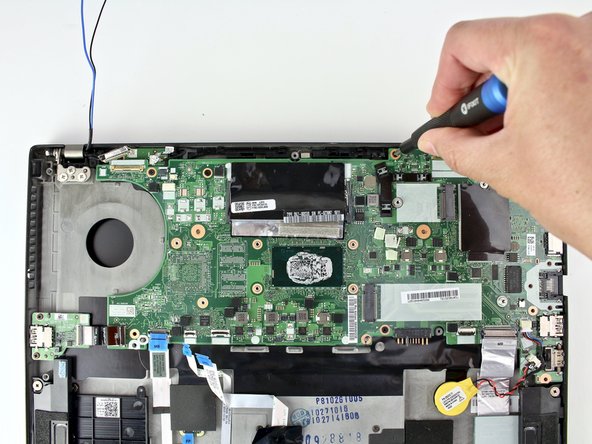
    • Use the Phillips #1 screwdriver to remove a 3 mm screw from the board.

  43. Lenovo ThinkPad T480s Power Button Board Replacement: stap 43, afbeelding 1 van 2 Lenovo ThinkPad T480s Power Button Board Replacement: stap 43, afbeelding 2 van 2
    • Remove the power button board from the system with your fingers.

Conclusie

To reassemble your device, follow these instructions in reverse order.

Take your e-waste to an R2 or e-Stewards certified recycler.

Repair didn’t go as planned? Try some basic troubleshooting, or ask our Answers community for help.

Sarah Westberg

Lid sinds: 03/11/19

23.201 Reputatie

70 handleidingen geschreven

Team

iFixit Lid van iFixit

Staff

135 Leden

17.189 handleidingen geschreven

0 opmerkingen

Voeg opmerking toe

Weergavestatistieken:

Afgelopen 24 uren: 0

Afgelopen 7 dagen: 4

Afgelopen 30 dagen: 30

Altijd: 1,100