
Lenovo Legion Y530-15ICH Fan Replacement

Inleiding
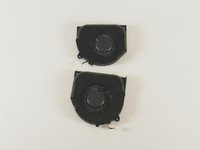
Ga naar stap 1Replacing faulty fans is essential to keeping your computer’s insides working. This guide details how to remove the fans to either clean or replace them to ensure the processor does not overheat.
Wat je nodig hebt
Onderdelen

Gereedschap


Toon meer…
-
-
Use a PZ00 screwdriver bit to remove the eleven screws securing the back cover.
-
Five 7mm screws
-
Two 6mm screws
-
Four 4mm screws
-
-
-
-
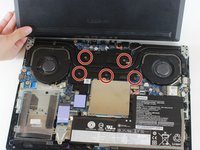
Use a JIS #1 screwdriver to loosen the five spring screws located at the middle of the fan piece.
-
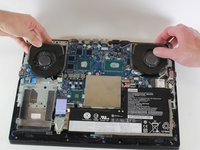
Remove the plastic covering after the screws have been loosened.
-


To reassemble your device, follow these instructions in reverse order.
To reassemble your device, follow these instructions in reverse order.
Annuleren: ik heb deze handleiding niet afgemaakt.
6 andere personen hebben deze handleiding voltooid.

Team

Cal Poly, Team S7-G1, Regan Winter 2020 Lid van Cal Poly, Team S7-G1, Regan Winter 2020
CPSU-REGAN-W20S7G1
4 Leden
12 handleidingen geschreven
4 opmerkingen
Thank you! Very clear and well photographed :)
Any recommended stores for the replacement fans?
Worked like a charm, thank you!!
where can i get a good replacement please