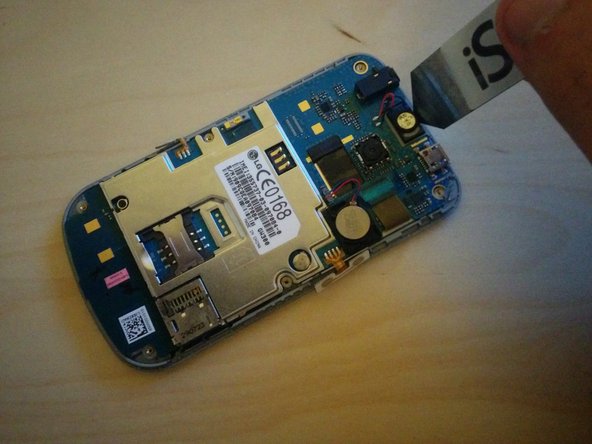
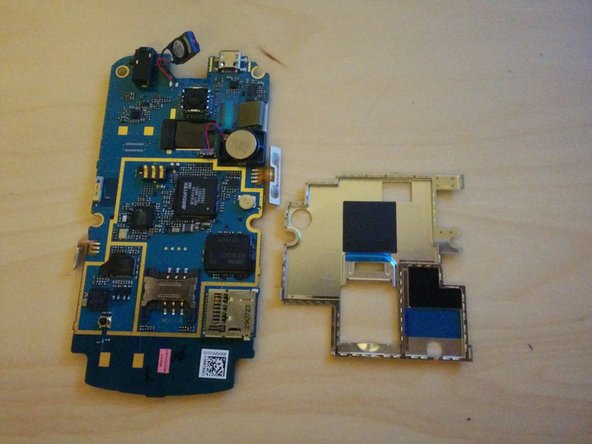
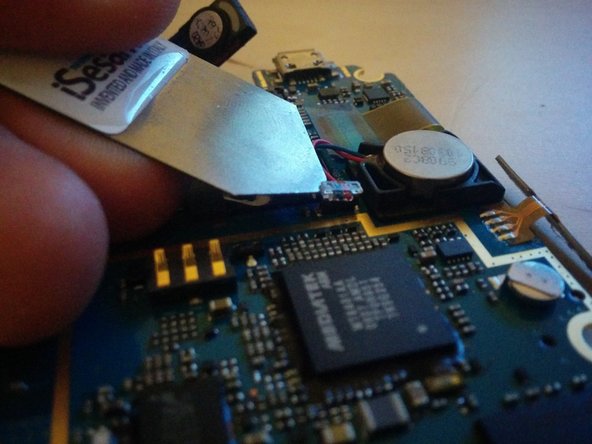
Ga door naar hoofdinhoud
Word lid van de reparatiegemeenschap - Account aanmaken

I have tried to include as much detail as possible in this teardown. I have even inspected the chips on the mainboard! Thanks for looking, and I hope you find this useful.

Wat je nodig hebt

Gereedschap

Deze demontage is geen reparatiehandleiding. Om je LG GW300 te repareren, gebruik onze reparatiehandleidingen.

  1. LG GW300 Teardown, LG GW300 Teardown: stap 1, afbeelding 1 van 1
    • Found this phone lying around, so decided to make a teardown of it!

  2. LG GW300 Teardown: stap 2, afbeelding 1 van 1
    • First, remove the backplate by pushing the button at the top of the back of the phone.

  3. LG GW300 Teardown: stap 3, afbeelding 1 van 3 LG GW300 Teardown: stap 3, afbeelding 2 van 3 LG GW300 Teardown: stap 3, afbeelding 3 van 3
    • From here there are six screws we have to remove.

    • But first... lemme take a battery out!

  4. LG GW300 Teardown: stap 4, afbeelding 1 van 1
    • Get a thin opening tool and slide it around the bezel of the device.

    • Make sure you put it in the correct place, behind the silver bezel of the front of the phone!

  5. LG GW300 Teardown: stap 5, afbeelding 1 van 1
    • The front and back of the device should separate.

    • Two buttons should come off after you have removed the back.

    • This is the rear speaker.

  6. LG GW300 Teardown: stap 6, afbeelding 1 van 3 LG GW300 Teardown: stap 6, afbeelding 2 van 3 LG GW300 Teardown: stap 6, afbeelding 3 van 3
    • Both of these buttons need to be pried from the front casing to allow the mainboard to come away from the front housing.

    • These buttons are soldered to the mainboard so make sure you don't break them!

    • The front speaker also has to be pried from the front housing.

  7. LG GW300 Teardown: stap 7, afbeelding 1 van 2 LG GW300 Teardown: stap 7, afbeelding 2 van 2
    • The main board can then be lifted from the front housing.

  8. LG GW300 Teardown: stap 8, afbeelding 1 van 1
    • The buttons on the front housing can then be pushed out through the back of the housing.

  9. LG GW300 Teardown: stap 9, afbeelding 1 van 2 LG GW300 Teardown: stap 9, afbeelding 2 van 2
    • The EMI shield can be removed by unclipping the clips on the side of the device.

  10. LG GW300 Teardown: stap 10, afbeelding 1 van 2 LG GW300 Teardown: stap 10, afbeelding 2 van 2
    • In the centre of the picture is the vibration module. It can be unclipped to remove it.

  11. LG GW300 Teardown: stap 11, afbeelding 1 van 3 LG GW300 Teardown: stap 11, afbeelding 2 van 3 LG GW300 Teardown: stap 11, afbeelding 3 van 3
    • The LCD ribbon cable and connector are under a plastic sheet that has to be removed.

    • The ribbon cable can then be take out of the connector

    • The ribbon connector is very fragile, so be careful when lifting the lever.

  12. LG GW300 Teardown: stap 12, afbeelding 1 van 2 LG GW300 Teardown: stap 12, afbeelding 2 van 2
    • Use a thin opening tool to separate the LCD from the main board.

    • Do this slowly and carefully as the screen can easily crack or bleed.

  13. LG GW300 Teardown: stap 13, afbeelding 1 van 1
    • Chip inspection time!

    • Mediatek ARM MT6A01AA

    • Samsung K5D1H12ACC-A075 NAND flash memory

    • Skyworks Solutions SKY77524-15

    • CSR 51E130A14U

James

Lid sinds: 09/30/12

185 Reputatie

1 Handleiding geschreven

1Gids Commentaar

Now if only I could find the datasheet/pinout for the "Mediatek ARM MT6A01AA"...

River Saxton - Antwoord

Voeg opmerking toe

Weergavestatistieken:

Afgelopen 24 uren: 1

Afgelopen 7 dagen: 4

Afgelopen 30 dagen: 6

Altijd: 1,467