Inleiding
Use this guide for replacing the keyboard on a Kindle 3. The guide shows how to disassemble the device to replace the damaged keyboard.
Wat je nodig hebt
-
-
Turn the device upside-down and insert a pry tool between the two case pieces.
-
Work the pry tool around the edge of the case, releasing the 18 clips. Don't insert your tool too far, or you may damage components near the edges of the device. The clips are all in the outer edge of the backplate anyway. Note that the clip above the power switch is bigger and stronger than the rest.
-
Pull the rear cover off. The remaining two clips near the center of the back are surprisingly strong, but they face in the same direction so don't just pull up. Instead slide the cover slightly towards the top of device to release them.
-
-
-
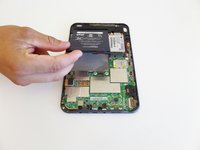
Unscrew the two silver 4 mm Phillips screws securing the battery connector.
-
Set the screws aside in a safe place -- there are exposed components and it's easy for them to short-circuit something.
-
-
-
Lift battery out of housing starting at the end that was secured by the screws.
-
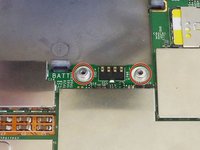
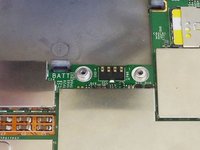
Watch out for the odd-shaped silver washers beneath the battery connector (see second photo); they are necessary for proper mating of the electrical contacts when the screws are re-tightened.
The washer came loose. Will it be ok?
I lost one of the washers. What do they do and where can I buy one? What’s the specific name for it?
They hold the battery flat. Without it pulls the battery into a curve. I have plenty of spare parts, including motherboards, both Wi-Fi and 3G. I’m in the UK
This helped me change my Kindle Keyboards battery easily. Thank you!
In my case, battery died. I replaced it with a spare pouch li-ion I had - the thing is, this battery communicates it's status through I2C, so I had to crank it open to separate the PCB from the actual battery. After doing so, I only had to solder the new battery between + and -, close up and it worked like a charm 😀
-
-
-
-
Remove six silver Phillips screws from the locations shown.
The components look slightly different from mine, eg there is a plastic covering the hard drive. what model is yours?
-
-
-
Lifting from the top edge, slide the entire motherboard and midframe assembly together away from the bottom edge of the Kindle, and remove it carefully.
When lifting it out, it seemed to be affixed to something at the far bottom right corner (relative to the above photo), and required a bit of tugging before popping free, which was a bit alarming. Not sure where it was stuck. Was definitely lifting it away from the base first before lifting too far up.
Also this is a good point to be reminded not to lose the little battery washers from earlier (step 3) if you decided to be smart and leave them on the board! Remove them and place them with the screws.
-
-
-
Replace the damaged keyboard.
-


To reassemble your device, follow these instructions in reverse order.
To reassemble your device, follow these instructions in reverse order.
Annuleren: ik heb deze handleiding niet afgemaakt.
9 andere personen hebben deze handleiding voltooid.
Team

CSU Fullerton, Team 1-5, Bruce Fall 2014 Lid van CSU Fullerton, Team 1-5, Bruce Fall 2014
CSUF-BRUCE-F14S1G5
4 Leden
15 handleidingen geschreven
4 opmerkingen
It works, but seriously overdoes the dismantling required . I just did this on a wifi 3g version (serial number started with B00A) and it took less than 30 minutes.
Steps 2,3 and 4 .You don't need to remove the silver screws holding the battery, the 3g unit or the inner ones on the black bit at lower right. None of them hold the board to the case, but ALL the grey screws do.
Step 5 You only need to undo the ribbon cable to the screen (marked orange) - the others don't need disturbing and are hard to put back correctly.
Steps 6 & 7 - Skip these.
Step 8 - the whole board lifts out - start at the top and be gentle - in case you've missed a screw or two.
Rebuilding - best to test before putting all the screws back, and refit the back starting at the switch end rather than the top or sides.
Thanks for the guide. Used to strip down a device saturated with suntan lotion. Per Dave’s comments I skipped detaching the extra ribbon connectors, but needed to take out most of the silver screws to get the main boards apart. I also wanted to detach the battery before wading in with contact cleaner and baby buds. Now back working a treat. Daniel
This guide no longer includes any extra/unnecessary steps—the above comments refer to an old version of the guide.
Ah, I put it on in the wrong order, then figured out that starting at the bottom works best. I did the bottom, top and corners and then the sides, because I already had the top done.
kwood - Antwoord
BE VERY CAREFUL HERE!! 15mm below the "next page" button was directly where the flex cable was. And it is an extremely fragile cable, even for flex cables. Which means I, of course, tore right through it without knowing until I got the cover off. So don't do that. Start 15mm above the lower corner, if anything, or start on the opposite side. Starting on the side with a single-point-of-failure is a really risky choice. The opposite side has basically nothing up against the edge, so you're free to poke it.
The other thing that isn't stated here is that the flex cable is inherently tied into the screen. Which means that if you, like me, damage that cable, the entire screen now broken and needs replacing. And if you, like me, was just trying to replace the battery or the motherboard, now it just makes sense to replace the entire device, both environmentally and financially. Whomp whomp.
bhurwitz - Antwoord
As is, the guide sets you up SPECIFICALLY to DAMAGE THE SCREEN by prying into its very delicate ribbon cable.
A Kenny - Antwoord
Apart from the buttons, are there any other specific places where we shouldn't pry, because it would damage something?
okojoijohoij - Antwoord
There are clips a several centimeters from the edge of the Kindle across from the page-turning buttons. Undoing these clips was the most difficult part of opening the back of the Kindle. Be careful and take your time here.
It's a good idea to start on at the left page-turning button to help minimize risk of damage to the flex cable.
John Thoreson - Antwoord
I've submitted an edit clearing up where to start the pry tool. Please folks, if you encounter something like this don't hesitate to remove bad information! With the contradictory instructions here I ended up starting on the left and piercing the cable like so many before me, which is very frustrating.
Jakob C - Antwoord
Die Anleitung sollte in diesem Punkt wirklich überarbeitet werden. Das ist die absolut gefährlichste Stelle, das Gerät zu öffnen. So habe ich das Flex-Kabel eines funktionierenden Displays zerstört. Ich schreibe dies auf Deutsch und bitte darum, die englischen Erläuterungen zu lesen, wo man besser öffnet.
Kajetan Hinner - Antwoord
I submitted an edit adding that the corners are another good place to start (it's how I just opened mine with no trouble) and moved the ribbon cable warning up to make sure people see it.
Neal Sofge - Antwoord
Regarding two last (central) clips, it helps to know they both are facing the same way and after releasing the outer clips you can slide the back cover slightly towards the top of device to release them.
Konrad Grzegorzewicz - Antwoord