Ga door naar hoofdinhoud
Huawei Mate 10 Pro Charging Port Replacement

Huawei Mate 10 Pro Charging Port Replacement

Dominik Schnabelrauch

Dominik Schnabelrauch en 3 andere bijdragers

Voor het laatst geüpdatet op June 20, 2024

45 minuten - 1 uur
Gemiddeld

Use this guide to replace the charging port in your Huawei Mate 10 Pro smartphone.

Wat je nodig hebt

Gereedschap

Toon meer…

  1. Huawei Mate 10 Pro Charging Port Replacement, Back Cover: stap 1, afbeelding 1 van 1
    • Switch off your phone.

    • Prepare an iOpener and apply it to the back of the phone for about two minutes to loosen the adhesive beneath the back cover.

  2. Huawei Mate 10 Pro Charging Port Replacement: stap 2, afbeelding 1 van 3 Huawei Mate 10 Pro Charging Port Replacement: stap 2, afbeelding 2 van 3 Huawei Mate 10 Pro Charging Port Replacement: stap 2, afbeelding 3 van 3
    Gereedschap gebruikt in deze stap:
    Halberd Spudger
    $2.99
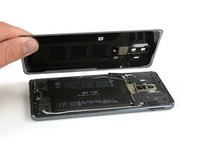
    • Lift up the back cover with a suction cup until you can insert the flat end of a halberd spudger.

    • Use the halberd spudger to cut the adhesive beneath the back cover on all sides of the phone.

    • Use opening picks to avoid the adhesive from sticking to the back cover again while cutting the adhesive on all sides.

  3. Huawei Mate 10 Pro Charging Port Replacement: stap 3, afbeelding 1 van 2 Huawei Mate 10 Pro Charging Port Replacement: stap 3, afbeelding 2 van 2
    • Don't remove the back cover all the way, yet. The fingerprint sensor cable is still connected to motherboard.

    • Flip the back cover over to the side.

    • Remove the Phillips #00 screw which holds down the metal shield, sitting on top of the connection of the fingerprint sensor cable.

  4. Huawei Mate 10 Pro Charging Port Replacement: stap 4, afbeelding 1 van 2 Huawei Mate 10 Pro Charging Port Replacement: stap 4, afbeelding 2 van 2
    Gereedschap gebruikt in deze stap:
    Tweezers
    $4.99
    • Use a pair tweezers to remove the metal shield covering the connector of the fingerprint sensor.

    • Disconnect the fingerprint sensor cable with a spudger.

    • When reassembling your phone apply new adhesive where it is necessary.

  5. Huawei Mate 10 Pro Charging Port Replacement, Shields: stap 5, afbeelding 1 van 3 Huawei Mate 10 Pro Charging Port Replacement, Shields: stap 5, afbeelding 2 van 3 Huawei Mate 10 Pro Charging Port Replacement, Shields: stap 5, afbeelding 3 van 3
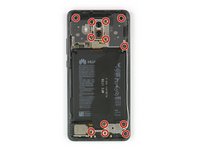
    • Remove the twelve Phillips #00 screws.

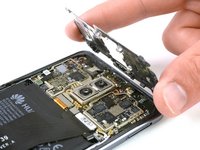
    • Carefully remove the shields on top of the motherboard and the charging board.

    • In case the shields do not pop out easily on their own after you removed the Phillips screws, you can use the pointed end of a spudger to pry them out.

  6. Huawei Mate 10 Pro Charging Port Replacement, Charging Port: stap 6, afbeelding 1 van 2 Huawei Mate 10 Pro Charging Port Replacement, Charging Port: stap 6, afbeelding 2 van 2
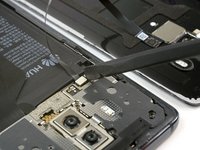
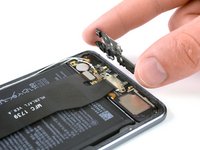
    • Use a spudger to disconnect the charging port flex cable from the motherboard and from the daughterboard.

  7. Huawei Mate 10 Pro Charging Port Replacement: stap 7, afbeelding 1 van 2 Huawei Mate 10 Pro Charging Port Replacement: stap 7, afbeelding 2 van 2
    Gereedschap gebruikt in deze stap:
    Tweezers
    $4.99
    • Use a pair of tweezers to carefully remove the charging port including its flex cable.

    • The charging port sits tightly in its recess. In case you have trouble removing it, use the flat end of a halberd spudger to pry it out.

Conclusie

To reassemble your device, follow these instructions in reverse order.

18 andere personen hebben deze handleiding voltooid.

Dominik Schnabelrauch

Lid sinds: 11/23/16

229.657 Reputatie

682 handleidingen geschreven

Team

iFixit Lid van iFixit

Staff

118 Leden

19.474 handleidingen geschreven

2 opmerkingen

Great tutorial! It has been a month without being able to charge my phone, and now it charges 2x as fast with my repair.

Bruce Panagopoulos - Antwoord

I recommend testing the USB C flex cable assembly before you reassemble the phone. As soon as it’s connected to the upper connector and the battery is plugged in the phone should be charging. Mine was broken from the factory but I went to a great local repair shop and got a new one, the guy said 1 out of 15 is broken from the factory. Great tutorial, successful repair.

Martin Olsson - Antwoord

Voeg opmerking toe

Weergavestatistieken:

Afgelopen 24 uren: 6

Afgelopen 7 dagen: 42

Afgelopen 30 dagen: 115

Altijd: 17,092