
Honeywell Pro 3000 Non-Programmable Thermostat Replacement
Inleiding
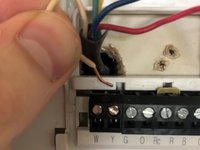
Ga naar stap 1This guide is to help replace and install an older thermostat with Honeywell Pro 3000 Non-Programmable Thermostat. This guide is important because a thermostat controls your heat and cooling systems and if these processes are being distributed correctly they can cost you more money in utilities. Before doing anything make sure the power to your thermostat is off to avoid any electrical hazard. When completing this process if you do not want to use batteries for your thermostat, connecting the blue wire to the blue terminal works as an alternative.
Wat je nodig hebt
Onderdelen
Gereedschap


Toon meer…
-
-
Find which switch on your circuit breaker is associated with your heating system. The number will match the number next to the breaker.
-
Turn the switch from on to off. Disconnecting the electricity to the thermostat.
-
-


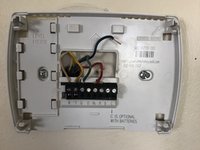


If the thermostat is not functioning as intended, take apart and reinstall making sure wire connections are secure.
If the thermostat is not functioning as intended, take apart and reinstall making sure wire connections are secure.
Team

Purdue University Northwest, Team S1-G10, Hingst Spring 2020 Lid van Purdue University Northwest, Team S1-G10, Hingst Spring 2020
PNW-HINGST-S20S1G10
1 Lid
1 handleiding geschreven