Ga door naar hoofdinhoud
Honeywell HY-204 Rotation Button Replacement

Honeywell HY-204 Rotation Button Replacement

Nolan Ernotte

Nolan Ernotte en 4 andere bijdragers

Voor het laatst geüpdatet op September 3, 2019

15 - 20 minuten
Moeilijk

This guide shows how to replace the rotation button that controls the oscillation of your fan. Replacing the rotation button requires soldering, so it may be a little tricky for those of you who are inexperienced with soldering.

Wat je nodig hebt

Gereedschap

Toon meer…

  1. Honeywell HY-204 Rotation Button Replacement, Case: stap 1, afbeelding 1 van 2 Honeywell HY-204 Rotation Button Replacement, Case: stap 1, afbeelding 2 van 2
    • Before you begin, be sure to unplug the fan.

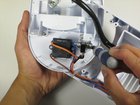
    • Remove the four 14 mm screws from the back of the device using the Phillips #0 Screwdriver.

  2. Honeywell HY-204 Rotation Button Replacement: stap 2, afbeelding 1 van 2 Honeywell HY-204 Rotation Button Replacement: stap 2, afbeelding 2 van 2
    • Pull the front and back parts of the case away from each other until the back is free from the front. This may require a large amount of force.

  3. Honeywell HY-204 Rotation Button Replacement, Control Panel: stap 3, afbeelding 1 van 2 Honeywell HY-204 Rotation Button Replacement, Control Panel: stap 3, afbeelding 2 van 2
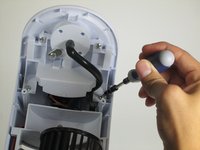
    • Remove the two 3mm screws found just below the top of the device using the Phillips #0 Screwdriver.

  4. Honeywell HY-204 Rotation Button Replacement: stap 4, afbeelding 1 van 1
    • Pry off the control panel by forcefully lifting the tab located inside the front of the fan with the plastic opening tool.

  5. Honeywell HY-204 Rotation Button Replacement, Rotation Button: stap 5, afbeelding 1 van 2 Honeywell HY-204 Rotation Button Replacement, Rotation Button: stap 5, afbeelding 2 van 2
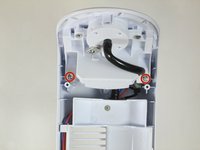
    • Remove the two 10mm Phillips #0 screws that are located next to the rotation button.

  6. Honeywell HY-204 Rotation Button Replacement: stap 6, afbeelding 1 van 1
    • Peel back the heat shrink tubing on both wires connecting to the button.

  7. Honeywell HY-204 Rotation Button Replacement: stap 7, afbeelding 1 van 1
    • Caution The soldering iron is very hot, be careful to avoid burns.

    • Desolder the two wires connected to the button and remove the button.

Conclusie

To reassemble your device, follow these instructions in reverse order.

Nolan Ernotte

Lid sinds: 10/14/14

384 Reputatie

3 handleidingen geschreven

Team

Cal Poly, Team 10-40, Amido Fall 2014 Lid van Cal Poly, Team 10-40, Amido Fall 2014

CPSU-AMIDO-F14S10G40

3 Leden

7 handleidingen geschreven

0 opmerkingen

Voeg opmerking toe

Weergavestatistieken:

Afgelopen 24 uren: 1

Afgelopen 7 dagen: 2

Afgelopen 30 dagen: 3

Altijd: 988