Ga door naar hoofdinhoud
Fujifilm FinePix HS30EXR Frame Replacement

Fujifilm FinePix HS30EXR Frame Replacement

Andrew Scouten

Andrew Scouten en 6 andere bijdragers

Voor het laatst geüpdatet op January 5, 2024

5 minuten
Gemiddeld

This guide serves as a tear-down of the frame and is meant to be used with the intention of removing it. This action is needed to access the inside components.

Warning: The frame may be damaged in this process, as well as the ribbon cable that connects the motherboard with the LCD Screen. Be very careful with the removal of the frame to avoid any damage.

Wat je nodig hebt

Gereedschap

  1. Fujifilm FinePix HS30EXR Frame Replacement, Frame: stap 1, afbeelding 1 van 1
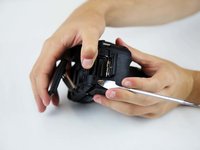
    • Flip the camera so that the bottom is facing upwards.

    • With the Phillips #00 screwdriver, remove all four screws.

  2. Fujifilm FinePix HS30EXR Frame Replacement: stap 2, afbeelding 1 van 1
    • Flip the camera so that it is now on the right side.

    • With the Phillips #00 screwdriver, remove all four screws.

  3. Fujifilm FinePix HS30EXR Frame Replacement: stap 3, afbeelding 1 van 1
    • Flip the camera so that it is now on the left side.

    • Move or remove the flap hiding the camera ports.

    • With the Phillips #00 screwdriver, remove all screws.

  4. Fujifilm FinePix HS30EXR Frame Replacement: stap 4, afbeelding 1 van 1
    • Flip the camera so that it is now on the top side.

    • With a spudger, pry off the highlighted metal piece of the camera.

  5. Fujifilm FinePix HS30EXR Frame Replacement: stap 5, afbeelding 1 van 1
    • With the Phillips #00 screwdriver, remove all four screws.

  6. Fujifilm FinePix HS30EXR Frame Replacement: stap 6, afbeelding 1 van 1
    • Pull the LCD screen up and out of the way.

    • With the Phillips #00 screwdriver, remove the screws.

  7. Fujifilm FinePix HS30EXR Frame Replacement: stap 7, afbeelding 1 van 2 Fujifilm FinePix HS30EXR Frame Replacement: stap 7, afbeelding 2 van 2
    • With a spudger, pry off the frame.

    • If the frame does not easily dislodge after a few attempts, ensure that all screws are taken out.

Conclusie

To reassemble your device, follow these instructions in reverse order.


Andrew Scouten

Lid sinds: 10/22/18

838 Reputatie

5 handleidingen geschreven

Team

Baylor, Team S1-G2, Williams Fall 2018 Lid van Baylor, Team S1-G2, Williams Fall 2018

BU-WILLIAMS-F18S1G2

4 Leden

12 handleidingen geschreven

0 opmerkingen

Voeg opmerking toe

Weergavestatistieken:

Afgelopen 24 uren: 0

Afgelopen 7 dagen: 3

Afgelopen 30 dagen: 14

Altijd: 777