Ga door naar hoofdinhoud
Epson Stylus NX240 Side Buttons Replacement

Epson Stylus NX240 Side Buttons Replacement

Joshua Fabel

Joshua Fabel en 2 andere bijdragers

Voor het laatst geüpdatet op March 31, 2023

15 - 30 minuten
Gemiddeld
Heeft betere plaatjes nodig

The buttons located on the side panel of the printer help communicate with functions that need to be performed such as scanning, copying, printing photos and turning the device on and off. Sometimes these buttons get stuck and need to be cleaned or replaced.

Wat je nodig hebt

Gereedschap

Toon meer…

  1. Epson Stylus NX240 Side Buttons Replacement, Side Buttons: stap 1, afbeelding 1 van 2 Epson Stylus NX240 Side Buttons Replacement, Side Buttons: stap 1, afbeelding 2 van 2
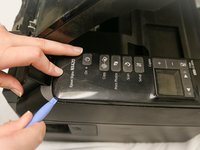
    • Go to the left side of the printer and locate the control panel with the buttons on it.

    • Take a plastic opening tool and stick it in the crack between the top of the panel and the body of the printer.

    • Pry the cover of the panel away from the body of the printer until the panel releases from the body of the printer.

  2. Epson Stylus NX240 Side Buttons Replacement: stap 2, afbeelding 1 van 1
    • Carefully lift up the panel cover and turn it to its side so that the buttons are facing towards the rest of the printer.

    • Notice that the panel cover is attached to the printer with a ribbon cable. The ribbon cable must stay connected to the body of the printer or else the buttons will be unresponsive once replaced.

  3. Epson Stylus NX240 Side Buttons Replacement: stap 3, afbeelding 1 van 1
    • Remove the six 3mm Phillips #2 screws connecting the control panel to the circuit board.

  4. Epson Stylus NX240 Side Buttons Replacement: stap 4, afbeelding 1 van 1
    • After unscrewing, carefully lift the plastic part of the control panel away from the circuit board.

    • The plastic part of the control panel is now separate.

  5. Epson Stylus NX240 Side Buttons Replacement: stap 5, afbeelding 1 van 1
    • Flip over the plastic part of the now separated control panel.

    • Remove the buttons by pulling them up with your fingers.

  6. Epson Stylus NX240 Side Buttons Replacement: stap 6, afbeelding 1 van 1
    • All parts should be separate now to clean or replace.

Conclusie

To reassemble your device, follow these instructions in reverse order.

Joshua Fabel

Lid sinds: 10/13/16

104 Reputatie

1 Handleiding geschreven

Team

University of Maine, Team 2-4, Diaz Fall 2016 Lid van University of Maine, Team 2-4, Diaz Fall 2016

UMAINE-DIAZ-F16S2G4

4 Leden

2 handleidingen geschreven

0 opmerkingen

Voeg opmerking toe

Weergavestatistieken:

Afgelopen 24 uren: 0

Afgelopen 7 dagen: 0

Afgelopen 30 dagen: 5

Altijd: 625