Ga door naar hoofdinhoud
Ecovacs Deebot 900 Wheel Replacement

Ecovacs Deebot 900 Wheel Replacement

Christina Corliss

Christina Corliss en 8 andere bijdragers

Voor het laatst geüpdatet op January 10, 2025

30 - 40 minuten
Moeilijk
Heeft betere plaatjes nodig
Ontbrekende informatie

The Ecovacs Deebot 900 is a highly efficient autonomous vacuum robot designed to make cleaning your home easier and more convenient. With its smart navigation and powerful cleaning capabilities, it ensures a spotless living space with minimal effort. However, like any device, it can encounter issues over time, such as jammed or malfunctioning wheels. When this happens, the Deebot may struggle to move effectively, preventing it from completing its cleaning tasks. To restore its functionality and keep your home tidy, this guide will walk you through the process of replacing a damaged wheel on the Ecovacs Deebot 900. By following these steps, you can ensure your Deebot continues to perform at its best.

Wat je nodig hebt

Onderdelen

Gereedschap

Toon meer…

iFixit krijgt commissie als je dingen koopt via deze links.
  1. Ecovacs Deebot 900 Wheel Replacement, Battery: stap 1, afbeelding 1 van 1
    • Remove all the brushes from the Deebot.

  2. Ecovacs Deebot 900 Wheel Replacement: stap 2, afbeelding 1 van 1
    • Using a Phillips #0 screwdriver, remove the two 12.25 mm screws holding the battery cover in place.​

  3. Ecovacs Deebot 900 Wheel Replacement: stap 3, afbeelding 1 van 1
    • Remove the battery cover.

  4. Ecovacs Deebot 900 Wheel Replacement: stap 4, afbeelding 1 van 1
    • Using the two white straps on the sides of the battery, gently remove the battery. ​

    • Be careful not to rip out the battery cable.

  5. Ecovacs Deebot 900 Wheel Replacement: stap 5, afbeelding 1 van 1
    • Carefully disconnect the battery cable by pulling near the connector at the bottom of the battery compartment.

  6. Ecovacs Deebot 900 Wheel Replacement, Front Bumper: stap 6, afbeelding 1 van 2 Ecovacs Deebot 900 Wheel Replacement, Front Bumper: stap 6, afbeelding 2 van 2
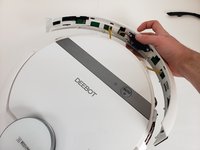
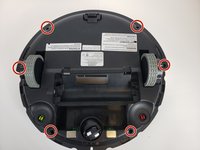
    • Using a Phillips #00 screwdriver, remove the eight screws on the bottom edge of the bumper. ​

  7. Ecovacs Deebot 900 Wheel Replacement: stap 7, afbeelding 1 van 1
    • Remove the black strip on the bottom of the bumper.

  8. Ecovacs Deebot 900 Wheel Replacement: stap 8, afbeelding 1 van 2 Ecovacs Deebot 900 Wheel Replacement: stap 8, afbeelding 2 van 2
    • Carefully lift up the bumper untill it pops out of place.​

  9. Ecovacs Deebot 900 Wheel Replacement: stap 9, afbeelding 1 van 2 Ecovacs Deebot 900 Wheel Replacement: stap 9, afbeelding 2 van 2
    • Disconnect the two cables connecting the bumper to the body of the Deebot.

    • Remove the front bumper from the device.

  10. Ecovacs Deebot 900 Wheel Replacement, Bottom Case: stap 10, afbeelding 1 van 2 Ecovacs Deebot 900 Wheel Replacement, Bottom Case: stap 10, afbeelding 2 van 2
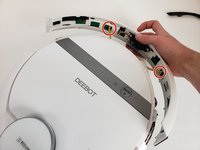
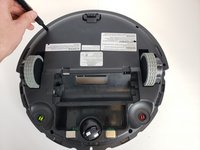
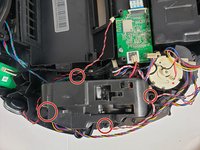
    • Using a Phillips #00 screwdriver, take out the six screws around the perimeter of the bottom case.

  11. Ecovacs Deebot 900 Wheel Replacement: stap 11, afbeelding 1 van 2 Ecovacs Deebot 900 Wheel Replacement: stap 11, afbeelding 2 van 2
    • Insert a Jimmy into the seam and work all the way around the robot.

    • Disconnect the two cables and remove the bottom case from the device.

  12. Ecovacs Deebot 900 Wheel Replacement, Motherboard: stap 12, afbeelding 1 van 1
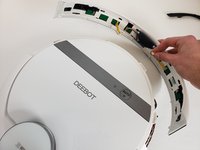
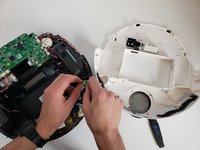
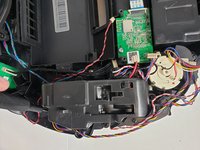
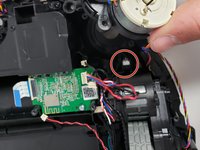
    • Using a Phillips #00 screwdriver, remove the two black screws holding the motherboard in place.​

  13. Ecovacs Deebot 900 Wheel Replacement: stap 13, afbeelding 1 van 1
    • Carefully remove the ribbon cables connected to the top of motherboard.

    • Keep track of where the cables connect to the motherboard.

  14. Ecovacs Deebot 900 Wheel Replacement: stap 14, afbeelding 1 van 1
    • Remove the last three ribbon cables on the underside of the motherboard.​

  15. Ecovacs Deebot 900 Wheel Replacement: stap 15, afbeelding 1 van 1
    • Lift the motherboard out of the Deebot and remove it from the device.

  16. Ecovacs Deebot 900 Wheel Replacement, Wheel: stap 16, afbeelding 1 van 1
    Gereedschap gebruikt in deze stap:
    Tweezers
    $4.99
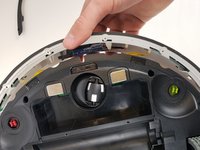
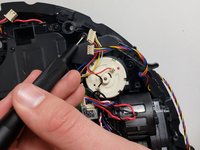
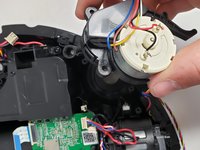
    • Using a screwdriver or tweezers, Gently lift the spring upward, ensuring not to apply excessive force that could damage surrounding components. Once the spring is loosened, grip it securely and pull it off from one side, allowing the tension to release naturally. Take care to note the spring’s orientation and placement for reassembly later.

  17. Ecovacs Deebot 900 Wheel Replacement: stap 17, afbeelding 1 van 2 Ecovacs Deebot 900 Wheel Replacement: stap 17, afbeelding 2 van 2
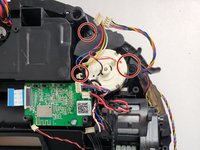
    • Using a Phillips #00 screwdriver, remove the four screws securing the wheel assembly in place. Begin by loosening each screw slightly to evenly distribute pressure, then fully unscrew them one at a time. Be sure to set the screws aside in a safe location for reassembly later. Gently lift the wheel assembly out of its housing.

  18. Ecovacs Deebot 900 Wheel Replacement: stap 18, afbeelding 1 van 1
    • Gently pry off the wheel cover using your fingers or a plastic tool, applying light pressure to release it. Set the cover aside for reassembly.

  19. Ecovacs Deebot 900 Wheel Replacement: stap 19, afbeelding 1 van 3 Ecovacs Deebot 900 Wheel Replacement: stap 19, afbeelding 2 van 3 Ecovacs Deebot 900 Wheel Replacement: stap 19, afbeelding 3 van 3
    • Using the Phillips #00 screwdriver, remove the three screws holding the side brush motor in place and lift the brush motor up.

  20. Ecovacs Deebot 900 Wheel Replacement: stap 20, afbeelding 1 van 2 Ecovacs Deebot 900 Wheel Replacement: stap 20, afbeelding 2 van 2
    • Lift the wheel assembly carefully, ensuring the attached sensor (black cable) comes out with it. Handle the sensor gently to avoid damage

Conclusie

To reassemble your device, follow these instructions in reverse order.

8 andere personen hebben deze handleiding voltooid.

6Gids Commentaar

Thanks, it helps a lot

Agoston David - Antwoord

I have an OZMO 930 that the left driver wheel is stuck. I tried to follow the above instruction, but I can’t go beyond step 10, I can’t take out the cover. Any help will be greatly appreciated,

OldManInChicago - Antwoord

do you have place to buy ecovac_deebot_900_54_gear ?? I thinking on printing it but after my printed gear to papper shreder I have no hopes it will last.

Plewu Gracz - Antwoord

Thanks for the guide on the Deebot 900 wheel replacement. Though it has partially helps to resolve the problems, but unable to find a wheel replacement. Hope you can help too.

wong CS - Antwoord

The rubber tires on my Deebot have worn through. Does anybody have a source for rubber tire replacement? The company wants to sell me two entire wheel assemblies. I find that unreasonable.

akobelan - Antwoord

Voeg opmerking toe

Weergavestatistieken:

Afgelopen 24 uren: 8

Afgelopen 7 dagen: 37

Afgelopen 30 dagen: 162

Altijd: 48,209