Ga door naar hoofdinhoud

Dyson Pure Cool AM11 Base Replacement

Wat je nodig hebt

  1. Dyson Pure Cool AM11 Base Replacement, Base: stap 1, afbeelding 1 van 3 Dyson Pure Cool AM11 Base Replacement, Base: stap 1, afbeelding 2 van 3 Dyson Pure Cool AM11 Base Replacement, Base: stap 1, afbeelding 3 van 3
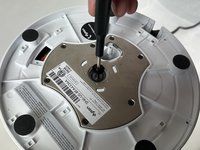
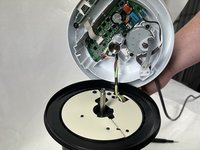
    • With the device flipped upside down, use a Phillips #1 screwdriver to remove the 4 screws holding the 3 tabs down.

  2. Dyson Pure Cool AM11 Base Replacement: stap 2, afbeelding 1 van 3 Dyson Pure Cool AM11 Base Replacement: stap 2, afbeelding 2 van 3 Dyson Pure Cool AM11 Base Replacement: stap 2, afbeelding 3 van 3
    • Remove all 3 tabs that you unscrewed.

  3. Dyson Pure Cool AM11 Base Replacement: stap 3, afbeelding 1 van 2 Dyson Pure Cool AM11 Base Replacement: stap 3, afbeelding 2 van 2
    • Using a Torx T20 Screwdriver, remove the screw in the center of the base.

    • Remove the two screws connected to the rotation arm.

  4. Dyson Pure Cool AM11 Base Replacement: stap 4, afbeelding 1 van 3 Dyson Pure Cool AM11 Base Replacement: stap 4, afbeelding 2 van 3 Dyson Pure Cool AM11 Base Replacement: stap 4, afbeelding 3 van 3
    • Lift the base of the housing from the rest of the fan.

    • Be careful not to pull too hard while lifting the lower body housing as there is wires that run throughout the housing that could be damaged if too much force is used.

Eindstreep

Gregory Crimmins

Lid sinds: 11/01/23

109 Reputatie

1 Handleiding geschreven

Team

UMass Dartmouth, Team 2-7, Gulbrandsen Fall 2023 Lid van UMass Dartmouth, Team 2-7, Gulbrandsen Fall 2023

UMASSD-GULBRANDSEN-F23S2G7

3 Leden

5 handleidingen geschreven

0 opmerkingen

Voeg opmerking toe

Weergavestatistieken:

Afgelopen 24 uren: 1

Afgelopen 7 dagen: 4

Afgelopen 30 dagen: 24

Altijd: 73