Ga door naar hoofdinhoud
Dell Vostro 3560 Back Panel Removal

Dell Vostro 3560 Back Panel Removal

Max Bareilles

Max Bareilles en een andere bijdrager

Voor het laatst geüpdatet op February 16, 2024

2 minuten
Eenvoudig
Door de gemeenschap gemaakte handleiding

This guide will show you how to remove the back panel of your Dell Vostro 3560 laptop to access the RAM, hard drive, and optical drive. Some of this guide was made with information from this video.

Wat je nodig hebt

Gereedschap

  1. Dell Vostro 3560 Back Panel Removal, Identify your laptop: stap 1, afbeelding 1 van 2 Dell Vostro 3560 Back Panel Removal, Identify your laptop: stap 1, afbeelding 2 van 2
    • Make sure you have the right laptop by checking the sticker.

  2. Dell Vostro 3560 Back Panel Removal, Remove Battery: stap 2, afbeelding 1 van 2 Dell Vostro 3560 Back Panel Removal, Remove Battery: stap 2, afbeelding 2 van 2
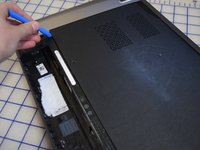
    • Start with your PC shut off and upside down.

    • Pull out tabs.

    • Pull up on rail to remove battery.

  3. Dell Vostro 3560 Back Panel Removal, Remove Back Panel: stap 3, afbeelding 1 van 1
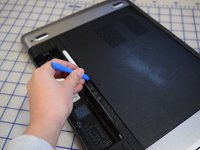
    • Remove the two screws:

    • One M2 Phillips screw (Fixed)

    • One 5-mm M2 Phillips screw

  4. Dell Vostro 3560 Back Panel Removal: stap 4, afbeelding 1 van 3 Dell Vostro 3560 Back Panel Removal: stap 4, afbeelding 2 van 3 Dell Vostro 3560 Back Panel Removal: stap 4, afbeelding 3 van 3
    • Use a iFixit opening tool to remove the back panel.

  5. Dell Vostro 3560 Back Panel Removal: stap 5, afbeelding 1 van 1
    • From here you can access:

    • The hard drive

    • The RAM.

    • The CD Drive.

Conclusie

To reassemble your device, follow these instructions in reverse order.

3 andere personen hebben deze handleiding voltooid.

Max Bareilles

Lid sinds: 02/24/20

664 Reputatie

5 handleidingen geschreven

0 opmerkingen

Voeg opmerking toe

Weergavestatistieken:

Afgelopen 24 uren: 0

Afgelopen 7 dagen: 6

Afgelopen 30 dagen: 18

Altijd: 1,160