Ga door naar hoofdinhoud
Dell Precision M4800 Wi-Fi Card Replacement

Dell Precision M4800 Wi-Fi Card Replacement

Naveen

Naveen en een andere bijdrager

Voor het laatst geüpdatet op December 22, 2023

15 - 30 minuten
Eenvoudig
Uitgelichte studenten-handleiding

This guide is designed to help you successfully replace the Wi-Fi card in your Dell Precision M4800. Whether you're experiencing internet connectivity issues or looking to upgrade your wireless capabilities on your laptop, this replacement will address those concerns and have your laptop running smoothly again.

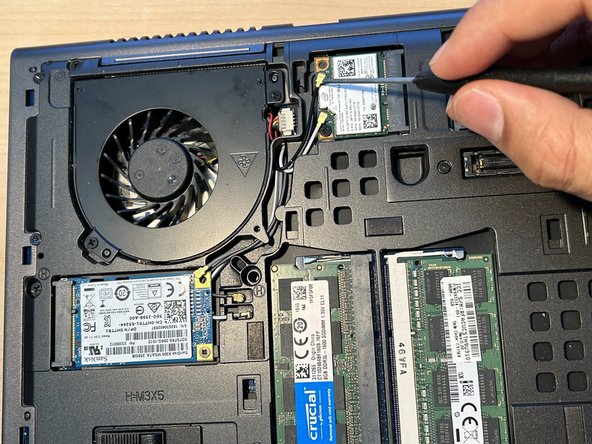
When looking for a replacement Wi-Fi card for your Dell M4800, it's essential to consider the following factors:

  • Form Factor: Ensure that the replacement Wi-Fi card is a Mini-PCI Express (mPCIe) card, as this is the standard form factor used in many laptops, including the Dell M4800.
  • Wireless Standards: Check for compatibility with the wireless standards you need. For example, modern Wi-Fi cards support standards like 802.11ac or 802.11ax, providing faster and more reliable wireless connections.
  • Bluetooth Compatibility: If your original Wi-Fi card also included Bluetooth functionality, make sure the replacement card has Bluetooth support if needed.


Before beginning, make sure to shut down your laptop entirely and disconnect it from any power source. If your laptop has a swollen battery, exercise caution and handle it with care.

Wat je nodig hebt

Onderdelen

Gereedschap

  1. Dell Precision M4800 Wi-Fi Card Replacement, Wi-Fi Card: stap 1, afbeelding 1 van 3 Dell Precision M4800 Wi-Fi Card Replacement, Wi-Fi Card: stap 1, afbeelding 2 van 3 Dell Precision M4800 Wi-Fi Card Replacement, Wi-Fi Card: stap 1, afbeelding 3 van 3
    • Ensure that all electrical sources are removed and turned off.

    • Unplug the charger from the laptop and shut it down.

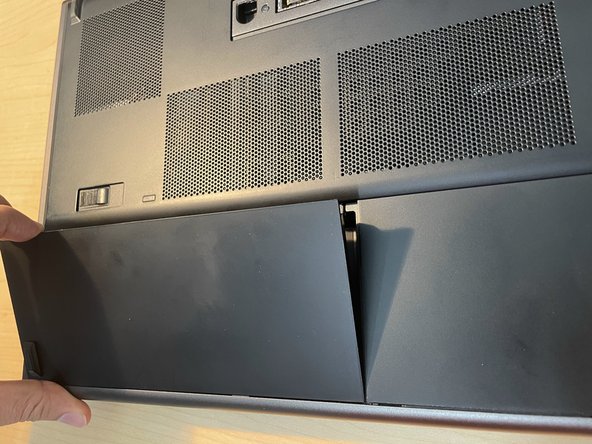
    • Flip the computer, so the bottom is facing upwards.

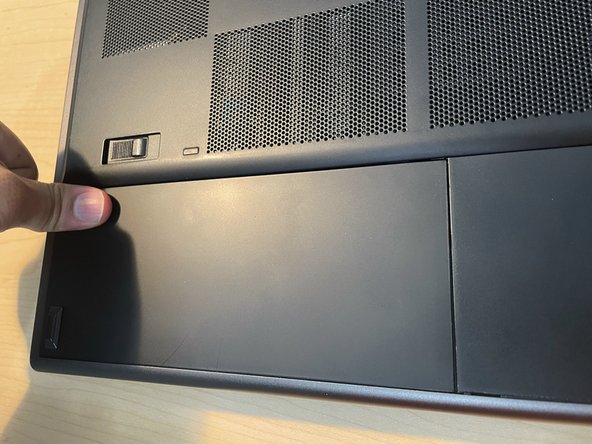
    • Slide the release latch to release the battery.

    • Lift and remove the battery from the laptop.

  2. Dell Precision M4800 Wi-Fi Card Replacement: stap 2, afbeelding 1 van 3 Dell Precision M4800 Wi-Fi Card Replacement: stap 2, afbeelding 2 van 3 Dell Precision M4800 Wi-Fi Card Replacement: stap 2, afbeelding 3 van 3
    • Using a Phillips #1 screwdriver, remove the two 5 mm screws fastening the backplate.

    • Slide the base cover towards the rear of the laptop.

    • Lift the base cover and remove it from the laptop.

  3. Dell Precision M4800 Wi-Fi Card Replacement: stap 3, afbeelding 1 van 3 Dell Precision M4800 Wi-Fi Card Replacement: stap 3, afbeelding 2 van 3 Dell Precision M4800 Wi-Fi Card Replacement: stap 3, afbeelding 3 van 3
    • Disconnect the black and white antenna cables by carefully pulling them upwards away from the card, being cautious to not bend the connector.

    • For the antenna pins a simple and slight nudge is usually enough, but remember that these pins are somewhat delicate.

    • Remove the screw.

  4. Dell Precision M4800 Wi-Fi Card Replacement: stap 4, afbeelding 1 van 2 Dell Precision M4800 Wi-Fi Card Replacement: stap 4, afbeelding 2 van 2
    • Remove the Wi-Fi card.

  5. Dell Precision M4800 Wi-Fi Card Replacement: stap 5, afbeelding 1 van 2 Dell Precision M4800 Wi-Fi Card Replacement: stap 5, afbeelding 2 van 2
    • Slide the replacement Wi-Fi card into the slot.

    • Tighten the screw securing the Wi-Fi card.

  6. Dell Precision M4800 Wi-Fi Card Replacement: stap 6, afbeelding 1 van 2 Dell Precision M4800 Wi-Fi Card Replacement: stap 6, afbeelding 2 van 2
    • Connect both antenna cables back to the same places according to the color code on the Wi-Fi card.

  7. Dell Precision M4800 Wi-Fi Card Replacement: stap 7, afbeelding 1 van 3 Dell Precision M4800 Wi-Fi Card Replacement: stap 7, afbeelding 2 van 3 Dell Precision M4800 Wi-Fi Card Replacement: stap 7, afbeelding 3 van 3
    • Slide the base cover towards the front of the laptop.

    • Slide the battery back into its place.

    • Make sure to put a little pressure on it if the battery is not fully in place. The battery release latch will automatically click back to the locked position.

Conclusie

To reassemble your device, follow these instructions in reverse order.

Naveen

Lid sinds: 09/19/23

195 Reputatie

1 Handleiding geschreven

Team

York University, Team B-19, Woodhouse Fall 2023 Lid van York University, Team B-19, Woodhouse Fall 2023

YORK-WOODHOUSE-F23SBG19

2 Leden

1 handleiding geschreven

Één opmerking

Great guide, well-written and concise. Thank you for sharing your knowledge and expertise. Best regards

Loren Martin - Antwoord

Voeg opmerking toe

Weergavestatistieken:

Afgelopen 24 uren: 1

Afgelopen 7 dagen: 12

Afgelopen 30 dagen: 42

Altijd: 824