Ga door naar hoofdinhoud
Dell Optiplex SX280 Lower Fan Replacement

Dell Optiplex SX280 Lower Fan Replacement

Tom

Tom en 9 andere bijdragers

Voor het laatst geüpdatet op December 15, 2023

20 - 35 minuten
Gemiddeld

This guide is designed to help replace a broken fan from the tower. When working with anything electrical make sure to disconnect it from the power source.

Wat je nodig hebt

Gereedschap

  1. Dell Optiplex SX280 Lower Fan Replacement, Panel Cover: stap 1, afbeelding 1 van 1
    • Make sure the computer is turned off, by selecting the start menu and choosing “Shut Down”.

    • Ensure all cables, speakers and other devices are unplugged and turned off before opening the computer case.

  2. Dell Optiplex SX280 Lower Fan Replacement: stap 2, afbeelding 1 van 2 Dell Optiplex SX280 Lower Fan Replacement: stap 2, afbeelding 2 van 2
    • Lay the computer on its side; you will see a blue knob.

    • Turn this knob 90 deg clockwise.

  3. Dell Optiplex SX280 Lower Fan Replacement: stap 3, afbeelding 1 van 2 Dell Optiplex SX280 Lower Fan Replacement: stap 3, afbeelding 2 van 2
    • Slide the panel case forward about 1/2 inch while knob is turned.

    • Lift panel case off computer.

  4. Dell Optiplex SX280 Lower Fan Replacement, Lower Fan: stap 4, afbeelding 1 van 2 Dell Optiplex SX280 Lower Fan Replacement, Lower Fan: stap 4, afbeelding 2 van 2
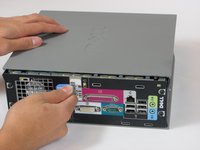
    • Remove the large blue cover from the computer. There are no screws or tabs holding it in place.

  5. Dell Optiplex SX280 Lower Fan Replacement: stap 5, afbeelding 1 van 1
    • Remove the power supply by pressing the release tab. It is distinguished by the black, red, green, and yellow wires.

  6. Dell Optiplex SX280 Lower Fan Replacement: stap 6, afbeelding 1 van 2 Dell Optiplex SX280 Lower Fan Replacement: stap 6, afbeelding 2 van 2
    • Remove the rubber grommets from the base of the fan. The iFixit Opening tool may be useful in this step.

  7. Dell Optiplex SX280 Lower Fan Replacement: stap 7, afbeelding 1 van 2 Dell Optiplex SX280 Lower Fan Replacement: stap 7, afbeelding 2 van 2
    • Press on the blue release tab and remove the fan.

Conclusie

To reassemble your device, follow these instructions in reverse order.

4 andere personen hebben deze handleiding voltooid.

Tom

Lid sinds: 10/04/10

850 Reputatie

7 handleidingen geschreven

Team

Cal Poly, Team 22-4, Maness Fall 2010 Lid van Cal Poly, Team 22-4, Maness Fall 2010

CPSU-MANESS-F10S22G4

4 Leden

26 handleidingen geschreven

0 opmerkingen

Voeg opmerking toe

Weergavestatistieken:

Afgelopen 24 uren: 3

Afgelopen 7 dagen: 6

Afgelopen 30 dagen: 15

Altijd: 4,245