
Dell Inspiron 1545 LCD Replacement
Inleiding
Ga naar stap 1If the screen itself is cracked or broken it may be necessary to replace the LCD screen.
Wat je nodig hebt
Onderdelen

Gereedschap


Toon meer…
-
-
-
Lift up the six Rubber feet. There is one in each corner at the bottom of the screen, and four along the top of the screen.
-
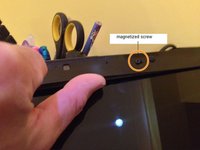
Remove the screws underneath. Note: one screw at the top and right of center may be magentized and not come out.
-
-
-
Using your thumb, starting at the top, push your thumb from the inside of the bezzel outwards and the plastic pops off. Work your thumb round repeating the process on both top and sides until you get to the bottom.
-
The bottom has double sided tape along the metal strip where the plastic meets the bezel. Separate this and then push outwards again.
-
The whole bezel should now be free and you can remove it from the laptop.
-
-
-
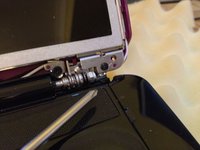
At the bottom, find the two hinges. There is a small triangle mark on both hinges. You need to remove the screws next to the triangle on the hinges (only one each side) and the screen is completely free of the chassis.
-
If you have a CCFL LCD panel, you may have to unscrew the inverter board.
-
Carefully rotate the panel out the lid cover.
-
If a CCFL LCD, the ribbon cable will be securely taped to the connector at the top as well as at the bottom edge of the panel.
-
Disconnect the ribbon cable from the screen at the bottom (larger connector) to completely remove the screen. Lift up lock bar (blue tab attached) then gently pull ribbon connector out.
-
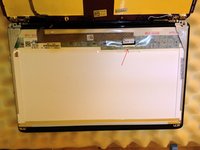
Remove the 2 brackets attached to the screen by removing 3 screws on the side of each bracket.
-
In my example, the product numbers of the screen are as follows :- BT156gw01 v.4 . If you put this number into eBay you will have several alternatives returned.
-
Fitting is reversal of steps so far.
-


To reassemble your device, follow these instructions in reverse order.
To reassemble your device, follow these instructions in reverse order.
Annuleren: ik heb deze handleiding niet afgemaakt.
4 andere personen hebben deze handleiding voltooid.
2 opmerkingen
No need to remove everything, here is an easier guide:
1. Remove the battery.
2. Take off the 6 rubber feet on the bezel
3. Remove the 6 bezel screws.
4. Remove the two LCD screws located next to the two arrows.
5. Slide the ribbon cable from the back of the LCD.
6. Reverse the procedure.