Ga door naar hoofdinhoud
Dell Inspiron 1545 Display Replacement

Dell Inspiron 1545 Display Replacement

Nathan Lemay

Nathan Lemay en 5 andere bijdragers

Voor het laatst geüpdatet op November 15, 2016

20 minuten
Gemiddeld
Actiemomenten

There are many parts that can go bad within a display. This guide does not necessarily cover the replacement of all the smaller pieces, but it does allow you to access those parts.

Wat je nodig hebt

Onderdelen

Gereedschap

Toon meer…

  1. Dell Inspiron 1545 Display Replacement, Battery: stap 1, afbeelding 1 van 1
    • Before attempting to remove the battery ensure that the laptop is disconnected from all power sources and turned off.

    • Turn the laptop over to its back.

  2. Dell Inspiron 1545 Display Replacement: stap 2, afbeelding 1 van 1
    • Slide the release latch while simultaneously pulling backwards on the battery.

  3. Dell Inspiron 1545 Display Replacement: stap 3, afbeelding 1 van 1
    • Slide the battery out of the battery bay.

  4. Dell Inspiron 1545 Display Replacement, Center Control Cover: stap 4, afbeelding 1 van 1
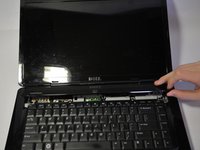
    • After removing the battery, remove the two screws (3mm Phillips #1) beneath it. These screws hold the Center Control Cover in place.

  5. Dell Inspiron 1545 Display Replacement: stap 5, afbeelding 1 van 1
    • Flip the laptop over to the front and open the display as far as possible.

  6. Dell Inspiron 1545 Display Replacement: stap 6, afbeelding 1 van 3 Dell Inspiron 1545 Display Replacement: stap 6, afbeelding 2 van 3 Dell Inspiron 1545 Display Replacement: stap 6, afbeelding 3 van 3
    • The Center Control Cover is VERY fragile, be careful when using prying tools.

    • Pry the Center Control Cover from the laptop. On the right there is a small divot, it is advised that you start removing the panel from here.

    • Carefully lift the Center Control Cover away from the laptop.

  7. Dell Inspiron 1545 Display Replacement, Keyboard: stap 7, afbeelding 1 van 1
    • Remove the two screws (5mm Phillips #1) at the top of the keyboard.

  8. Dell Inspiron 1545 Display Replacement: stap 8, afbeelding 1 van 1
    • Slide the keyboard out and away from the laptop and lift it up to access the keyboard connector.

    • Do not pull hard on the keyboard while removing it, you may damage the keyboard or the keyboard connector.

  9. Dell Inspiron 1545 Display Replacement: stap 9, afbeelding 1 van 1
    • Lift the connector latch that secures the keyboard cable to the connector on the motherboard and remove the cable.

  10. Dell Inspiron 1545 Display Replacement: stap 10, afbeelding 1 van 1
    • Lift the keyboard up and away from the laptop.

  11. Dell Inspiron 1545 Display Replacement, Display: stap 11, afbeelding 1 van 1
    • Remove the two screws (5.5mm, Phillips #1) from the laptop base.

  12. Dell Inspiron 1545 Display Replacement: stap 12, afbeelding 1 van 1
    • Remove black and white wires from the WLAN that lead to the display by pulling straight up.

    • Unwind the wires so they can be freely pulled through in the next step.

  13. Dell Inspiron 1545 Display Replacement: stap 13, afbeelding 1 van 1
    • Turn the laptop over to its standard position.

    • Disconnect the Wed cable and Camera1 cable from the respective Motherboard connectors as marked. Unsecure the wires so they are loose.

    • Pull the black and white wires previously connected to the WLAN through the hole.

  14. Dell Inspiron 1545 Display Replacement: stap 14, afbeelding 1 van 1
    • Remove the Camera1 cable, the Wed cable, and the black and white wires from the routing guides.

    • Remove the four screws (5mm Phillips #1) (two on either side) that secure the display assembly.

  15. Dell Inspiron 1545 Display Replacement: stap 15, afbeelding 1 van 1
    • Lift the display assembly off the computer.

Conclusie

To reassemble your device, follow these instructions in reverse order.

11 andere personen hebben deze handleiding voltooid.

Nathan Lemay

Lid sinds: 04/16/14

3.112 Reputatie

15 handleidingen geschreven

Team

Cal Poly, Team 9-14, Regan Spring 2014 Lid van Cal Poly, Team 9-14, Regan Spring 2014

CPSU-REGAN-S14S9G14

4 Leden

15 handleidingen geschreven

3 opmerkingen

wow that is really good

Mck - Isolutions - Antwoord

AWESOME, but how to know if display is faulty or some issue in the other device causing blank screen

Kumar Bhrigu - Antwoord

put it back toghther, then plug in a external monitor

Feyrowan -

Voeg opmerking toe

Weergavestatistieken:

Afgelopen 24 uren: 0

Afgelopen 7 dagen: 9

Afgelopen 30 dagen: 23

Altijd: 5,786