Ga door naar hoofdinhoud
Canon PowerShot SX120 IS Back Cover Replacement

Canon PowerShot SX120 IS Back Cover Replacement

Maria

Maria en 8 andere bijdragers

Voor het laatst geüpdatet op December 21, 2022

20 - 30 minuten
Eenvoudig

Disassemble the back cover of the Canon PowerShot SX120 IS in order to open the camera and access the inside components.

Wat je nodig hebt

Gereedschap

  1. Canon PowerShot SX120 IS Back Cover Replacement, Back Cover: stap 1, afbeelding 1 van 1
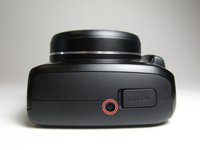
    • Turning the camera so the screen is facing you.

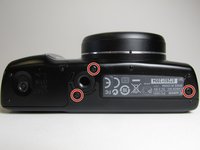
    • Remove the two black 3.4 mm screws with a Phillips #00 screwdriver.

  2. Canon PowerShot SX120 IS Back Cover Replacement: stap 2, afbeelding 1 van 1
    • Put the camera with the lens facing up and turn it to the side so the DC IN A/V OUT DIGITAL is facing you.

    • Remove the single black 3.4 mm screw with a Phillips #00 screwdriver.

  3. Canon PowerShot SX120 IS Back Cover Replacement: stap 3, afbeelding 1 van 2 Canon PowerShot SX120 IS Back Cover Replacement: stap 3, afbeelding 2 van 2
    • Put the camera with the lens facing up, and turn it to the side where the battery cover is located.

    • Remove the three black 3.4 mm screws with a Phillips #00 screwdriver.

  4. Canon PowerShot SX120 IS Back Cover Replacement: stap 4, afbeelding 1 van 2 Canon PowerShot SX120 IS Back Cover Replacement: stap 4, afbeelding 2 van 2
    • Put the camera with the lens facing up, turn it to the side where the compartment of the battery (CR1220) for time/date is located.

    • Remove the single black 3.4 mm screw with a Phillips #00 screwdriver.

  5. Canon PowerShot SX120 IS Back Cover Replacement: stap 5, afbeelding 1 van 1
    • Put the camera with the lens facing down, and turn it to the side where the DC IN A/V OUT DIGITAL cover and the silver lanyard attachment are located.

    • Open the DC IN A/V OUT DIGITAL cover.

    • Remove the single black 3.4 mm screw with a Phillips #00 screwdriver.

  6. Canon PowerShot SX120 IS Back Cover Replacement: stap 6, afbeelding 1 van 3 Canon PowerShot SX120 IS Back Cover Replacement: stap 6, afbeelding 2 van 3 Canon PowerShot SX120 IS Back Cover Replacement: stap 6, afbeelding 3 van 3
    • Turn the camera with the lens facing down.

    • Opening the camera can be challenging. Don't get discouraged if it takes you a few tries before the camera is opened.

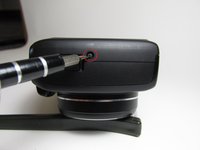
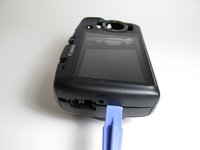
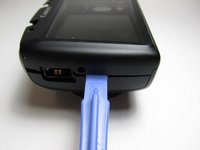
    • Use the iFixit opening tool to make leverage. Insert the opening tool in the seam where the front case and the back case assemble.

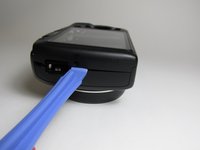
    • Carefully put pressure on the opening tool so the cover can gradually open.

    • Slowly slide the opening tool along the gap and around the edge of the camera.

    • When you are dissembling the back cover, the DC IN A/V OUT DIGITAL cover will also disassemble and fall off.

  7. Canon PowerShot SX120 IS Back Cover Replacement: stap 7, afbeelding 1 van 1
    • Remove the back cover and the DC IN A/V OUT DIGITAL cover from the camera.

Conclusie

To reassemble your device, follow these instructions in reverse order.

2 andere personen hebben deze handleiding voltooid.

Maria

Lid sinds: 03/13/14

923 Reputatie

1 Handleiding geschreven

Team

Één opmerking

It took me 2 hours to install the battery door. I dropped one screw and could not find it any more it just vanished.

I was lucky to find one just like the one I lost after a half hour search.All in all I did a pretty good good job for an

auto mechanic .Thanks very much for your help, it was very easy to follow your instructions.

Fred Czarnik

Frederick Czarnik - Antwoord

Voeg opmerking toe

Weergavestatistieken:

Afgelopen 24 uren: 3

Afgelopen 7 dagen: 10

Afgelopen 30 dagen: 31

Altijd: 1,896