Ga door naar hoofdinhoud

Blackberry Z20 Leap LCD/Digitizer Replacement Replacement

Wat je nodig hebt

  1. Blackberry Z20 Leap LCD/Digitizer Replacement Replacement, Blackberry Leap Screen Replacement: stap 1, afbeelding 1 van 2 Blackberry Z20 Leap LCD/Digitizer Replacement Replacement, Blackberry Leap Screen Replacement: stap 1, afbeelding 2 van 2
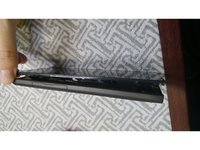
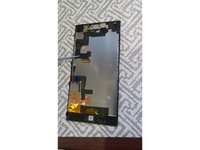
    • Blackberry Z20 Leap (STR200-2) with a bad LCD. The first question is...Where are the screws?

  2. Blackberry Z20 Leap LCD/Digitizer Replacement Replacement, remove screws: stap 2, afbeelding 1 van 2 Blackberry Z20 Leap LCD/Digitizer Replacement Replacement, remove screws: stap 2, afbeelding 2 van 2
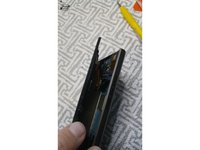
    • The screws are behind the sticker beside the camera. Heat the sticker and use a knife to pry under the sticker to remove it. There are 2 screws which you need a T6 torx screwdriver to remove.

  3. Blackberry Z20 Leap LCD/Digitizer Replacement Replacement, unseat screen assembly: stap 3, afbeelding 1 van 3 Blackberry Z20 Leap LCD/Digitizer Replacement Replacement, unseat screen assembly: stap 3, afbeelding 2 van 3 Blackberry Z20 Leap LCD/Digitizer Replacement Replacement, unseat screen assembly: stap 3, afbeelding 3 van 3
    • Push up on screen with thumbs once the screws have been removed. The screen assembly will now come away from the chassis. Be careful there is still some ribbon cables connected to the screen assembly.

  4. Blackberry Z20 Leap LCD/Digitizer Replacement Replacement, disconnect connectors: stap 4, afbeelding 1 van 3 Blackberry Z20 Leap LCD/Digitizer Replacement Replacement, disconnect connectors: stap 4, afbeelding 2 van 3 Blackberry Z20 Leap LCD/Digitizer Replacement Replacement, disconnect connectors: stap 4, afbeelding 3 van 3
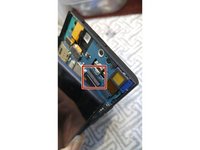
    • In the top there is a connector where you have to lift the black part of the connector to remove the ribbon. I used tweezers to lift the connector and to remove the ribbon cable

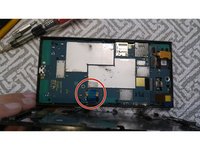
    • Once the top ribbon is removed there is another cable connected in the middle. The phone will open up more to give you access. You will need to lift the black part of the connector to remove the ribbon. Again, I used tweezers. The screen assembly should now come away from the chassis

Conclusie

To reassemble your device, follow these instructions in reverse order.

9 andere personen hebben deze handleiding voltooid.

Amanda Baxter

Lid sinds: 02/08/16

217 Reputatie

1 Handleiding geschreven

8 opmerkingen

Excellent Guide Amanda! thanks for the great work!

Xpider - Antwoord

How to remove lcd from the frame (bezel)

Sani Shik - Antwoord

Can you advise how this is done please...removing the lcd from the frame

zoe smith -

I bought a T6 torx screwdriver but it is too big for my Leap (STR200-1). Any idea what size torx I need? I'm guessing T5 but...

Dave - Antwoord

Yep bought a T5 torx screwdriver and that did it

Dave - Antwoord

Voeg opmerking toe

Weergavestatistieken:

Afgelopen 24 uren: 0

Afgelopen 7 dagen: 1

Afgelopen 30 dagen: 4

Altijd: 5,341