Ga door naar hoofdinhoud
Asus X200MA Motherboard Replacement

Asus X200MA Motherboard Replacement

Alli Krininger

Alli Krininger en 2 andere bijdragers

Voor het laatst geüpdatet op December 26, 2019

20 - 30 minuten
Gemiddeld

This guide provides step-by-step instructions on the replacement of the motherboard of ASUS X200MA. This guide can be used to upgrade or replace an obsolete, malfunctioning, or a damaged motherboard. Use caution when removing and installing the motherboard as it is connected to the hard drive.

Wat je nodig hebt

Gereedschap

Toon meer…

  1. Asus X200MA Motherboard Replacement, Back Panel: stap 1, afbeelding 1 van 1
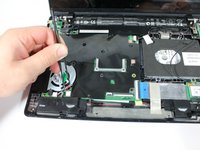
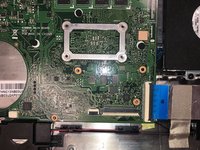
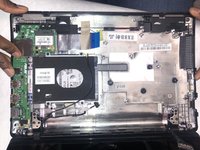
    • Remove the following six screws:

    • Six 4 mm screws using a Phillips #0 screwdriver.

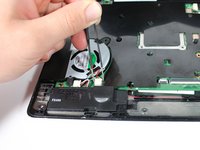
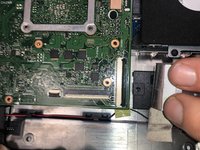
    • Remove the following one screw:

    • One 14 mm screw using a Phillips #0 screwdriver.

    • The 14mm screw goes in the center.

  2. Asus X200MA Motherboard Replacement: stap 2, afbeelding 1 van 1
    • Take two rubber caps off the back side of the laptop.

    • Use a Phillips #0 screwdriver to remove the two 14 mm screws under the rubber caps.

  3. Asus X200MA Motherboard Replacement: stap 3, afbeelding 1 van 1
    • Use a plastic or metal spudger to separate the keyboard from the back panel and lift the keyboard out of place.

  4. Asus X200MA Motherboard Replacement, Battery: stap 4, afbeelding 1 van 1
    • Take two rubber caps off the back side of the laptop.

  5. Asus X200MA Motherboard Replacement: stap 5, afbeelding 1 van 1
    • Remove the following two screws under the rubber caps.

    • Two 14 mm screws using the Phillips #0 screw driver.

  6. Asus X200MA Motherboard Replacement: stap 6, afbeelding 1 van 1
    • Flip up the following:

    • The two latches holding the two cables shown(white and black)

    • Pull the cables free from the latches

    • Lift the keyboard from the computer

  7. Asus X200MA Motherboard Replacement: stap 7, afbeelding 1 van 1
    • Remove the following screws from the inside of the laptop:

    • Two 4 mm screws using the Phillips #0 phillips screwdriver.

    • One 5 mm screw using the Phillips #0 Phillips screwdriver located in the center a little below the battery.

  8. Asus X200MA Motherboard Replacement: stap 8, afbeelding 1 van 1
    • Slide the battery up and out.

  9. Asus X200MA Motherboard Replacement, Fan: stap 9, afbeelding 1 van 1
    • Remove the Two 4 mm screws using Phillips #0 phillips screwdriver.

  10. Asus X200MA Motherboard Replacement: stap 10, afbeelding 1 van 2 Asus X200MA Motherboard Replacement: stap 10, afbeelding 2 van 2
    • Unplug the set of wires located at bottom corner on fan.

  11. Asus X200MA Motherboard Replacement: stap 11, afbeelding 1 van 2 Asus X200MA Motherboard Replacement: stap 11, afbeelding 2 van 2
    • Lift up and out to completely the remove fan component.

  12. Asus X200MA Motherboard Replacement, Motherboard: stap 12, afbeelding 1 van 1
    • Use Phillips #0 screwdriver to remove the eight 4.0 mm screws.

  13. Asus X200MA Motherboard Replacement: stap 13, afbeelding 1 van 2 Asus X200MA Motherboard Replacement: stap 13, afbeelding 2 van 2
    • Pull back the blue ribbon, freeing it from the latch.

  14. Asus X200MA Motherboard Replacement: stap 14, afbeelding 1 van 3 Asus X200MA Motherboard Replacement: stap 14, afbeelding 2 van 3 Asus X200MA Motherboard Replacement: stap 14, afbeelding 3 van 3
    • Lift and pull the motherboard out from the hard drive and remove it from the base plate.

Conclusie

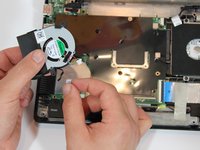
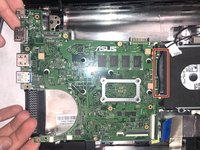
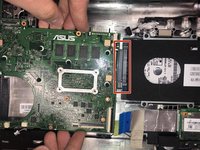
To reassemble your device, follow these instructions in reverse order.

2 andere personen hebben deze handleiding voltooid.

Alli Krininger

Lid sinds: 11/11/19

391 Reputatie

3 handleidingen geschreven

Team

IUPUI, Team S2-G4, Stella Fall 2019 Lid van IUPUI, Team S2-G4, Stella Fall 2019

IUPUI-STELLA-F19S2G4

4 Leden

3 handleidingen geschreven

0 opmerkingen

Voeg opmerking toe

Weergavestatistieken:

Afgelopen 24 uren: 2

Afgelopen 7 dagen: 6

Afgelopen 30 dagen: 21

Altijd: 1,364