Ga door naar hoofdinhoud

Asus X200CA Wifi Card Replacement

Wat je nodig hebt

  1. Asus X200CA Wifi Card Replacement, Keyboard: stap 1, afbeelding 1 van 2 Asus X200CA Wifi Card Replacement, Keyboard: stap 1, afbeelding 2 van 2
    • Remove the 8 black 4.7mm screws securing the keyboard to the bottom cover.

    • Remove the black 14.5mm screw from the center of the bottom cover.

  2. Asus X200CA Wifi Card Replacement: stap 2, afbeelding 1 van 1
    • Wedge a metal spudger between the keyboard and bottom cover and slide it around the perimeter until all edges separate.

  3. Asus X200CA Wifi Card Replacement: stap 3, afbeelding 1 van 1
    • Pull apart the keyboard and the bottom cover using your hands.

    • The keyboard and trackpad cables are still connected to the mainboard via a ZIF connector. Carefully disconnect them before completely removing the keyboard to prevent damage to the board or cables.

  4. Asus X200CA Wifi Card Replacement, Wifi Card: stap 4, afbeelding 1 van 2 Asus X200CA Wifi Card Replacement, Wifi Card: stap 4, afbeelding 2 van 2
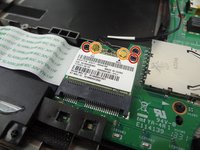
    • Use a Phillips #00 screwdriver to remove the 2 screws.

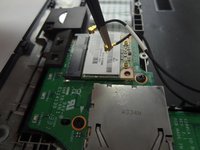
    • Use tweezers to separate the 2 coaxial connectors.

  5. Asus X200CA Wifi Card Replacement: stap 5, afbeelding 1 van 1
    • Use fingers or tweezers to remove the wifi card.

Conclusie

To reassemble your device, follow these instructions in reverse order.

3 andere personen hebben deze handleiding voltooid.

Jacqueline Collier

Lid sinds: 10/09/17

1.047 Reputatie

5 handleidingen geschreven

Team

USF Tampa, Team S1-G2, Leahy Fall 2017 Lid van USF Tampa, Team S1-G2, Leahy Fall 2017

USFT-LEAHY-F17S1G2

4 Leden

5 handleidingen geschreven

0 opmerkingen

Voeg opmerking toe

Weergavestatistieken:

Afgelopen 24 uren: 1

Afgelopen 7 dagen: 6

Afgelopen 30 dagen: 13

Altijd: 1,018