Ga door naar hoofdinhoud

Acer Aspire V5-591G-75KE Power Jack Harness Replacement

Wat je nodig hebt

  1. Acer Aspire V5-591G-75KE Power Jack Harness Replacement, Acer Aspire V5-591G-75KE Disassembly: stap 1, afbeelding 1 van 3 Acer Aspire V5-591G-75KE Power Jack Harness Replacement, Acer Aspire V5-591G-75KE Disassembly: stap 1, afbeelding 2 van 3 Acer Aspire V5-591G-75KE Power Jack Harness Replacement, Acer Aspire V5-591G-75KE Disassembly: stap 1, afbeelding 3 van 3
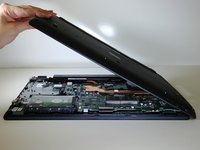
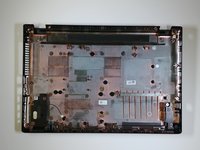
    • Close down the display and flip the device upside down.

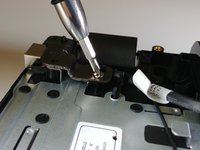
    • Use a Phillips #1 screwdriver to remove 18 black 10mm Phillips Head screws in order to loosen up the protective bottom casing.

  2. Acer Aspire V5-591G-75KE Power Jack Harness Replacement: stap 2, afbeelding 1 van 2 Acer Aspire V5-591G-75KE Power Jack Harness Replacement: stap 2, afbeelding 2 van 2
    • With the screws removed, flip the device right-side up and open up the display.

    • Run a plastic spudger tool along the seam of the face-plate in order to loosen up the protective bottom casing.

    • Popping sounds are normal, but forceful prying can damage delicate components. Be especially careful near the USB and HDMI ports.

  3. Acer Aspire V5-591G-75KE Power Jack Harness Replacement: stap 3, afbeelding 1 van 2 Acer Aspire V5-591G-75KE Power Jack Harness Replacement: stap 3, afbeelding 2 van 2
    • Close the display down once more, and flip the laptop upside down, with the hinge facing away from you.

    • Do not yank the bottom casing off. There is a small speaker wire that connects it to the motherboard.

    • Taking note of the small speaker wire, gently lift only the left side of the bottom casing.

  4. Acer Aspire V5-591G-75KE Power Jack Harness Replacement: stap 4, afbeelding 1 van 3 Acer Aspire V5-591G-75KE Power Jack Harness Replacement: stap 4, afbeelding 2 van 3 Acer Aspire V5-591G-75KE Power Jack Harness Replacement: stap 4, afbeelding 3 van 3
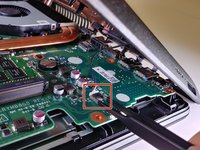
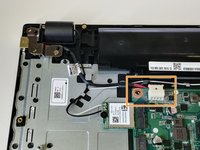
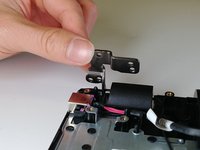
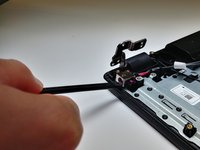
    • Using a pair of blunt tweezers, push on the tabs of the small white connector to separate it from the motherboard.

    • The entire bottom casing should lift with no resistance. If there is too much resistance, verify you removed all the screws, and run the plastic spudger tool around the face-plate again.

  5. Acer Aspire V5-591G-75KE Power Jack Harness Replacement, Power Jack Harness: stap 5, afbeelding 1 van 2 Acer Aspire V5-591G-75KE Power Jack Harness Replacement, Power Jack Harness: stap 5, afbeelding 2 van 2
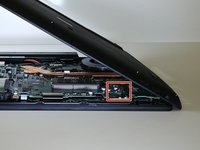
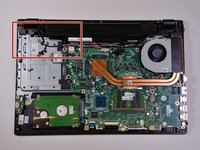
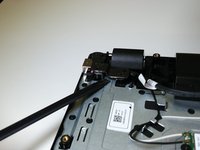
    • Locate the power jack harness on the upper left quadrant of your device.

    • Note where the power jack harness connects to the mother board of your device.

  6. Acer Aspire V5-591G-75KE Power Jack Harness Replacement: stap 6, afbeelding 1 van 1
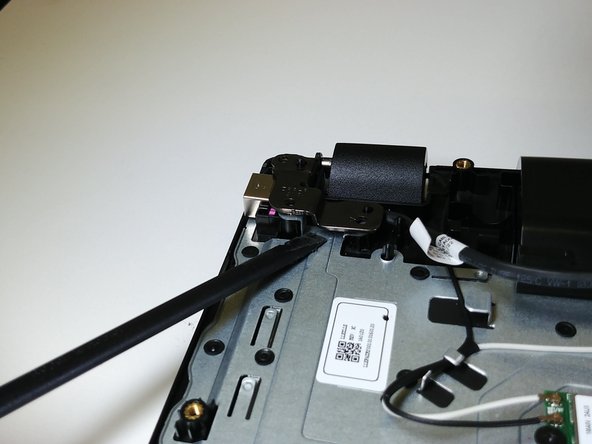
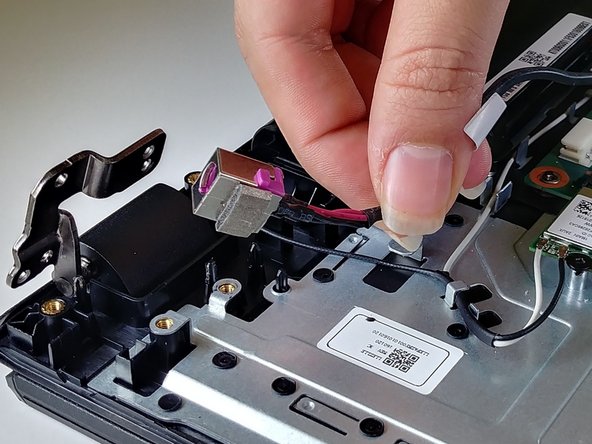
    • With a pair of blunt tweezers, push on the side tabs of the connector to disconnect the harness from the motherboard.

  7. Acer Aspire V5-591G-75KE Power Jack Harness Replacement: stap 7, afbeelding 1 van 3 Acer Aspire V5-591G-75KE Power Jack Harness Replacement: stap 7, afbeelding 2 van 3 Acer Aspire V5-591G-75KE Power Jack Harness Replacement: stap 7, afbeelding 3 van 3
    • Using a Phillips #1 screwdriver, remove the single 10mm Phillips Head screw located on the hinge.

    • Wedge the spudger tool below the hinge, and lift only enough to get a grip with your fingers.

    • Use your hand to lift the hinge the rest of the way to avoid damaging your spudger tool.

  8. Acer Aspire V5-591G-75KE Power Jack Harness Replacement: stap 8, afbeelding 1 van 2 Acer Aspire V5-591G-75KE Power Jack Harness Replacement: stap 8, afbeelding 2 van 2
    • Wedge the spudger tool below the port harness head, and lift straight up until the side tabs clear the channels on each side.

    • There is a piece of tape holding the power jack harness in place, which will give you some resistance. Prying through this tape will not damage the harness.

  9. Acer Aspire V5-591G-75KE Power Jack Harness Replacement: stap 9, afbeelding 1 van 1
    • Lift to completely remove the rest of the power jack harness out of the casing.

Conclusie

To reassemble your device, follow these instructions in reverse order.

Één andere persoon heeft deze handleiding voltooid.

Reina Godeck

Lid sinds: 10/16/17

741 Reputatie

5 handleidingen geschreven

Team

UW Tacoma, Team S3-G5, Liner Fall 2017 Lid van UW Tacoma, Team S3-G5, Liner Fall 2017

UWT-LINER-F17S3G5

4 Leden

18 handleidingen geschreven

3 opmerkingen

Thank you so much! Just fixed my finance’s computer using these directions and I’m a hero!

Amanda M. - Antwoord

Okay, so I did fix this… But after we booted up the sound stopped working. I was very careful, but maybe knocked something? Any suggestions much appreciated.

Thank you

Amanda M. - Antwoord

Check the step where you open the case. There is a cable you need to remove thats holding the case to the laptop. Just link that back to where it was and it should work

hrstg -

Voeg opmerking toe

Weergavestatistieken:

Afgelopen 24 uren: 0

Afgelopen 7 dagen: 0

Afgelopen 30 dagen: 9

Altijd: 1,448