Ga door naar hoofdinhoud
Acer Aspire V5-591G-75KE Fan and Heatsink Replacement

Acer Aspire V5-591G-75KE Fan and Heatsink Replacement

Tasier Hagler

Tasier Hagler en 5 andere bijdragers

Voor het laatst geüpdatet op May 16, 2024

10 - 20 minuten
Moeilijk

This guide will show the user how to remove the fan and heat-sink.

Do not proceed with this guide unless you are prepared to clean and re-apply thermal compound. For more information, please refer to the How to Clean and Apply Thermal Compound guide.

Wat je nodig hebt

Reparatieset

Deze set bevat alle onderdelen en tools om deze handleiding te voltooien.

Onderdelen

Gereedschap

  • Phillips #1 Screwdriver
    Phillips #1 Screwdriver
  • Spudger
    Spudger

Toon meer…

iFixit krijgt commissie als je dingen koopt via deze links.
  1. Acer Aspire V5-591G-75KE Fan and Heatsink Replacement, Acer Aspire V5-591G-75KE Disassembly: stap 1, afbeelding 1 van 3 Acer Aspire V5-591G-75KE Fan and Heatsink Replacement, Acer Aspire V5-591G-75KE Disassembly: stap 1, afbeelding 2 van 3 Acer Aspire V5-591G-75KE Fan and Heatsink Replacement, Acer Aspire V5-591G-75KE Disassembly: stap 1, afbeelding 3 van 3
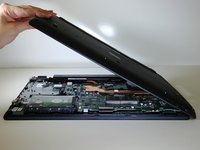
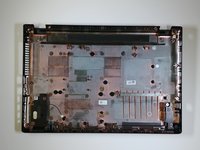
    • Close down the display and flip the device upside down.

    • Use a Phillips #1 screwdriver to remove 18 black 10mm Phillips Head screws in order to loosen up the protective bottom casing.

  2. Acer Aspire V5-591G-75KE Fan and Heatsink Replacement: stap 2, afbeelding 1 van 2 Acer Aspire V5-591G-75KE Fan and Heatsink Replacement: stap 2, afbeelding 2 van 2
    • With the screws removed, flip the device right-side up and open up the display.

    • Run a plastic spudger tool along the seam of the face-plate in order to loosen up the protective bottom casing.

    • Popping sounds are normal, but forceful prying can damage delicate components. Be especially careful near the USB and HDMI ports.

  3. Acer Aspire V5-591G-75KE Fan and Heatsink Replacement: stap 3, afbeelding 1 van 2 Acer Aspire V5-591G-75KE Fan and Heatsink Replacement: stap 3, afbeelding 2 van 2
    • Close the display down once more, and flip the laptop upside down, with the hinge facing away from you.

    • Do not yank the bottom casing off. There is a small speaker wire that connects it to the motherboard.

    • Taking note of the small speaker wire, gently lift only the left side of the bottom casing.

  4. Acer Aspire V5-591G-75KE Fan and Heatsink Replacement: stap 4, afbeelding 1 van 3 Acer Aspire V5-591G-75KE Fan and Heatsink Replacement: stap 4, afbeelding 2 van 3 Acer Aspire V5-591G-75KE Fan and Heatsink Replacement: stap 4, afbeelding 3 van 3
    Gereedschap gebruikt in deze stap:
    Tweezers
    $4.99
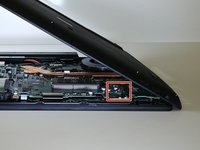
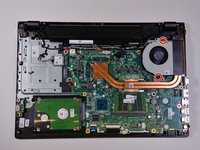
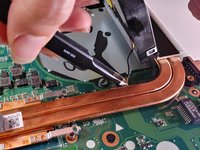
    • Using a pair of blunt tweezers, push on the tabs of the small white connector to separate it from the motherboard.

    • The entire bottom casing should lift with no resistance. If there is too much resistance, verify you removed all the screws, and run the plastic spudger tool around the face-plate again.

  5. Acer Aspire V5-591G-75KE Fan and Heatsink Replacement, Fan and Heatsink: stap 5, afbeelding 1 van 2 Acer Aspire V5-591G-75KE Fan and Heatsink Replacement, Fan and Heatsink: stap 5, afbeelding 2 van 2
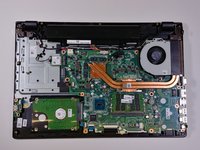
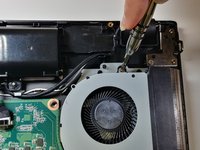
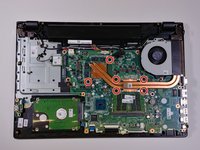
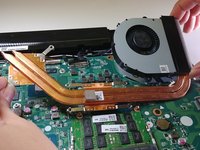
    • Use a Phillips Head size #1 screwdriver to remove the two silver-colored 10mm Phillips Head screws securing the fan to the motherboard.

    • There are two screw holes, but you might only find one screw.

  6. Acer Aspire V5-591G-75KE Fan and Heatsink Replacement: stap 6, afbeelding 1 van 2 Acer Aspire V5-591G-75KE Fan and Heatsink Replacement: stap 6, afbeelding 2 van 2
    Gereedschap gebruikt in deze stap:
    Tweezers
    $4.99
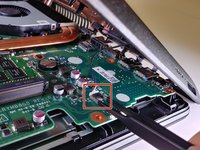
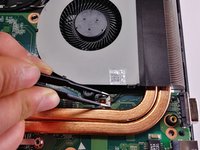
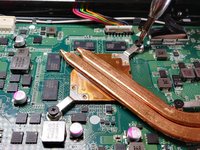
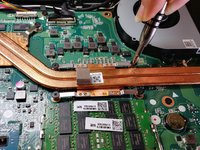
    • Use a pair of blunt tweezers to gently push on the 3-pin connector. This disconnects the fan from the motherboard.

    • You can lift up the fan if you need additional space to remove the connector.

  7. Acer Aspire V5-591G-75KE Fan and Heatsink Replacement: stap 7, afbeelding 1 van 3 Acer Aspire V5-591G-75KE Fan and Heatsink Replacement: stap 7, afbeelding 2 van 3 Acer Aspire V5-591G-75KE Fan and Heatsink Replacement: stap 7, afbeelding 3 van 3
    • Use a Phillips #1 screwdriver to remove 6 black 10mm Phillips Head screws that connect the copper heat-sink to the motherboard.

  8. Acer Aspire V5-591G-75KE Fan and Heatsink Replacement: stap 8, afbeelding 1 van 3 Acer Aspire V5-591G-75KE Fan and Heatsink Replacement: stap 8, afbeelding 2 van 3 Acer Aspire V5-591G-75KE Fan and Heatsink Replacement: stap 8, afbeelding 3 van 3
    • Once you separate the heat-sink from the motherboard, you will need to clean and re-apply thermal compound. Do not proceed unless you are prepared and you have the necessary materials.

    • Using both hands, gently lift the heat-sink and fan components from the motherboard.

    • Old thermal compound can dry up and adhere the heat-sink to the motherboard like glue. This may make removing the fan and heat-sink difficult.

    • Do not re-seat the fan and heat-sink without cleaning and re-applying the thermal compound. For more information, please refer to this guide.

Conclusie

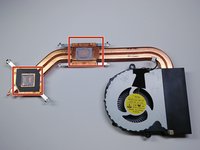
You can follow the steps in reverse to reassemble your device, but you should not re-seat the heat sink and fan without cleaning and re-applying the thermal compound.

Één andere persoon heeft deze handleiding voltooid.

Tasier Hagler

Lid sinds: 10/18/17

428 Reputatie

4 handleidingen geschreven

Team

UW Tacoma, Team S3-G5, Liner Fall 2017 Lid van UW Tacoma, Team S3-G5, Liner Fall 2017

UWT-LINER-F17S3G5

4 Leden

18 handleidingen geschreven

0 opmerkingen

Voeg opmerking toe

Weergavestatistieken:

Afgelopen 24 uren: 1

Afgelopen 7 dagen: 9

Afgelopen 30 dagen: 22

Altijd: 1,698