Ga door naar hoofdinhoud
Acer Aspire V5-571-6889 Motherboard Replacement

Acer Aspire V5-571-6889 Motherboard Replacement

Samuel Miguel

Samuel Miguel en 5 andere bijdragers

Voor het laatst geüpdatet op May 7, 2024

30 minuten
Gemiddeld

This guide shows the necessary steps to replace the Acer Aspire V5-571-6889 motherboard, the central network of the computer which all components are connected to and use for communication with one another. Motherboards most often need replacement in an everyday use laptop if they have sustained damage from overheating or from the normal wear of all electrical components over time. However, upgrading a motherboard can have other benefits such as increased speed of the overall computer for gaming and increased quality of streaming content.

This guide will walk through the steps necessary for removing the motherboard starting from removing the top cover and keyboard to expose the motherboard, disconnecting the components in their recommended order, and finally removing the motherboard from the computer housing.

Before continuing with this guide, please make sure the computer is off and unplugged from all external power sources and follow the steps out of the reach of children.

  1. Acer Aspire V5-571-6889 Motherboard Replacement, Hard Drive: stap 1, afbeelding 1 van 1
    • Flip laptop over so that the back is facing upward.

    • Push switch to the right.

    • Pull battery away from the laptop.

  2. Acer Aspire V5-571-6889 Motherboard Replacement: stap 2, afbeelding 1 van 1
    • Use a #0 Phillips head screw driver to remove all of the screws.

  3. Acer Aspire V5-571-6889 Motherboard Replacement: stap 3, afbeelding 1 van 1
    • Flip laptop back over.

    • Open the laptop.

    • Wedge a prying tool between the keyboard and laptop body seam to remove keyboard.

    • Be careful not to bend the keyboard too much or break the tabs that connect the keyboard to the laptop.

  4. Acer Aspire V5-571-6889 Motherboard Replacement: stap 4, afbeelding 1 van 1
    • Gently lift keyboard.

    • Disconnect keyboard from the laptop.

  5. Acer Aspire V5-571-6889 Motherboard Replacement, Remove Upper Cover: stap 5, afbeelding 1 van 1
    • Disconnect the two ribbon cables at the near left.

    • Remove six screws: ⁃ one by the left most ribbon cable connector ⁃ one mid-right center ⁃ one on the near edge left of center ⁃ three across the back

    • Use a prying tool to remove the upper cover.

  6. Acer Aspire V5-571-6889 Motherboard Replacement: stap 6, afbeelding 1 van 1
    • Locate the hard drive.

    • Lift the hard drive.

    • Disconnect hard drive.

  7. Acer Aspire V5-571-6889 Motherboard Replacement, Motherboard: stap 7, afbeelding 1 van 1
    • Use #0 Phillips screw driver to remove the 2.5 x 5 mm with screw attached to the Motherboard.

  8. Acer Aspire V5-571-6889 Motherboard Replacement: stap 8, afbeelding 1 van 1
    Gereedschap gebruikt in deze stap:
    Tweezers
    $4.99
    • Use Tweezers to remove the antenna cables attached to the Wi-Fi card.

  9. Acer Aspire V5-571-6889 Motherboard Replacement: stap 9, afbeelding 1 van 1
    • Use #0 Phillips screw driver to remove the two 2.5 x 5 mm Phillips #0 screws connecting the Wi-Fi card to the Motherboard.

  10. Acer Aspire V5-571-6889 Motherboard Replacement: stap 10, afbeelding 1 van 1
    • Lift and pull out the Wi-Fi card.

  11. Acer Aspire V5-571-6889 Motherboard Replacement: stap 11, afbeelding 1 van 1
    • Use #0 Phillips screw driver to remove the 2.5 x 5 mm Phillips #0 screw on the CD-ROM Drive.

  12. Acer Aspire V5-571-6889 Motherboard Replacement: stap 12, afbeelding 1 van 1
    • Lift and pull out the CD-ROM Drive.

  13. Acer Aspire V5-571-6889 Motherboard Replacement: stap 13, afbeelding 1 van 1
    • Use #0 Phillips screw driver to remove the 2 x 3 mm Phillips #0 screw holding down CD-ROM connector.

  14. Acer Aspire V5-571-6889 Motherboard Replacement: stap 14, afbeelding 1 van 1
    • Pull out the CD-ROM Drive connector.

  15. Acer Aspire V5-571-6889 Motherboard Replacement: stap 15, afbeelding 1 van 2 Acer Aspire V5-571-6889 Motherboard Replacement: stap 15, afbeelding 2 van 2
    • Use Tweezers to remove the tape covering the display cable connector.

    • Gently disconnect the display cable connector.

  16. Acer Aspire V5-571-6889 Motherboard Replacement: stap 16, afbeelding 1 van 1
    • Gently peel back the black cloth tape holding the wires in place.

  17. Acer Aspire V5-571-6889 Motherboard Replacement: stap 17, afbeelding 1 van 1
    • Gently lift Motherboard.

    • Do not remove yet. There are some connections that need to be disconnected.

  18. Acer Aspire V5-571-6889 Motherboard Replacement: stap 18, afbeelding 1 van 1
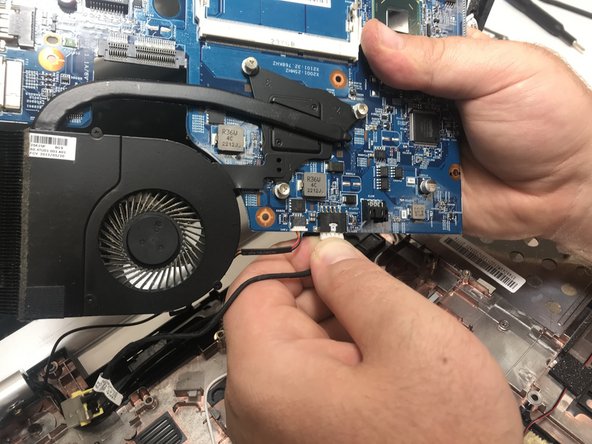
    • Gently remove the connector underneath the Motherboard.

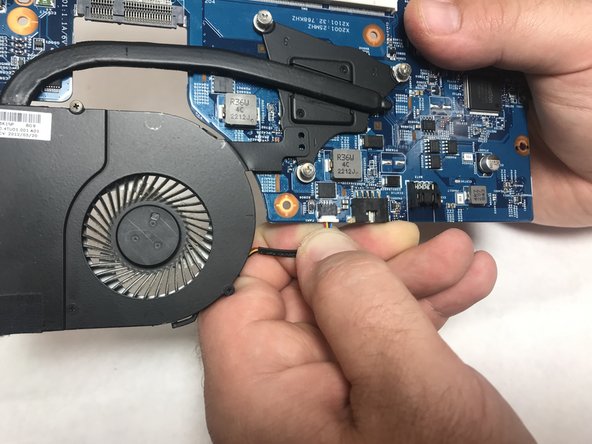
  19. Acer Aspire V5-571-6889 Motherboard Replacement: stap 19, afbeelding 1 van 3 Acer Aspire V5-571-6889 Motherboard Replacement: stap 19, afbeelding 2 van 3 Acer Aspire V5-571-6889 Motherboard Replacement: stap 19, afbeelding 3 van 3
    • Gently disconnect the three connectors attached to the Motherboard.

  20. Acer Aspire V5-571-6889 Motherboard Replacement: stap 20, afbeelding 1 van 1
    • Use #0 Philips screw driver to unscrew the three 2.5 mm x 4 mm screws connecting the CPU fan to the Motherboard.

  21. Acer Aspire V5-571-6889 Motherboard Replacement: stap 21, afbeelding 1 van 1
    • The motherboard is ready to be replaced.

    • Attach the CPU fan to the new motherboard during reassembling.

Conclusie

To reassemble your device, follow these instructions in reverse order.

Samuel Miguel

Lid sinds: 07/08/19

241 Reputatie

1 Handleiding geschreven

Team

IUPUI, Team S2-G4, Harley Summer 2019 Lid van IUPUI, Team S2-G4, Harley Summer 2019

IUPUI-HARLEY-SU19S2G4

3 Leden

4 handleidingen geschreven

0 opmerkingen

Voeg opmerking toe

Weergavestatistieken:

Afgelopen 24 uren: 0

Afgelopen 7 dagen: 3

Afgelopen 30 dagen: 17

Altijd: 691