
Acer Aspire V5-571 HDD (Hard Disk Drive) Replacement

Inleiding
Ga naar stap 1How to replace or upgrade the Hard Drive.
Wat je nodig hebt
Reparatiesets
Deze sets bevatten alle onderdelen en tools om deze handleiding te voltooien.


Onderdelen


Gereedschap


Toon meer…
Video overzicht
-
-
Turn off the laptop and remove the battery.
-
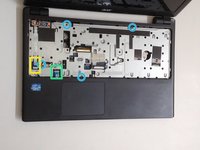
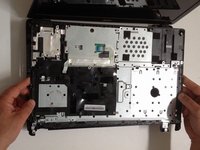
Remove two screws securing the Keyboard.
-
The Keyboard is held by two locking clips, under the battery. Use the sharp tip of a plastic tool to release the keyboard.
-
-
-
-
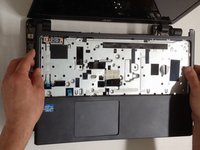
Remove 4x phillips screws and disconnect:
-
Power On button flex cable
-
Touch pad flex cable
-
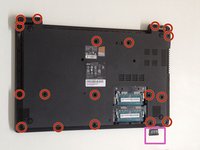
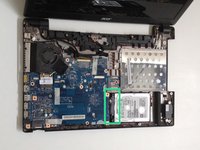
Remove 18x Phillips screws from the bottom cover.
-
Remove any memory SD Card from the Card reader.
-
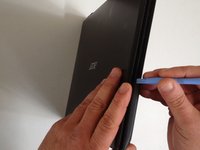
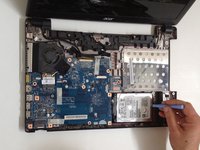
Start opening with a plastic opening tool.
-
-
-
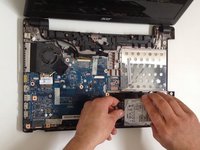
Gently remove the HDD and disconnect the SATA cable from it.
-


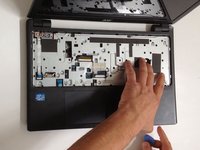


To reassemble your device, follow these instructions in reverse order.
To reassemble your device, follow these instructions in reverse order.
Annuleren: ik heb deze handleiding niet afgemaakt.
32 andere personen hebben deze handleiding voltooid.

Team

6 opmerkingen
Good job! What a pain, though, to swap the HDD :)
I am currently working on this laptop and it doesn't open at all like this one. This is only one back... and 18 screws holding it on. I can partially snap the back off but i can't pry it apart by the dvd drive. I'm also guessing the same model is manufactured differently for different retailers. (This happens in the retail hardware world where a dewalt drill from home depot will be made cheaper than a dewalt from ace hardware) so now I"m stuck. any ideas would be helpful. thanks.
ok found the problem. i accidentally popped out the dvd drive (when I was just trying to open it lol) and up under the lip I found three 1/8" long very-flat head screws. unscrewed those and the back came right off.
New customer that does like shopping local with recommended proprietors and stockiest of the required components.
Thank you Mr Jason Paul Cominelli.
are 9mm hard disk can fit?
the original was 7mm