Ga door naar hoofdinhoud

Repair and disassembly guides for Acer TravelMate laptops.

33 Vragen Bekijk alle

New laptop screen is completely black when I turn it on?

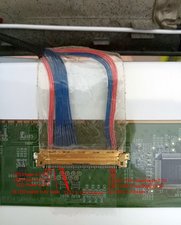
I replaced my old cracked screen with a new LCD screen of the same make and model. Model B116XW02 V.0 LTN116AT01 CLAA116WA0A LP116WH1-TLN1 TLP1

Block Image

Block Image

Block Image

Block Image

Block Image

Block Image

Block Image

Block Image

Block Image

Now when I turn the laptop on, the screen is totally black. But when I shine a bright light on the back of the screen, an image appears on screen. So is this a dead backlight or bad inverter?

Weird thing is, the old screen lit up fine, it was just badly cracked. The new screen is totally dark. BUT now when I try in the old screen, it’s also totally dark but passes the flashlight test. So what’s the deal? Did I blow the inverter somehow? Damage a cable? I’ve checked the connections a hundred times and it’s driving me crazy. I don’t even know where the inverter is on an Acer TravelMate 8172T and I can’t mess around with the board. Please help!

Beantwoord deze vraag Dit probleem heb ik ook

Is dit een goede vraag?

Score 1
Voeg een opmerking toe

1 Antwoord

Het nuttigste antwoord

@miss_jessi that looks like an LED backlit display. Most likely it does not have a separate inverter. The circuitry will be part of your motherboard. Give us the exact model number for your replacement screen so we can verify this.

Check your connector. Make sure that it is properly seated and that it does not look like it burned. IF that checks out you may have to consider posting some really good pictures of your logic board etc., with your question. that way we can see what you see. Hopefully we will find out the make and model for your specific motherboard and that schematics are available.

Voeg afbeeldingen toe aan een bestaande vraag

UPDATE 02/02/20

Block Image

pinout for the LED backlight on the controller board

Was dit antwoord nuttig?

Score 1

26 opmerkingen:

Hi @miss_jessi ,

Here's a link to the datasheet for the screen.

On p18-19 you will find the pinout for the LVDS cable connections.

The LED power supply is on pins 38-40 and can be between 6-21V (usually 12V) and the LED earth connections are on pins 31-33

The VLED enable is on pin 36 (this turns the LEDs on or off) and can be between 2.5 -5.5V High level and 0 - 0.8V Low level.

Hopefully this may be of some help.

Just verifying that you did disconnect the battery from the motherboard before doing the repair. ;-)

door

@jayeff I did disconnect it. If I hadn't, could that have destroyed some component on the motherboard?

door

Hi @miss_jessi ,

Possibly.

There is always power on the motherboard at some points on the board when the laptop is turned off. So if you inadvertently touched something on the board with a screwdriver which may have "bridged" a connection, creating a circuit that is normally not there then it may have damaged a component.

Unfortunately the power button is not a power isolating button it simply tells the laptop to shutdown to a very, very low power state. Negligible power used really but when you press the power button obviously there is power there from the components on the board through the button to start up the laptop.

Old saying in electronics repair - power off first, on last - when doing any repairs except when testing.

If you have a DMM you can test whether it is the LED power supply from the motherboard that is the problem or if the power is OK it may be the LED enable circuit from the motherboard.

Hopefully is wasn't the new panel that "blew" the circuit (whichever one is at fault) and therefore that is why the old one didn't light up again either. You may have some recourse with the supplier about this then. See below

With the panel disconnected from the motherboard use an Ohmmeter to measure between the LED power pins (one at a time) on the cable from the panel and the earth pins and make sure that it isn't a short circuit reading. Also do the same from the LED enable pin to earth on the panel cable. Measure the old panel as well

door

@jayeff thanks for the response! I just removed the old screen and plugged in the new one, so I didn't touch the board, only the connector cable. This is a real mystery to me.

I did notice one side of the LCD connector cable looks a bit damaged, the housing around the connector separated. But it still plugs in. Is there some way to clean these connectors? Should I upload a pic? I'm hoping it's not some dead board component because that goes way above my skill level. Cleaning a connector or replacing a cable is about as much as I know :(

door

Hi @miss_jessi ,

Posting an image would help.

If the connector you're talking about is on the motherboard then yes it makes sense that it may not work with both panels, assuming that the cable is permanently connected to the panel.

Use the datasheet to check which end (or look for numbering on the motherboard) has the power i.e. toward pin #40.

Is this the damaged end on the motherboard connector?

If so it may not be putting enough pressure on the cable for a good connection to be made.

Hopefully it is still connected to the motherboard.

Did you have any problems removing the original cable in the first place?

door

21 commentaren meer tonen

Voeg een opmerking toe

Voeg je antwoord toe

Missjessi zal eeuwig dankbaar zijn.
Weergavestatistieken:

Afgelopen 24 uren: 1

Afgelopen 7 dagen: 1

Afgelopen 30 dagen: 10

Altijd: 388