Ga door naar hoofdinhoud

Wat je nodig hebt

Deze demontage is geen reparatiehandleiding. Om je Belkin WeMo Switch te repareren, gebruik onze reparatiehandleidingen.

  1. Belkin WeMo Switch Teardown, Belkin WeMo Switch Teardown: stap 1, afbeelding 1 van 2 Belkin WeMo Switch Teardown, Belkin WeMo Switch Teardown: stap 1, afbeelding 2 van 2
    • Model: F7C027

    • FCC ID: K7SF7C027

    • Input: 120 V, 15 A, 60 Hz

    • Output: 120V, 15 A, 60 Hz

  2. Belkin WeMo Switch Teardown: stap 2, afbeelding 1 van 2 Belkin WeMo Switch Teardown: stap 2, afbeelding 2 van 2
    • Remove the four 11.9 mm triangle screws securing the two halves of the case together.

    • The upper two screws are hidden underneath the label, so you'll need to cut away the sticker directly above the screws.

  3. Belkin WeMo Switch Teardown: stap 3, afbeelding 1 van 2 Belkin WeMo Switch Teardown: stap 3, afbeelding 2 van 2
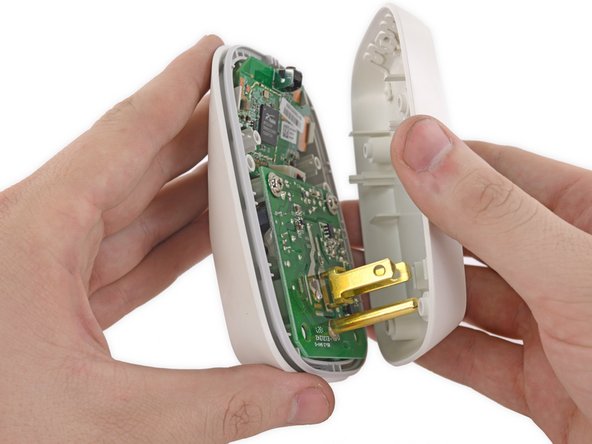
    • Carefully pry the back case off.

  4. Belkin WeMo Switch Teardown: stap 4, afbeelding 1 van 1
    • Remove the two 9.9 mm Phillips #1 screws securing the power board to the device.

  5. Belkin WeMo Switch Teardown: stap 5, afbeelding 1 van 1
    • Use a pair of tweezers to disconnect the power plug from the motherboard.

  6. Belkin WeMo Switch Teardown: stap 6, afbeelding 1 van 2 Belkin WeMo Switch Teardown: stap 6, afbeelding 2 van 2
    • Remove the power board from the device.

  7. Belkin WeMo Switch Teardown: stap 7, afbeelding 1 van 3 Belkin WeMo Switch Teardown: stap 7, afbeelding 2 van 3 Belkin WeMo Switch Teardown: stap 7, afbeelding 3 van 3
    • Use the flat end of spudger to gently pry the retaining flaps away from the motherboard.

    • The motherboard should now come free.

  8. Belkin WeMo Switch Teardown: stap 8, afbeelding 1 van 2 Belkin WeMo Switch Teardown: stap 8, afbeelding 2 van 2
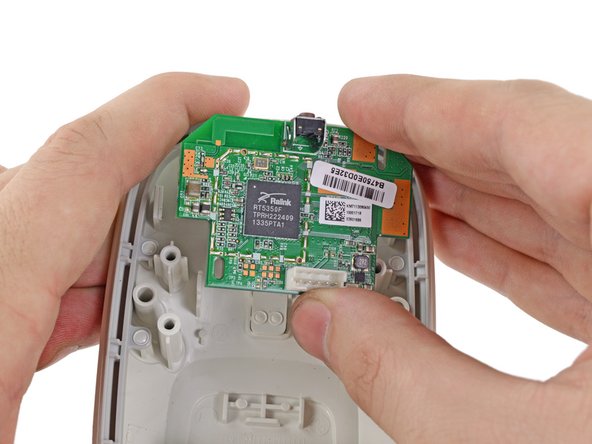
    • Components on the motherboard:

    • Ralink RT5350 Wi-Fi SoC

    • Winbond W9825G6JH-6 256 Mb 166 MHz SDRAM

    • Macronix MX25L12835EMI-10G 128 Mb NOR Flash Memory

    • Momentary push button switch for factory reset

    • Momentary push button switch for power switch

  9. Belkin WeMo Switch Teardown: stap 9, afbeelding 1 van 2 Belkin WeMo Switch Teardown: stap 9, afbeelding 2 van 2
    • Components on the power board:

    • Hongfa HF3FA 10 A Relay

    • Power Integrations LNK606DG 5.5 W AC/DC Converter

    • TAICON 6.8 µF Capacitor (x2)

    • FOAI 680 µF Capacitor (x2)

    • JOYIN JVR10N471K 385 V 70 J Varistor

    • Chipsen EPC13 50 W Transformer

    • PANJIT International TB8S 800 V 30 A Bridge Rectifier Diode

  10. Belkin WeMo Switch Teardown: stap 10, afbeelding 1 van 1
    • Final layout.

Geoff Wacker

Lid sinds: 09/30/13

89.953 Reputatie

89 handleidingen geschreven

4 opmerkingen

I notice that’s a 240V 10amp relay they’ve used. Do you think there is any electrical difference (aside from the plug pattern) between the US 110V version and the EU/Australian 220V one?

Greg Bromage - Antwoord

Thank you, that was a big help! The exterior on off button had come loose and was rattling around inside and I was able to repair it thanks to your tear down guide.

L Threet - Antwoord

A T-7 torx screwdriver works well if you don't have the 2mm triangle

olaf - Antwoord

Thanks, also here 2 of them after little use: The exterior on off button had come loose and was rattling around inside. Very poor quality now I have opened them. Guess need to try and glue them back on.

Helmuth van Es - Antwoord

Voeg opmerking toe

Weergavestatistieken:

Afgelopen 24 uren: 0

Afgelopen 7 dagen: 3

Afgelopen 30 dagen: 19

Altijd: 9,876