Deze versie kan foutieve bewerkingen bevatten. Schakel over naar de recentste gecontroleerde momentopname.
Wat je nodig hebt
-
Deze stap is niet vertaald. Help het te vertalen
-
Use the tip of a spudger to remove the black rubber screw cover from the side of the PS3.
-
-
Deze stap is niet vertaald. Help het te vertalen
-
Remove the single 8.5 mm T10 Security Torx screw from the smart plate.
-
-
Deze stap is niet vertaald. Help het te vertalen
-
Pull the smart plate toward the hard drive bay, then lift it off the body of the PS3.
-
-
Deze stap is niet vertaald. Help het te vertalen
-
Remove the following seven screws:
-
Six 52 mm Phillips screws
-
One 30 mm Phillips screw
-
-
Deze stap is niet vertaald. Help het te vertalen
-
Lift the top cover from its rear edge and rotate it toward the front of the PS3.
-
Remove the top cover.
-
There is a plastic hook located in a hole on the top back right hand side corner. Carefully push the plastic hook a bit from the rear of the machine with a spudger to release the rear right of the casing.
-
-
Deze stap is niet vertaald. Help het te vertalen
-
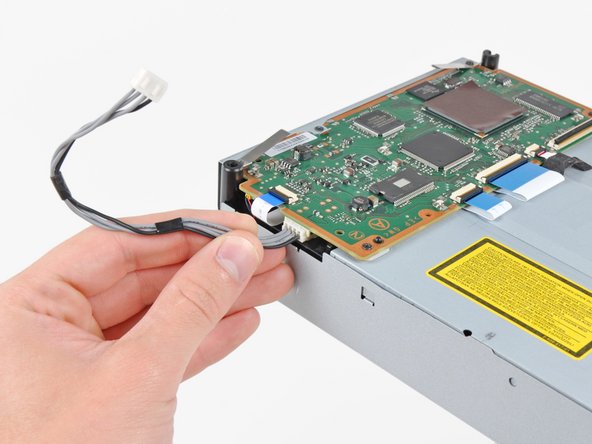
Disconnect the Blu-ray power cable from the motherboard.
-
-
Deze stap is niet vertaald. Help het te vertalen
-
Lift the Blu-ray drive from the edge nearest the power supply and rotate it away from the chassis enough to access its ribbon cable.
-
-
Deze stap is niet vertaald. Help het te vertalen
-
Use your fingernail to flip up the retaining flap on the Blu-ray ribbon cable socket.
-
Pull the ribbon cable out of its socket.
-
Remove the Blu-ray drive from the PS3.
-
-
Deze stap is niet vertaald. Help het te vertalen
-
Pull the control board ribbon cable straight up and out of its socket on the motherboard.
-
-
Deze stap is niet vertaald. Help het te vertalen
-
Remove the two 12 mm Phillips screws securing the control board to the lower case.
-
Remove the control board and its attached cable from the PS3.
-
-
Deze stap is niet vertaald. Help het te vertalen
-
Remove the following eight screws securing the motherboard assembly to the lower case:
-
Seven 12 mm Phillips screws (ph2)
-
One 30 mm Phillips screw
-
-
Deze stap is niet vertaald. Help het te vertalen
-
Use the flat end of a spudger to pry the hard drive bay cover away from the lower case.
-
Remove the hard drive bay cover.
-
-
-
Deze stap is niet vertaald. Help het te vertalen
-
Lift the motherboard assembly out of the lower case.
-
-
Deze stap is niet vertaald. Help het te vertalen
-
Remove the 7.7 mm Phillips screw securing the ground strap to the chassis.
-
-
Deze stap is niet vertaald. Help het te vertalen
-
Pull the AC-In cables slightly away from the rear cover for clearance to access the AC-In connector.
-
While depressing its locking mechanism, pull the AC-In connector out of its socket on the power supply.
-
-
Deze stap is niet vertaald. Help het te vertalen
-
Pull the AC inlet out from the bottom of the rear cover, minding any of its cables that may get caught.
-
-
Deze stap is niet vertaald. Help het te vertalen
-
While lightly pulling the rear cover away from the logic board assembly, use the flat end of a spudger to release the clips along the top and bottom edges of the rear cover.
-
-
Deze stap is niet vertaald. Help het te vertalen
-
Remove the rear cover from the logic board assembly.
-
-
Deze stap is niet vertaald. Help het te vertalen
-
De-route the fan cables from the plastic finger molded into the heat sink.
-
Disconnect the fan from the motherboard.
-
-
Deze stap is niet vertaald. Help het te vertalen
-
Remove the two 9 mm Phillips screws securing the memory card reader to the chassis.
-
-
Deze stap is niet vertaald. Help het te vertalen
-
Lift the memory card reader out of the PS3 enough to access its ribbon cable.
-
Flip up the retaining flap on the memory card reader ribbon cable socket.
-
Pull the ribbon cable out of its socket and remove the memory card reader.
-
-
Deze stap is niet vertaald. Help het te vertalen
-
Disconnect the DC-In cables from the front of the heat sink.
-
-
Deze stap is niet vertaald. Help het te vertalen
-
Remove the five 9 mm Phillips screws securing the power supply to the chassis.
-
-
Deze stap is niet vertaald. Help het te vertalen
-
Lift the power supply by its front edge to clear the two posts attached to the motherboard.
-
Remove the power supply.
-
-
Deze stap is niet vertaald. Help het te vertalen
-
Remove the four 16.5 mm shouldered Phillips screws securing the heat sink to the motherboard.
-
Remove the two brackets held under the screws you just removed.
-
-
Deze stap is niet vertaald. Help het te vertalen
-
Lift the motherboard assembly off the heat sink.
-
Be sure to apply a new layer of thermal paste when reattaching the heat sink.
-
-
Deze stap is niet vertaald. Help het te vertalen
-
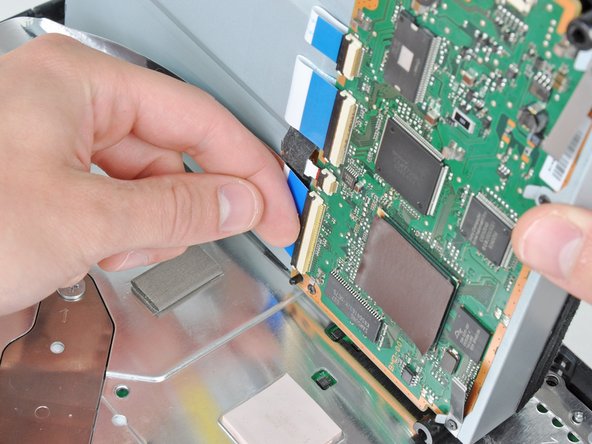
Flip up the retaining flap on the Blu-ray ribbon cable socket.
-
Remove the Blu-ray ribbon cable.
-
-
Deze stap is niet vertaald. Help het te vertalen
-
Flip up the flap on the memory card reader ribbon cable socket and remove the ribbon cable.
-
-
Deze stap is niet vertaald. Help het te vertalen
-
Flip up the retaining flap on the Wi-Fi/Bluetooth ribbon cable socket.
-
Pull the Wi-Fi/Bluetooth ribbon cable out of its socket.
-
-
Deze stap is niet vertaald. Help het te vertalen
-
Disconnect the DC-In cable from the motherboard and set it aside.
-
-
Deze stap is niet vertaald. Help het te vertalen
-
Rotate the PRAM battery slightly counter-clockwise and remove it from the motherboard assembly.
-
-
Deze stap is niet vertaald. Help het te vertalen
-
Remove the blue 8 mm Phillips screw securing the hard drive cage to the chassis.
-
-
Deze stap is niet vertaald. Help het te vertalen
-
Push the hard drive cage toward the front of the motherboard assembly.
-
Remove the hard drive from the motherboard assembly.
-
-
Deze stap is niet vertaald. Help het te vertalen
-
Remove the two 3.7 mm #0 Phillips screws securing the chassis to the hard drive socket.
-
-
Deze stap is niet vertaald. Help het te vertalen
-
Remove the two 8.3 mm #0 Phillips screws securing the two halves of the motherboard together.
-
-
Deze stap is niet vertaald. Help het te vertalen
-
Carefully feed the Wi-Fi/Bluetooth ribbon cable through the hole in the top motherboard cover.
-
Remove the top motherboard cover.
-
-
Deze stap is niet vertaald. Help het te vertalen
-
Remove the motherboard from the bottom motherboard cover.
-
-
Deze stap is niet vertaald. Help het te vertalen
-
Flip up the retaining flap on the Wi-Fi/Bluetooth ribbon cable socket.
-
Remove the Wi-Fi/Bluetooth ribbon cable from the motherboard.
-
Motherboard remains.
-
Annuleren: ik heb deze handleiding niet afgemaakt.
81 andere personen hebben deze handleiding voltooid.
4 opmerkingen
Just fixed my YLOD last nite and it works like a charm! best guide on the internet, and it was free! i bought the kit here and it has everything you need minus the gunk off. One thing I'd like to see is how to organize all the screws... I had 2 left over after reassembling the unit. it'll also be nice if the guide showed you how to put certain parts back on (back case, top case units).
It took me a total of 3 hours to do. Not bad considering I don't tear things apart for a living.
other than that, the guide and kit are awesome!
Just fixed my PS3 Fat. It's the only one that plays PS2 games so it was hard to part with. Instructions were easy to follow. However, I didn't replace the pads on the chips. PS3 is working beautifully again and the fan is much quieter now. I kept forgetting screws and the WIFI cable so I had to take it apart at least a few more times. Now I can take apart and reassemble the PS3 in my sleep.


