Ga door naar hoofdinhoud
Word lid van de reparatiegemeenschap - Account aanmaken

Parrot Skycontroller 2 Power Port Replacement

Wat je nodig hebt

  1. Parrot Skycontroller 2 Power Port  Replacement, Power Port: stap 1, afbeelding 1 van 3 Parrot Skycontroller 2 Power Port  Replacement, Power Port: stap 1, afbeelding 2 van 3 Parrot Skycontroller 2 Power Port  Replacement, Power Port: stap 1, afbeelding 3 van 3
    • Flip the controller upside down.

    Vraag FixBot
  2. Parrot Skycontroller 2 Power Port  Replacement: stap 2, afbeelding 1 van 1
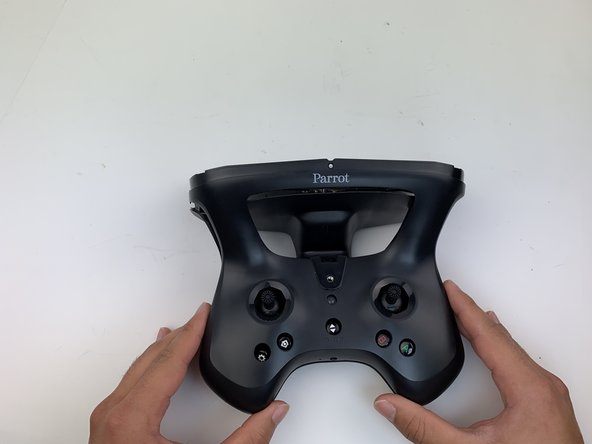
    • Remove one 9mm screw using a #4 flathead screwdriver.

    Vraag FixBot
  3. Parrot Skycontroller 2 Power Port  Replacement: stap 3, afbeelding 1 van 3 Parrot Skycontroller 2 Power Port  Replacement: stap 3, afbeelding 2 van 3 Parrot Skycontroller 2 Power Port  Replacement: stap 3, afbeelding 3 van 3
    • Insert the plastic opening tool into the top of the battery cover and pry upwards to lift the cover.

    • Remove the cover by pulling up and out.

    Vraag FixBot
  4. Parrot Skycontroller 2 Power Port  Replacement: stap 4, afbeelding 1 van 3 Parrot Skycontroller 2 Power Port  Replacement: stap 4, afbeelding 2 van 3 Parrot Skycontroller 2 Power Port  Replacement: stap 4, afbeelding 3 van 3
    • Pull the connectors out by gently pushing the tabs and pulling up on the connector.

    • Disconnect the battery from the remote by pressing the white tab and pulling apart.

    Vraag FixBot
  5. Parrot Skycontroller 2 Power Port  Replacement: stap 5, afbeelding 1 van 2 Parrot Skycontroller 2 Power Port  Replacement: stap 5, afbeelding 2 van 2
    • Remove the battery from it's brackets by pulling up gently on the ends of the battery.

    • Some force may be required to separate the battery from it's brackets.

    Vraag FixBot
  6. Parrot Skycontroller 2 Power Port  Replacement: stap 6, afbeelding 1 van 1
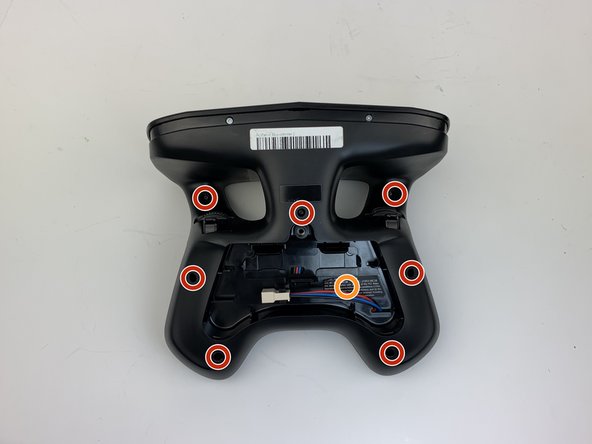
    • Remove the seven black 11mm screws using the Torx TR6 screwdriver.

    • There is a hidden screw located behind the sticker in the battery compartment.

    • Pull back the sticker with your finger nail and remove the one black 11mm screw using the Torx TR6 screwdriver.

    Vraag FixBot
  7. Parrot Skycontroller 2 Power Port  Replacement: stap 7, afbeelding 1 van 3 Parrot Skycontroller 2 Power Port  Replacement: stap 7, afbeelding 2 van 3 Parrot Skycontroller 2 Power Port  Replacement: stap 7, afbeelding 3 van 3
    • Remove the seven silver 4mm screws from around the edge of the top panel using the Torx TR6 Screwdriver.

    • The opposite side to the third picture has a screw located on each side of the USB port.

    Vraag FixBot
  8. Parrot Skycontroller 2 Power Port  Replacement: stap 8, afbeelding 1 van 1
    • Remove the battery compartment plate by pulling up and out.

    Vraag FixBot
  9. Parrot Skycontroller 2 Power Port  Replacement: stap 9, afbeelding 1 van 1
    • Remove the top plate by pushing on the corners with your hand.

    • Be careful to not pull too hard on the cable.

    Vraag FixBot
  10. Parrot Skycontroller 2 Power Port  Replacement: stap 10, afbeelding 1 van 3 Parrot Skycontroller 2 Power Port  Replacement: stap 10, afbeelding 2 van 3 Parrot Skycontroller 2 Power Port  Replacement: stap 10, afbeelding 3 van 3
    • Remove the face plate by pulling up and out.

    Vraag FixBot
  11. Parrot Skycontroller 2 Power Port  Replacement: stap 11, afbeelding 1 van 3 Parrot Skycontroller 2 Power Port  Replacement: stap 11, afbeelding 2 van 3 Parrot Skycontroller 2 Power Port  Replacement: stap 11, afbeelding 3 van 3
    • Make sure the controller is flat, then proceed to desolder the power port.

    • Desolder the four connection points surrounding the charging port.

    • Remove the power port from the controller.

    • For help with soldering best practices, check out our How to Solder and Desolder Connections guide.

    • Excessive heat can damage the power port, so do not apply the soldering iron to the component for too long.

    Vraag FixBot
Conclusie

To reassemble your device, follow these instructions in reverse order.

Één andere persoon heeft deze handleiding voltooid.

0Gids Commentaar

Voeg opmerking toe

Weergavestatistieken:

Afgelopen 24 uren: 1

Afgelopen 7 dagen: 11

Afgelopen 30 dagen: 60

Altijd: 799