Wat je nodig hebt
-
-
-
We beginnen met het verwijderen van het achterpaneel.
-
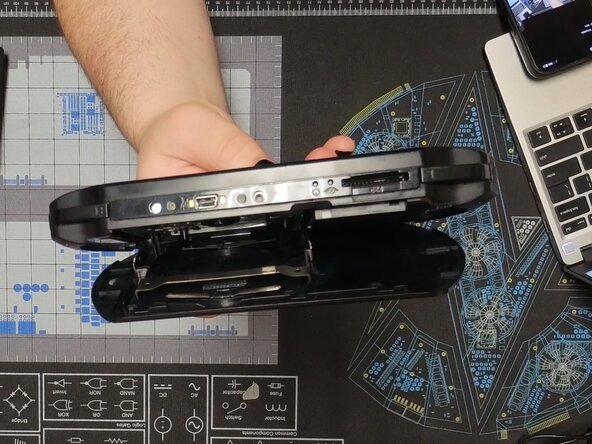
Open hiervoor het paneel en knijp voorzichtig in de UMD-lade totdat deze omhoog komt.
-
Indien correct uitgevoerd, hoort deze plat tegen het achterpaneel aan te liggen terwijl hij open staat.
-
-
-
Buig voorzichtig aan het achterpaneel om het scharnier aan de linkerkant los te maken.
-
Zodra het eruit is gekomen, zou het eruit moeten zien zoals op de tweede foto.
-
-
-
Verwijder de schroef met een #00 Philips-schroevendraaier en schuif de batterijklep omhoog.
-
De batterij kan nu worden verwijderd door deze eruit te trekken.
-
Bij het terugplaatsen is het handig om een spudger te gebruiken om de kabel terug te duwen.
-
-
-
-
Verwijder alle vier de schroeven aan de achterkant met hetzelfde bitje als voorheen.
-
Verwijder daarna de twee bovenste schroeven.
-
-
-
Steek vervolgens een spudger tussen de L-knop en de voorplaat en maak ze van elkaar los. Doe daarna hetzelfde aan de rechterkant.
-
Schuif vervolgens de voorplaat omlaag richting de onderkant van het scherm om de onderste clips los te maken.
-
Zorg dat je de voorplaat ondersteunt, aangezien de knoppen aan de voorzijde nog verbonden zijn met een kwetsbare lintkabel.
-
-
-
Schuif een spudger onder beide clips om het scherm los te maken
-
Draai het scherm vervolgens voorzichtig naar de linkerkant van het apparaat zodat je het moederbord kunt zien.
-
-
-
Klik voorzichtig de lintkabel van het Beeldscherm los en verwijder deze.
-
Leg het Beeldscherm vervolgens opzij.
-
Haal de tape van de lintkabel van het voorpaneel, klik deze los en verwijder de kabel.
-
-
-
Verwijder de lintkabel en voedingskabel
-
Til voorzichtig de knopconstructie en oplaadpoort op
-
De schouderknop zit vastgeplakt, dus schuif een spudger onder de knop en pel deze er voorzichtig af
-
-
-
Klik de twee gemarkeerde lintkabels los en verwijder ze
-
Verwijder de gemarkeerde schroef en til de analoge stick eruit
-
Til het knoppenpaneel voorzichtig op en pel de schouderknop eraf
-
Installeer bij het opnieuw in elkaar zetten de joystick vóór de knoppen.
-
-
-
Maak beide lintkabels los en verwijder ze
-
Verwijder de gemarkeerde schroef op het moederbord
-
Til de onderkant van het moederbord op en schuif het eruit
-
Zorg er voor de herinstallatie voor dat de afdekking van de aan/uit-schakelaar is geplaatst voordat deze wordt vastgeschroefd. Deze moet losgeschroefd worden om de installatie uit te voeren
-
-
-
Draai het apparaat om en verwijder de gemarkeerde schroeven
-
Til de UMD-lezer uit het apparaat zonder de lens aan te raken
-
-
-
Gefeliciteerd, je hebt je PSP E1000 uit elkaar gehaald. Veel plezier met de hermontage!
-


 Vraag FixBot




4Gids Commentaar
My aim was to clean the inside, so I only disassembled it up to the screen, but I accidentally pulled the socket where the volume button is connected hard.So that black thing broke but the part that goes into the socket is intact. Finally, after cleaning it, I plugged it into the socket, then I put the LCD screen into its socket and placed it. Finally, after putting the device back into its parts, I pressed the power button but the screen did not come on.
What black thing are you referring to?
When you turned it on did the top LEDs come on or did they stay off?
Same thing for me. Got to the LCD part to clean the dust, plugged everything back but the green Led didn't show up when i tried to turn it on. The charging light does come on though.
The door won't close . I think I messed up when I took out the white piece under the umd piece
