Inleiding
This guide will walk you through the steps to disassemble the Oculus Quest 2 controller to access the joystick and clean it to remove drift.
PROCEED AT YOUR OWN RISK. It is easy to lose pieces and damage the device. Opening it up like this will void the warranty if the device is still covered.
I first used Electrical Contact Cleaner to help fix the drift with some success, but the drift eventually would come back. Over time, the duration my controller would work without drift would decrease; so I decided to open up the controller to learn more about what was happening and how to correct it.
Before attempting this, I recommend trying Electrical Contact Cleaner first.
3 pieces of advice on using contact spray:
- Remove the battery first!
- Less spray is better. (If you completely saturate the joystick, it will take longer to dry since it is enclosed. I like to leave the controller upside down for 5-10 minutes to let it dry out.)
- Make sure that you are pressing down on the joystick while spraying so that the cleaner can reach the sensor.
- Once you have sprayed it, move the joystick around in circles. This will cause the 2 contact pieces to move the cleaner around on the sensor to try to clean it.
- Pressing down on the joystick while moving it doesn't make a difference. In fact, it might actually make it less effective.
I hope this helps anyone adventurous enough to attempt this. At the very least, you will now understand what causes drift and why you can't soak the joystick with Electrical Contact Cleaner to fix it.
Wat je nodig hebt
-
Gereedschap gebruikt in deze stap:Tweezers$4.99
-
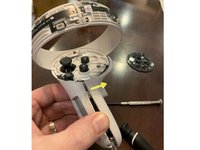
Start by opening the battery compartment and removing the batteries, using your fingers or something else to gently pull them out.
-
Peel off the three stickers that are hiding screws using your fingernails or something pointy, such as a pair of tweezers.
-
Unscrew the three T5 Torx screws behind the stickers using a small Torx screwdriver.
-
Remove the fourth screw located inside the hole near the top of the battery compartment using the same Torx screwdriver.
-
-
-
Gently pry the faceplate off using a spudger or flathead screwdriver.
-
-
-
Remove the five Torx T5 screws.
-
Remove the longer, black T5 screw.
-
Remove the two smaller T4 screws.
-
Remove the single long silver T5 screw.
The ring is going to fight you every step of the way, by design. Many of the screws are angled in such a way as to put the ring in the way of a driver. You may need to just use a bit and hand-screw them.
It seems, that the yellow marked screws are something under T5, like T4 or T3. With my T5 bit, i couldn't remove these screws.
Yes, I use T4 for the yellow marked screws
can sombody help i cant remove the blue marked screw at all when i screw it it just scews in place and bobs up and down a little i tried it on the other controller and it does the same thing
When unscrewing, slip something like a credit card or other type of flat plastic shim under the screw head with one hand while unscrewing with the other
-
-
-
Use a spudger or screwdriver to press the plastic notch until it releases.
-
Starting from the side without the notch, gently remove the casing using your hands by moving it away from the center of the console.
-
-
-
Using your hands, move the left half of the handle slightly (0.5cm) away from the controller.
-
While holding the left side as described above, push the right side towards the body of the controller.
-
Now you are able to slide the right part to the right and remove it.
-
The pin is located here.
I am struggling with this step there is a pin holding it right behind the button you push with your middle finger and it won’t come loose.
Une vise en plus en haut du boîtier de pile ! sur mon model plus récent !
-
-
-
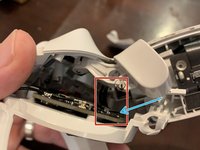
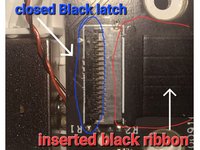
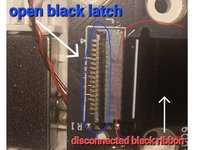
Disconnect the ribbon. There is a latch (possibly black - opposite from the ribbon side of the connector) you flip up on the main circuit board (blue arrow). This is easy to take apart but a pain to put back together. Make sure you have needle-nose pliers or tweezers for this when you put it back together.
-
Blue arrow points to ribbon connector on main circuit board. White arrows on 2nd & 3rd images point to ribbon and connector latch on battery circuit board.
You just need to pull, in paralel direction to the board. There is no latch to open. I got it back in using flat head pliers but slightly scratched the coating. Still works but idealy you use pliers with plastic tips.
There is a latch on almost all ribbon connectors, if you didn't find it, you risk breaking it
You can get to this ribbon cable if you teardown the handle further and then you can remove the ribbon cable from the handle and fit it better to the circuit board and avoid the risk of tearing the ribbon cable just by removing the bottom part behind the battery bay and to give your self more space you can remove the bottom trigger
I agree that removing the rest of the handle and removing the ribbon from both ends is easier. The ribbon is also glue to part of the handle so don't pull on it and be careful freeing it as it can tear if you using anything sharp. Other wise it's fairly difficult to put back on.
I struggled with getting the ribbon cable re-attached until I saw this Youtube video: https://www.youtube.com/watch?v=aZ57n6ia.... At 9:20 he explains how to break the handle down further. After that, it took me 10 seconds.
A nabour tore the ribbon cable connector of the board when taking the controller apart. Anyone know the name of the connector model?
Thanks!And... this is where I broke the latch 😒....
Ok now I'm pretty sure I broke the latch because there is no latch to lift up. This may have changed in most recent controllers, but THERE WAS NO LATCH on mine. VR Wizard is right. It just needs to be pulled horizontally.
This tutorial need to be amended. It literally made me break the connector 😓
My controllers did in fact have latches on all ribbon cables.
For anyone reading through these comments while attempting this repair: Take your time, have lots of light, a magnifier if possible, and take your time to closely inspect the ribbon connectors for latches before proceeding.
I was quite confused about the latch idea as I'm used to it being on the same side of the connector as the ribbon. This is the first time I've seen the latch on the opposite side. See the two images available to show one of the the latches better.
Also the connector this step refers to is the main circuit board connector. NOT the battery circuit board connector, which doesn't need to be disconnected. -
-
-
Now, you need to remove the 4 screws holding the circuit board to the controller.
-
The joystick has a small ribbon (blue ribbon) as well, but it is easy to connect and disconnect. Flip the latch up to disconnect the joystick ribbon.
The screw in the top right corner of this pic would be MUCH more accessible if the trigger were removed - is this possible?
Yes, carefully push the pivot pin out from the trigger pivot point. Remove trigger while noting how return spring is mated with the trigger.
-
-
-
-
Lift up the circuit board and pull the joystick free. The X button and the Oculus button may fall out. Not a big deal, just make sure they are put back in the correct position before sealing everything up.
this looks extremely similar to gulikit switch joy-cons anyone knows if they could be used instead?
https://gulikit.com/productinfo/945307.h...Sadly no they cant.
The switch thumbsticks go at a right angle to their contact point. These as you can see are a straight line.
It would make things much easier tho. But, companies gotta be all unique with their stuff and have zero interchangeability. Honestly i keep praying someone will come up with “hall effect” sticks for quest and switch.
-
-
-
Pull the rubber cap off of the joystick.
There is a myth going around that the Oculus/Meta Quest 2 joystick/ thumbsticks have a capacitive censor on the rubber pads. That seems to not be the case as there are no circuits attached to it.
-
-
-
The housing is held together by the tabs on the bottom plate. Bend them back to pop it off. Be careful doing this, there are a lot of little pieces and a spring that can go flying.
-
-
-
Here are all of the pieces inside the joystick on the bottom row.
-
1 - The sensor that causes drift when dirty
-
2 - The bottom part of the joystick that the stick fits into. This is what moves the sensor left/right.
-
3 - This piece sits on top of #2. This is what moves the sensor up/down
-
4 - The stick. This fits through the hole in #3 and fits inside #2.
-
5 - These two pieces are what make contact with the sensor and they are moved around by #2 and #3
-
MISSING FROM PICTURE - There is a little black plastic piece that is in the shape of an arch that locks #2 into place in the housing.
-
-
-
Here are all of the pieces inside the joystick on the top row.
-
6 - Metal housing
-
7 - Spring for pressing down on the joystick
-
8 - Metal ring to keep the joystick in place and to create contract with the spring (#7)
-
9 - Plastic housing
-
-
-
Now that you have it taken apart, use contact cleaner to clean both pieces in the red box on the right and clean the sensor in the red box on the left. Cleaning the sensor is the most important. After spraying with contact cleaner, I use a small paint brush to clean it.
-
The 3 black sections (blue arrows) are what recognize up/down/left/right. If there is anything on those, it causes drift. The more you use the controller, the more the black material breaks down and leaves residue behind. Also, the more you use it, the more sweat/dust/dirt find their way into the housing.
-
If you use the controller long enough, eventually this will breakdown and can't be fixed. This is a problem with all controllers, not just Oculus.
so seeming that the problem is residue from the black material and foreign debris. is it possible to seal the housing?
-
-
-
Put the stick through the opening and attach #2 to the bottom of the stick like this. Both #2 and #3 can only sit in the plastic housing a certain way. If it doesn't move correctly, this is probably the problem.
-
-
-
Slightly push the stick up so that you can place both #5s in the groove. #2 and #3 sit on top of #5. At this point you should be able to see how the joystick makes #5 move.
-
-
-
Place the spring on and the tiny little black piece. That tiny little black piece (blue arrow) locks #2 in place.
-
-
-
Put the sensor on the metal housing. It can only fit one way.
-
Now, sandwich the housing together without letting anything slip.
-
Bend the metal tabs back into place so that it is secured.
-
-
-
Reverse the instructions to put it back together. Be careful with the ribbon I mentioned in Step 6.
-
Some of the pieces require a little finesse to reassemble, especially the piece that goes around the trigger.
-
Make sure that you didn't disconnect any of the ribbons. The last time I did this, I accidentally loosened one of the ribbons under the trigger (blue arrow) and eventually is disconnected.
Can you reattach the the part the ribbon slides into if it comes detached from the circuit bouard
my controller doesn't have screws behind the battery place
You have to remove the sticker first
Hello. Can anyone help me with a problem i have?
I think i might've damaged my controllers in the process.
the right controller wont track properly and randomly disconnects and connects. and sometimes it disconnects completely.
even with a fully charged battery inside. i have to take the battery out and put in again to make the controller work again.
the tracking is all over the place.
my left controller works fine no problems at all.Thank you so much mate. Turns out my sensors were dirty, and it was causing a massive drift to the right.
After cleaning and air spraying it, works like a charm.
yay i fixed mine by cleaning the green pcb part thing with a cotton ball damped with isopropyl 70% alcohol
-


To reassemble your device, follow these instructions in reverse order.
To reassemble your device, follow these instructions in reverse order.
Annuleren: ik heb deze handleiding niet afgemaakt.
68 andere personen hebben deze handleiding voltooid.
43 opmerkingen
i wanna know how the controller worke. infared or bluetooth, or even area positioning system bull $@$*, please help actually sent from my quest 2
The controller uses infared to connect to the quest 2.
Lucas C -
That's BS. It uses Bluetooth 5.0 LE. The Quest 2 has no way to send or recieve IR
Both replies are half right. The controllers use BT to connect to the headset for functionality, but positional tracking is done via infrared in the halos. The 4 cameras on the front of the headset are infrared cameras.
Justin P -
Yeah, a basic inspection of the controller says it does not operate by infrared. Infrared is an optic device, and the controller has no optics. I'll stick with Lucas on this one.
Justin P has the correct answer. Button / Trigger / Analog-Stick / Touch-Sensor inputs are communicated to the headset through bluetooth, while the positional tracking of the controllers is done visually through the headset's cameras which are looking for the (invisible to human eye) infrared spots emitted from ir leds in the controller's ring.
-A VR Developer
BAM5 -
Bam5 is correct. I suppose everybody was on the right path but he nailed it with an excellent correct explanation.
The controller has about 12 Infra-red lights on the controller, and the headset has IR cameras that track the distance between the lights on the controllers and does some algorithm stuff to work out the position of the controllers. Then bluetooth handles the controllers buttons and also the other sensors like an accelerometer. These sensors are used whenever the cameras cant see the controller and it does track pretty well when its behind your back etc. but only for about 3-10 seconds
Nick -
Thank you! This guide saved me from purchasing a new left controller, when it developed at “stutter” or “stumble” when i tried moving forwards. I followed the guide, though i didnt have any contact cleaner. I used isopropylalcohol on cotton swab (cotton bud?) instead with excellent results.
thank you, fixed my controller when adjusting the deadzone and spraying contact cleaner from the outside didnt help.
thank you, but I tried opening mine and the analog assembly looks a little bit different from yours. for one the outer casing is black plastic instead of white, and on the sensor inside it only has 2 black pads while the other ones are just bare copper traces. also there are no small black piece that holds #2 in place.
I tried cleaning them still with mixed result. it does help with the jitter issue (in my case the analog keeps being tilted down on its own randomly) but it doesn't entirely fix the problem for me.
replacing the whole analog part might be the only way but sadly it's hard to find replacement for
here's a picture for reference https://imgur.com/a/kys5llb
Replacements are available on aliexpress
Lucas C -
you can buy replacement analogs on amazon
I got one for $12 USD
It comes with tools as well!
Replacement now available on Aliexpress.
I need help with the infrared LED. Everything seems fine, pressing the Oculus button + B does make the controller vibrate, but the LED's wont turn on.
This worked for me. Thank you for such a detailed instruction.
The symptom I experienced was that the RIGHT controller was not selecting items in the O2 home menus. This is because the left controller joystick was constantly stealing the focus due to "noise" that this wonderful guide helps resolve. Thank you thank you thank you!
I did this fix this evening and the drift is completely gone. there is 0 drift now. One thing that I would recommend you add to your tutorial as I have a problem that future me will have to tackle.... When putting everything back together, please mention that the long silver screw should not be over tightened as it is very easy to break. I tightened the long silver screw and after trying to make sure it was tight, the top part without thread broke off. :-/
BUT.... nothing structurally was compromised or loose. I will just have a problem when I go to clean the joystick once more.
Thank you for this tutorial.
@matty_mac are you actually still alive? I would love to have a video tutorial because my small brain can't get the controller back together. Would this be possible for you or anyone else with experience?
There's a dude on YouTube goes by ima_rainbow who fr does a kickass video tutorial on this if ur still needing one , or if anyone that sees this is looking for one. Dude was the only reason I choked up the courage to open mine up but ifixit (amazing site js fr lol) was the only reason I got the balls to attempt opening up the headset itself actually, when it got stuck in a bootloop
Alguna idea de como reparar el gatillo lateral?
These are fantastic instructions. The symptom for me was that left & right was drifting and not working consistently. Upon disassembly of my joystick I found that one of the black plastic pieces (the tab that controls left-right, unsurprisingly) was broken. Gluing it wasn't a realistic option so I ordered a replacement part.
Spilled some juice on the controller and the stick was stuck reading full left. Removing cap and injecting spray didn't help. Teardown revealed the joystick ribbon connector was contaminated.
Sprayed connector with electrical cleaner for a few seconds, reassembled, and performed stick calibration - good as new.
Thx for the teardown instructions!
The ribbon cords that r warned about at the end of this marked by the blue arrows , in case anyone else ever goes thru wat I did at least , over time have a possibility of popping off the circuit board (well the connector for the ribbon cord technically, meaning the cord is in the connector also js) and it will cause the controller to basically vibrate over and over and over plus not track since those r the ribbon cords for the sensors that go along the ring. And if this is something that happens and ur like someone like myself who doesnt own a soldering iron dont go running to buy a new controller, and I'm sure theres probably plenty of people who will look at this and say I'm fukn with people when I say if u have it at ur disposal just simply gorilla glue it back on. Obviously it doesnt need more than a drop of it but as long as u line up the popped off connector to where it should be which isnt hard and let dry rq its highly likely ull get it working again. Dont believe me well u can try it not like u can
Break it if it's already broken so. Plus if ur having to get to this point because ur $@$* won't work wat else do u gotta lose lol at least that was my mentality.
can sombody help i cant remove the blue marked screw at all when i screw it it just scews in place and bobs up and down a little i tried it on the other controller and it does the same thing
The main ribbon that is inserted into the motherboard came off. Can you help me with this? Below I have tried to explain it best I could. I had no problem with taking everything apart following your directions and it was when I was doing the assembly and went to attach the ribbon the part attached to the motherboard that the ribbon slipped into came off the motherboard. It almost seemed powdery and crumbled off. I'm no tech but was wondering if this is something I can fix or do I need professional help. Thanks and I really like your tutorials they are very helpful.
*This is the ribbon I'm referring to from the dismantling controller directions Step 6 but I was reassembling at this point. "There is a latch you flip up on the circuit board (blue arrow). This is easy to take apart but a pain to put back together. Make sure you have needle-nose pliers or tweezers for this when you put it back together." Oculus Quest 2 Controller Disassembly
i eefed up the ribbon socket (step 6) it can be fixed ?
Thank you for the tutorial. I did as you explained and it worked wonderfully, no drift anymore.
Details about step 5 of prying the controller apart and disconnecting the ribbon in step 6 can be supplemented with additional steps found in:
https://www.youtube.com/watch?v=aZ57n6ia... between 9min00 and 10min45.
Thanks again for the help.
Gotta say, this tutorial is way too good. Got my drift fixed on my first try!
they both use bt and infered
Great guide, I do wish it didn't skip a section on removing the additional plastic section between steps 6 and 7 to access the circuit board fully but overall the guide was very helpful and helped me successfully replace a drifting joystick
I have to say thank you for your comment. I actually followed this guide got the joystick all the way apart and put it all back together did not perform any proper cleaning but it was still drifting because well I didn't clean it. Your comment gave me the idea of replacing the joystick rather than repairing the joystick. Thank you very much I will now be looking into buying joysticks to put in rather than trying to clean the old ones that are drifting. Where might one find those joysticks I wonder.
Apologies, just came back across this thread today and not totally sure if I'm responding the correct way here but if you are still looking for sources, I got mine from eBay, easy enough to find sellers with a good rep but make sure to pay extra attention to the specific listings, as some sell 2 modules while others only sell the 1.
Aranohr -