Ga door naar hoofdinhoud

Nokia G22 Back Cover Replacement

Wat je nodig hebt

  1. Nokia G22 Back Cover Replacement, Eject the SIM card tray: stap 1, afbeelding 1 van 3 Nokia G22 Back Cover Replacement, Eject the SIM card tray: stap 1, afbeelding 2 van 3 Nokia G22 Back Cover Replacement, Eject the SIM card tray: stap 1, afbeelding 3 van 3
    • Insert a SIM eject tool, bit, or a straightened paper clip into the small hole on the SIM card tray on the upper left edge of the phone.

    • Press firmly to eject the tray.

  2. Nokia G22 Back Cover Replacement, Remove the SIM card tray: stap 2, afbeelding 1 van 3 Nokia G22 Back Cover Replacement, Remove the SIM card tray: stap 2, afbeelding 2 van 3 Nokia G22 Back Cover Replacement, Remove the SIM card tray: stap 2, afbeelding 3 van 3
    • Remove the SIM card tray.

    • When installing either a SIM card or a microSD card, make sure they're in the correct orientation and sitting completely flush with the edges of the tray before reinserting the tray into the phone.

  3. Nokia G22 Back Cover Replacement, Insert an opening pick: stap 3, afbeelding 1 van 3 Nokia G22 Back Cover Replacement, Insert an opening pick: stap 3, afbeelding 2 van 3 Nokia G22 Back Cover Replacement, Insert an opening pick: stap 3, afbeelding 3 van 3
    • The back cover of the phone is held in place by plastic clips.

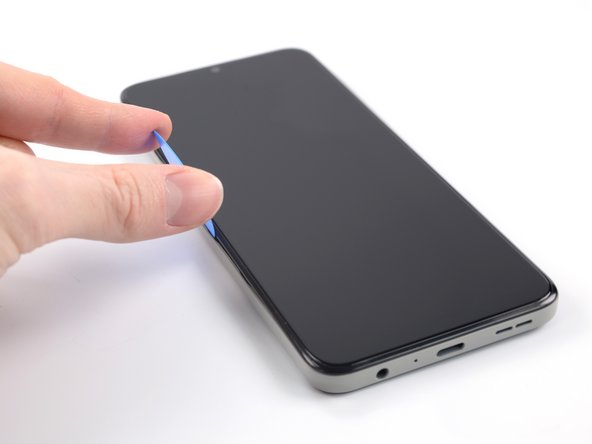
    • Insert an opening pick under the small notch in the SIM card tray slot.

  4. Nokia G22 Back Cover Replacement, Release the plastic clips: stap 4, afbeelding 1 van 3 Nokia G22 Back Cover Replacement, Release the plastic clips: stap 4, afbeelding 2 van 3 Nokia G22 Back Cover Replacement, Release the plastic clips: stap 4, afbeelding 3 van 3
    • Position the opening pick at a steep downward angle between the back cover and the screen assembly.

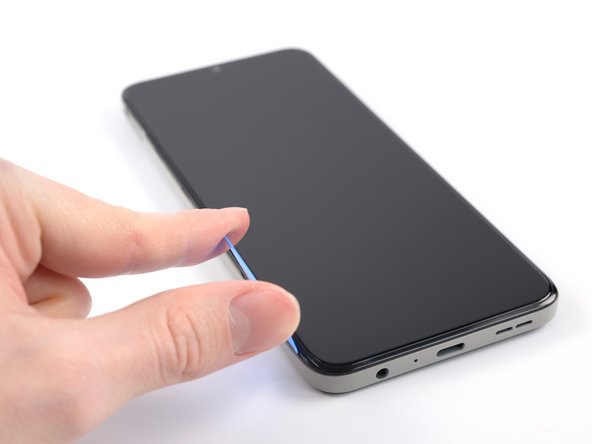
    • Slide the opening pick down the left edge of the phone to release the plastic clips.

  5. Nokia G22 Back Cover Replacement: stap 5, afbeelding 1 van 3 Nokia G22 Back Cover Replacement: stap 5, afbeelding 2 van 3 Nokia G22 Back Cover Replacement: stap 5, afbeelding 3 van 3
    • Turn the opening pick around the corner and continue to slide it along the bottom edge to release the plastic clips.

  6. Nokia G22 Back Cover Replacement: stap 6, afbeelding 1 van 3 Nokia G22 Back Cover Replacement: stap 6, afbeelding 2 van 3 Nokia G22 Back Cover Replacement: stap 6, afbeelding 3 van 3
    • Slide the opening pick up the right edge to continue releasing the plastic clips.

  7. Nokia G22 Back Cover Replacement: stap 7, afbeelding 1 van 3 Nokia G22 Back Cover Replacement: stap 7, afbeelding 2 van 3 Nokia G22 Back Cover Replacement: stap 7, afbeelding 3 van 3
    • Slide the opening pick along the top edge to release the remaining plastic clips.

    • Don't try to fully remove the back cover just yet, as it's still connected to the phone.

  8. Nokia G22 Back Cover Replacement, Flip open the back cover: stap 8, afbeelding 1 van 3 Nokia G22 Back Cover Replacement, Flip open the back cover: stap 8, afbeelding 2 van 3 Nokia G22 Back Cover Replacement, Flip open the back cover: stap 8, afbeelding 3 van 3
    • With the phone laying screen-side down, carefully lift the right edge of the back cover, opening it like a book.

    • Take care not to strain or tear the attached fingerprint reader cable during this procedure.

    • Lay the back cover next to the phone.

  9. Nokia G22 Back Cover Replacement, Unfasten the fingerprint reader bracket: stap 9, afbeelding 1 van 1
    • Use a Phillips screwdriver to remove the 3.8 mm‑long screw securing the fingerprint reader bracket.

  10. Nokia G22 Back Cover Replacement, Remove the fingerprint reader bracket: stap 10, afbeelding 1 van 2 Nokia G22 Back Cover Replacement, Remove the fingerprint reader bracket: stap 10, afbeelding 2 van 2
    • Use a pair of tweezers or your fingers to remove the fingerprint reader bracket.

    • Take care not to puncture the battery with your tool—a punctured or bent battery may leak dangerous chemicals or cause a fire.

    • During reassembly, make sure to align the fingerprint reader bracket correctly and push the small metal edge back into its recess under the motherboard cover.

  11. Nokia G22 Back Cover Replacement, Disconnect the fingerprint reader: stap 11, afbeelding 1 van 3 Nokia G22 Back Cover Replacement, Disconnect the fingerprint reader: stap 11, afbeelding 2 van 3 Nokia G22 Back Cover Replacement, Disconnect the fingerprint reader: stap 11, afbeelding 3 van 3
    • Use the flat end of a spudger to disconnect the fingerprint reader by prying the connector straight up from its socket.

    • To re-attach press connectors like this one, carefully align and press down on one side until it clicks into place, then repeat on the other side. Do not press down on the middle. If the connector is misaligned, the pins can bend and cause permanent damage.

    • Remove the back cover.

  12. Nokia G22 Back Cover Replacement, Release the fingerprint reader: stap 12, afbeelding 1 van 2 Nokia G22 Back Cover Replacement, Release the fingerprint reader: stap 12, afbeelding 2 van 2
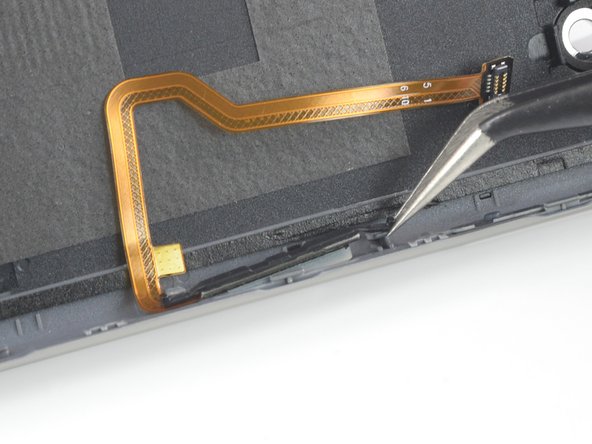
    • Using a pair of tweezers, grip the top of the fingerprint reader and lift it out and around the top plastic tab, separating it from the back cover.

  13. Nokia G22 Back Cover Replacement, Remove the fingerprint reader: stap 13, afbeelding 1 van 2 Nokia G22 Back Cover Replacement, Remove the fingerprint reader: stap 13, afbeelding 2 van 2
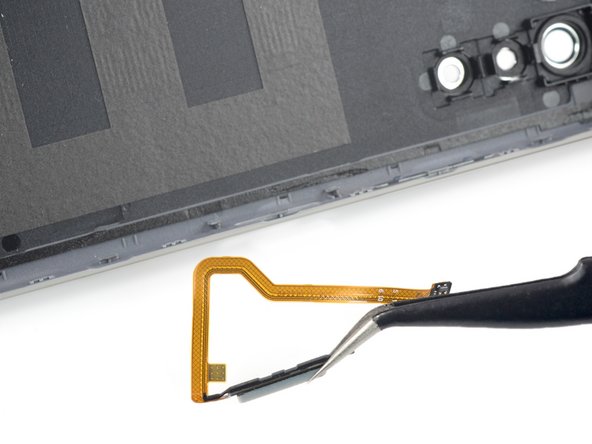
    • Use a pair of tweezers to lift the fingerprint reader out of its bottom plastic tab.

    • Remove the fingerprint reader.

  14. Nokia G22 Back Cover Replacement, Only the back cover remains: stap 14, afbeelding 1 van 1
    • Only the back cover remains.

    • During reassembly, you will need to transfer the fingerprint reader to the new part.

Conclusie

To reassemble your device, follow these instructions in reverse order.

Take your e-waste to an R2 or e-Stewards certified recycler.

Repair didn’t go as planned? Try some basic troubleshooting, or ask our Answers community for help.

3 andere personen hebben deze handleiding voltooid.

Manuel Haeussermann

Lid sinds: 07/13/22

15.541 Reputatie

71 handleidingen geschreven

Team

iFixit Lid van iFixit

Staff

135 Leden

16.820 handleidingen geschreven

0 opmerkingen

Voeg opmerking toe

Weergavestatistieken:

Afgelopen 24 uren: 5

Afgelopen 7 dagen: 32

Afgelopen 30 dagen: 129

Altijd: 3,290