Deze vertaling is door een computer gegenereerd en is nog niet door iemand nagekeken. Spreek je deze taal? Bekijk het hier.
Inleiding
Deze handleiding bevat instructies voor het vervangen van het schijfstation in je Nintendo Wii mini, zodat game-discs weer kunnen worden geplaatst. Naast het feit dat het schijfstation geen disc kan innemen, kunnen vuil op de disc en krassen er uiteindelijk voor zorgen dat het spel schokkerig is of onduidelijk wordt weergegeven. Mogelijk moet je de disc vervangen. De pagina voor probleemoplossing geeft je meer inzicht in verdere problemen.
Het gebruik van een pincet voor het hanteren van kleine voorwerpen zoals schroeven wordt aangeraden om verlies van onderdelen te voorkomen. Om verdere problemen met de hardware te voorkomen, mag je niet aan (kabel)aansluitingen of kabels komen terwijl je de ventilator losmaakt, omdat dit ertoe kan leiden dat de (kabel)aansluiting losraakt.
Wat je nodig hebt
-
-
-
Verwijder de twee rubberen voetjes aan de achterkant van de console om de verborgen schroeven bloot te leggen.
-
Verwijder de vier 6 mm kruiskopschroeven.
 Vraag FixBot
-
-
-
Zet de Wii mini rechtop. Haal vervolgens een plastic Openingsgereedschap langs de middelste rand van de console om het bovenste deel los te maken.
-
Til voorzichtig de bovenste bedekking van de console op en leg deze opzij.
-
-
-
-
Gereedschap gebruikt in deze stap:Tweezers$4.99
-
Draai de Wii mini om zodat de achterkant van het apparaat naar je toe wijst.
-
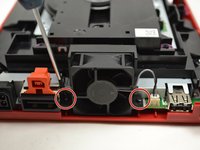
Gebruik een Phillips #0-kruiskopschroevendraaier om de twee schroeven van 6 mm aan weerszijden van het ventilatordeel los te schroeven.
-
-
-
-
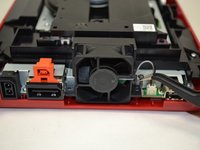
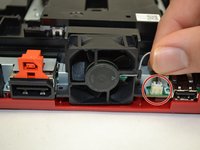
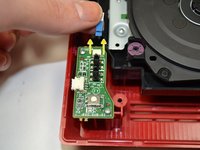
Gebruik je vingers om de bovenkant van de (kabel)aansluiting voorzichtig recht omhoog te trekken om de ventilator los te maken van de console.
-
Verwijder de ventilator en leg deze opzij.
-
-
-
-
-
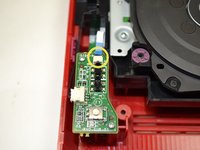
Schuif met je vingers de blauwe lintkabel uit de bovenkant van het voedingsbord.
-
Gebruik een Phillips #0-kruiskopschroevendraaier om de twee schroeven van 4 mm aan de boven- en onderkant van het voedingsbord los te draaien.
-
-
-
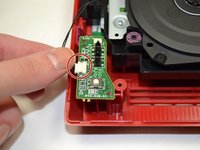
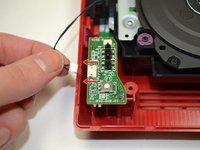
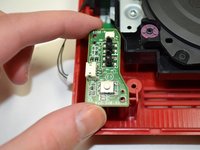
Trek voorzichtig met uw vingers aan de kabelaansluiting om de stroomplaat los te koppelen van de discdrive.
-
-
-
-
-
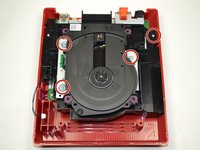
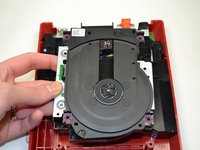
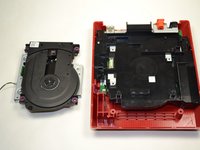
Draai de vier 6 mm kruiskopschroeven los met een kruiskopschroevendraaier (maat Phillips #0).
-
-


Volg deze instructies in omgekeerde volgorde om je apparaat weer in elkaar te zetten.
Annuleren: ik heb deze handleiding niet afgemaakt.
4 andere personen hebben deze handleiding voltooid.
Met dank aan deze vertalers:
100%

Translation Bot helpt ons de wereld te repareren! Doe je mee?
Begin met vertalen ›
Team

1Gids Commentaar
i even took apart the disk drive. turns out it wasn't working because the lid was missing one of the plastic parts that pushes the sensor in the disk drive that indicates that the lid is closed