Deze vertaling geeft mogelijk niet de meest recente updates van de bronhandleiding weer. Help ons met het updaten van de vertaling of bekijk de bronhandleiding.
Inleiding
Deze handleiding toont je hoe je kapotte joystickmodules in je Nintendo Switch Pro controller verwijdert en vervangt. Deze handleiding vereist het de-solderen van je oude en het solderen van je nieuwe joystick op het circuitbord. Als je nog niet kan solderen, kun je het met behulp van deze handleiding leren.
Wat je nodig hebt
-
-
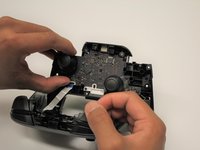
Draai de controller om zodat de stickers in de richting van het plafond wijzen.
-
-
-
Verwijder de vijf 5 mm rondkopschroeven met de Phillips #00 schroevendraaier.
-
-
-
Verwijder de 5 mm rondkopschroeven met een Phillips #00 schroevendraaier.
-
Gebruik je nagel om het LED-licht uit de gleuf te peuteren.
You are not removing the 4 LEDs here, they are soldered on the board. You are only removing the light transporting plastic piece.
-
-
-
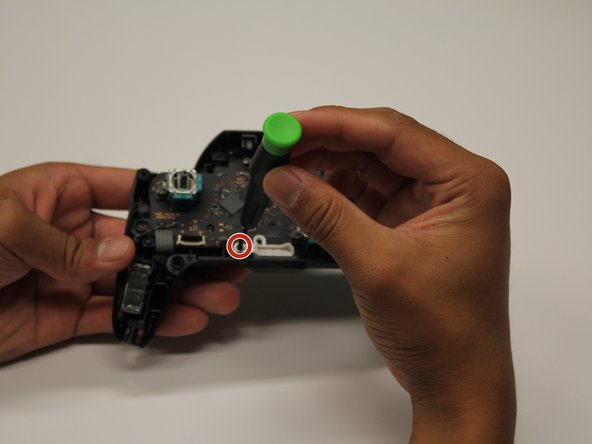
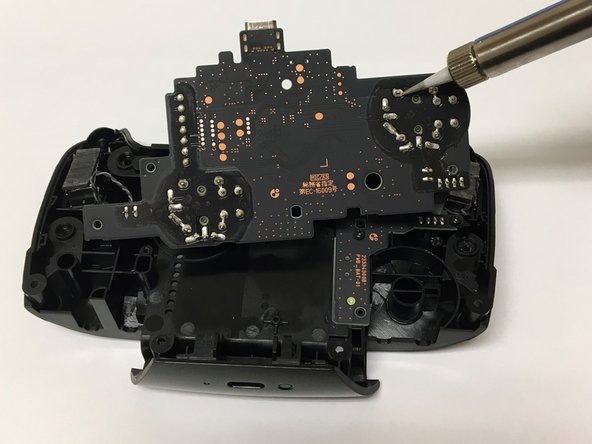
Zorg dat je goed bij de achterkant van het circuitbord kan om zo een goede toegang tot de soldeerverbindingen te hebben.
-
De-soldeer alle omlijnde soldeerverbindingen.
-
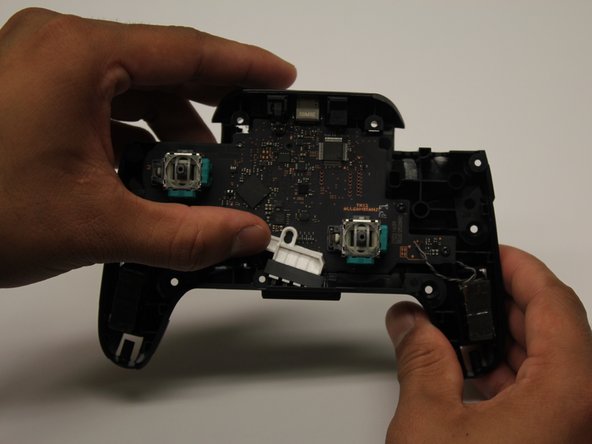
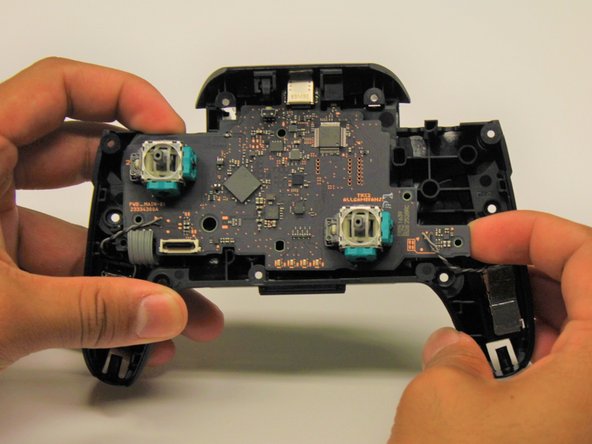
Verwijder de joystickmodule van het circuitbord.
Bonjour,pour dessouder les joysticks, qu’avez-vous utilisez comme outil: de la tresse ou une pompe à dessouder ?
Par avance merci.
Patrick
The most difficult part of this was desoldering. I used no-clean soldering braid and the original solder did not wick up. I heated each solder pad and added just a bit of 60/40 tin/lead solder. After that the braid worked much better and all solder wicked up to the braid allowing me to remove the component.
I used this tutorial to replace one broken joystick after it took s heavy hit but now both of my joysticks drift and when I tried to calibrate them they looked to be moving on there own please help
Have a look at the "Gulikit TMR" replacement Sticks, they have a superb performance.
-


Om je toestel weer in elkaar te zetten, volg je deze instructies in omgekeerde volgorde.
Om je toestel weer in elkaar te zetten, volg je deze instructies in omgekeerde volgorde.
Annuleren: ik heb deze handleiding niet afgemaakt.
43 andere personen hebben deze handleiding voltooid.
Met dank aan deze vertalers:
33%

Thomas Keulemans helpt ons de wereld te herstellen! Wil je bijdragen?
Begin met vertalen ›

Team

Cal Poly, Team S11-G2, Regan Fall 2019 Lid van Cal Poly, Team S11-G2, Regan Fall 2019
CPSU-REGAN-F19S11G2
5 Leden
43 handleidingen geschreven
25 opmerkingen
I managed to replace mine with much difficulty with the soldering but the stick does not seem to turn fully anymore, both with the replacement and the original. For reference, when I go to test it, it no longer registers as reaching the outer circle when pressed all the way down. Similarly when I go to calibrate it, it only reaches up til about the 2nd outer circle, not enough to actually trigger the green arrow. Since this seems to occur on both the replacement and original stick now, I’m guessing this must be some issue that arose while I was struggling with the desoldering process. Anybody have any ideas what might be causing my issue? Have I just damaged it beyond repair?
Without pictures it is impossible to tell, but there is the possibility that you strips the metal connection on the solder point. This is fixable by “bridging” the connection. You will want to find schematics of the wiring for the PCB and then solder the wire over to the next connection.
As a side note, I should mention that I have never tried this on a controller of any sort and that I have only used this method on keyboards with single wire connections. It is possible that the connection in a controller PCB have more going on and that this technique will not work.
Gavin A -
I have the same problem, I buy 2 joystick module from iFixit and the two gave me the same issue, the joystick module don't reach the green arrow.
I can't calibrate because of that issue.
Any ideas?
I have also had the same issue with replacement, only reaches roughly 75%. I contacted ifixit and they sent me a replacement thinking it might be a faulty pot, I installed the new stick and have the same issue. Maybe different years used different resistance.
See my answer a bit down. I think it has to do with the resistance of the module. I had the same issue with the part I received from iFixit, the original part has a resistance of 1150 ohm, but the replacement is 1600 ohm. And I have a different module which is about 500 ohm, and that works just fine.
I managed to repair a drifting stick input without any soldering by just replacing the potentiometer in the stick module. You can pry open the housing on the sides, swap it out (make sure it’s the right orientation), and snap it back into place. Potentiometers for Dualshock 4 analog sticks worked for me—apparently these parts are industry standard. Doing this from now on for all my drifty sticks.
Hi Scott —
.
So, first off, thanks for the tip! Now, I realize I may be asking a bit much of you here, but, is there any chance you could post/take/fwd any pics of the (sub)procedure you describe? It’d be really helpful to have a reference like that before I tear into a functioning joystick — even if it has a sporadic (though no less infuriating for that) issue.
.
If that’s not feasible, then perhaps you know of and can post a link to a decent guide for doing so on any of the platforms that use these (apparently standard) items?
.
Thanks in advance for any help on this! :oD
anatinus -
I would like to try it your way. Do you have any pictures or something like it. Maybe a video?
Do you know how to correctly reassemble the grey piece in the picture?
First thought was something had snapped but after popping off the same piece from the other (working) thumbstick they seem to be identical and neither the part nor the socket seems damaged. I also can’t see any evidence of glue.
The problem is I can’t get the part to clip back into place - it is supposed to sit flush and taught without any movement when the stick is rotated. But no matter how I reapply it I can’t clip it into place.
After doing this. I lost charging capabilities and the capability to even plug it into a PC. Any advice will be beneficial.
After replacing my analog with one from iFixIt I am only getting about half range on my analog and cannot complete recalibration. I tried 2 analogs from iFixIt with the same issue. I replaced with the original and have full range again
I destroyed some of the wiring, but measured connections on the other stick, and used a thin wire to re-wire the broken connection from top to bottom. Works great, even could calibrate it without issues. Unfortunately I broke the thick wires soldering that connects the battery, I’ll need some more delicate equipment to fix that one, until then it works fine when connected to power with cable.
I have a broken joystick cap, can I just replace it and stop at step 12?
Thank you
Is this verified to be working with the replacement part from ifixit? I ordered 2 but don't want to do all the solder work if ppl are only getting 75% range of motion from the non oem parts
For anyone having problems with reduced stick movement, I ran into the same issue but was able to calibrate the stick in the Switch settings by being persistent and repeatedly trying to give the Switch the calibration input it wanted. I sometimes took short breaks in between inputs, not sure if that mattered. The rotation took the longest, maybe two minutes but eventually it completed and now my left stick is as precise as the right stick which I didn't touch. I hope this helps anyone else!
When you say "repeatedly trying to give the Switch the calibration input it wanted" do you just mean, you keep pushing right on the joystick and eventually the triangle lit up? If so, how long did you have to hold it, or how many times did you repeatedly push the joystick to the right until the triangle lit up? Nothing is happening for me with either holding or repeating the input (the triangle remains unlit and I only make it half way to the edge of the circle).
I also had the problem with the reduced stick movement, which caused being unable to calibrate the (left) stick. Had my pro controller since 2018 and after about a year it got stick drift. I fixed that myself by replacing the joystick module with a one I bought for an Xbox 360 controller.
That one worked just fine, but after a couple of years the module broke and the stick would stay in one direction. So I bought a new part and replaced it but that gave me the reduced stick movement issue. So I ordered a replacement stick from iFixit but it had the same problem.
I think the issue lies in the amount of resistance the module has. The original (right) module has a resistence of about 1150 ohm, but the iFixit one has a resistance of about 1600 ohm and the Xbox 360 one has about 500 ohm resistance. So I took the resistance parts of the Xbox 360 module and placed them on the original part and soldered that back in place and now it works again.
So now I have 2 pro controllers :D
Forgot to mention, I also have a Wii U module from the gamepad which had drift and that does have 1600 ohm resistance.
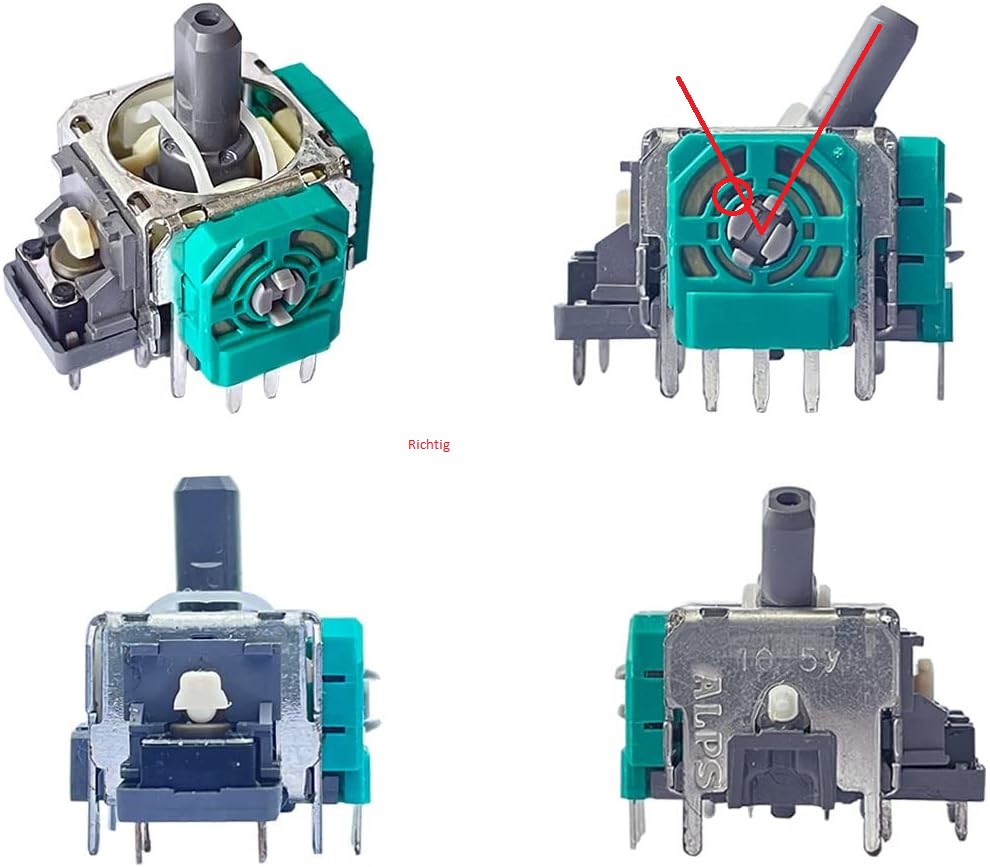
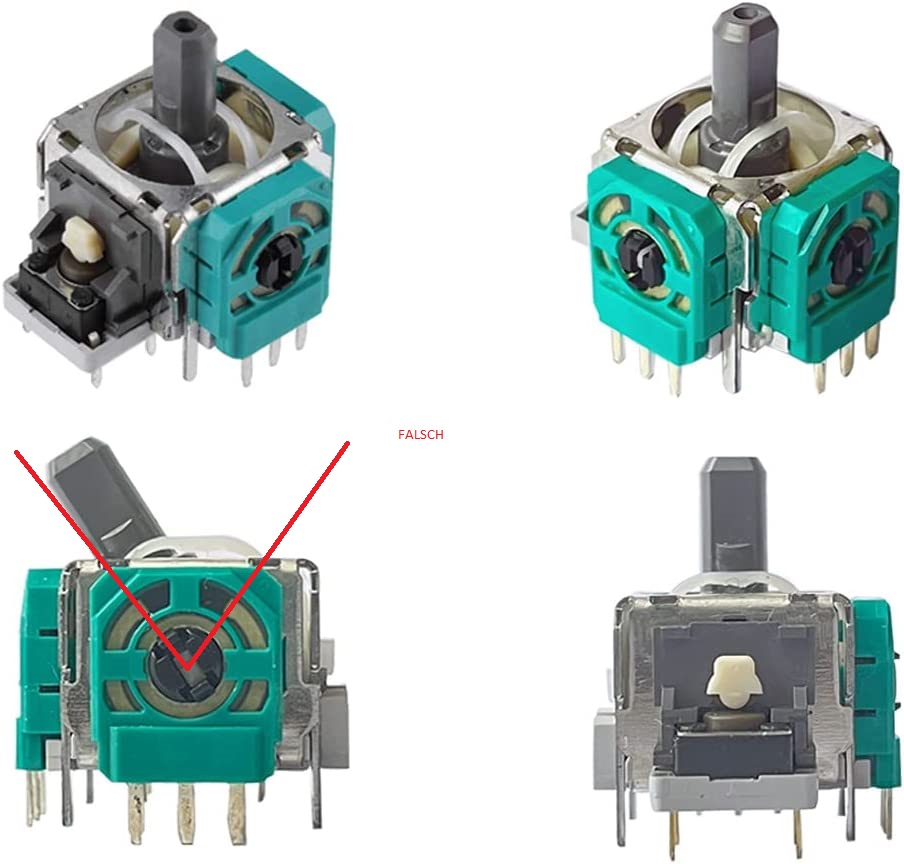
ACHTUNG "problems with reduced stick movement" ... wenn man den Rand in der Kalibrierung nicht mehr erreicht:
ifixit verkauft die falschen Ersatzteile (jedenfals für meine Switch Pro Serie)
siehe
https://abload.de/img/61byj4dqlol._ac_sl...
und
https://abload.de/img/615ltr7fwyl._ac_sl...
die Falschen haben einen größeren Bewegungswinkel den man aber durch den Gehäuseanschlag nicht erreicht.
Die Richtigen haben einen kleineren Arbeitsbereichswinkel und zusätzlich eine kleine Markierung auf der linken Seite des inneren Ringes.
Deshalb : vor dem Tausch unbedingt nachsehen welche im Controller verbaut sind !!!!
I've bought this module and can confirm it doesn't work on a Pro controller purchased in either 2017 or 2018 (not sure if they changed manufacturing process at some point). I am only able to get half way to the edge of the calibration circle. As others have mentioned, it could be due to the resistance of the module being different, or the German response above hints that it could be due to a range of motion difference. I did try calibrating without the faceplate on the pro controller (it was dangling from the ribbon cable shown in step 9) and then I was able to reach the edge of the calibration circle to complete calibration. But replacing the faceplate limits the motion of the controller so that you can't use it effectively.
Any tips? Someone mentioned replacing a potentiometer, but I don't know what that is and would need a guide.
Can iFixIt confirm if they have the original 1150 ohm resistance joystick modules available under a different listing?
When you say "repeatedly trying to give the Switch the calibration input it wanted" do you just mean, you keep pushing right on the joystick and eventually the triangle lit up? If so, how long did you have to hold it, or how many times did you repeatedly push the joystick to the right until the triangle lit up? Nothing is happening for me with either holding or repeating the input (the triangle remains unlit and I only make it half way to the edge of the circle).
I messed up with the repair and broke off a contact pad so now when putting it back the joystick is registering constant downward movement
https://i.postimg.cc/GRq6Dj8N/IMG-202311...
Is there a way to fix this?
Be carefull, these screws are super easy to strip even with the right tools.
Lukas Eberharter - Antwoord
I tried editing these instructions after I had trouble with stripping screws, but it doesn't seem to take. The issue is that these are JIS and not Phillips screws. They are VERY similar looking but a Phillips head screwdriver will strip the screws.
Isaac Webb - Antwoord
I tried using a Philips #00 screwdriver but it didn’t work
vincent ingrassia - Antwoord
Don't even think about trying Phillips. There are some other guides online that say you'll be fine, but they're wrong. Even one attempt with Phillips WILL strip these, and you will never, ever get this controller open once that happens. Even with JIS they're really hard to get out and really easy to strip.
Luke T. Allen - Antwoord