Ga door naar hoofdinhoud
Word lid van de reparatiegemeenschap - Account aanmaken

New Nintendo 2DS XL Front Buttons Replacement

Wat je nodig hebt

  1. New Nintendo 2DS XL Front Buttons Replacement, Prepare for disassembly: stap 1, afbeelding 1 van 1
    • Before you begin, power off the console and remove:

    • The stylus

    • Any game cartridge

    • The microSD card

    Vraag FixBot

    Voeg opmerking toe

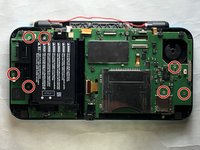
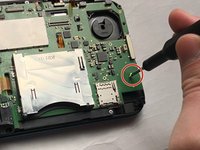
  2. New Nintendo 2DS XL Front Buttons Replacement, Remove the back cover screws: stap 2, afbeelding 1 van 1
    • Use a tri‑point Y00 screwdriver to remove the four 6 mm‑long screws located at the four corners of the bottom panel.

    Vraag FixBot

    Voeg opmerking toe

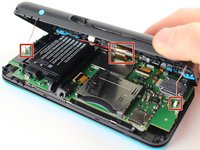
  3. New Nintendo 2DS XL Front Buttons Replacement, Release the back cover clips: stap 3, afbeelding 1 van 2 New Nintendo 2DS XL Front Buttons Replacement, Release the back cover clips: stap 3, afbeelding 2 van 2
    • Use a spudger to gently pry around the two short edges and front edge (with the stylus cut‑out) to release the clips securing the back cover.

    • Swing the back cover open from its front edge to release the clips along the hinge edge. Don't remove it fully—three cables are connecting it to the motherboard (two on each side and one in the rear).

    Vraag FixBot

    Voeg opmerking toe

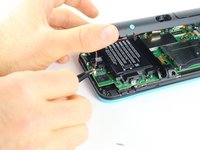
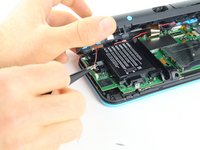
  4. New Nintendo 2DS XL Front Buttons Replacement, Disconnect the back cover: stap 4, afbeelding 1 van 3 New Nintendo 2DS XL Front Buttons Replacement, Disconnect the back cover: stap 4, afbeelding 2 van 3 New Nintendo 2DS XL Front Buttons Replacement, Disconnect the back cover: stap 4, afbeelding 3 van 3
    Gereedschap gebruikt in deze stap:
    Tweezers
    $4.99
    • Use tweezers to disconnect the two cables that connect the rear buttons on either side to the motherboard by gently pulling them upwards.

    • Fold the back cover over the hinge edge, keeping the cable connected. Don't strain the cable.

    Vraag FixBot

    Voeg opmerking toe

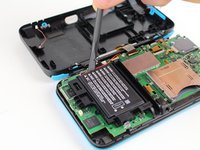
  5. New Nintendo 2DS XL Front Buttons Replacement, Battery Removal: stap 5, afbeelding 1 van 2 New Nintendo 2DS XL Front Buttons Replacement, Battery Removal: stap 5, afbeelding 2 van 2
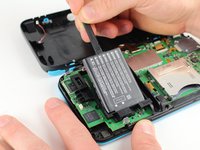
    • The battery is lightly adhered to its enclosure.

    • Use the flat end of a spudger to gently pry the battery out of its plastic enclosure.

    Vraag FixBot

    Voeg opmerking toe

  6. New Nintendo 2DS XL Front Buttons Replacement, Motherboard: stap 6, afbeelding 1 van 2 New Nintendo 2DS XL Front Buttons Replacement, Motherboard: stap 6, afbeelding 2 van 2
    Gereedschap gebruikt in deze stap:
    Tweezers
    $4.99
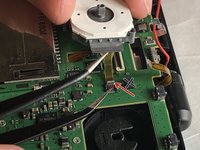
    • There are 8 ribbon cables that need to be removed as shown in the picture.

    • 2 of connectors (in green) are friction fit, unlike the rest of the connectors. Remove the cable by pulling it out gently flat in the arrow direction. Do not attempt to open or unlatch these connectors in any way. Doing so will break them.

    • For the remaining 6 (in red), use a pair of tweezers to flip the latches up and pull the ribbon cable out.

    • Note that the second picture shows a broken ribbon connector next to the joystick ribbon connector (to the right of the red arrow). Do not attempt to unlatch this connector as shown in the picture!

    Vraag FixBot

    Voeg opmerking toe

  7. New Nintendo 2DS XL Front Buttons Replacement: stap 7, afbeelding 1 van 2 New Nintendo 2DS XL Front Buttons Replacement: stap 7, afbeelding 2 van 2
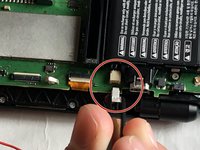
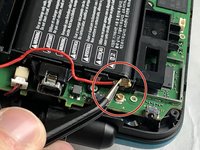
    • Unplug the following wires from the motherboard using a pair of tweezers.

    Vraag FixBot

    Voeg opmerking toe

  8. New Nintendo 2DS XL Front Buttons Replacement: stap 8, afbeelding 1 van 2 New Nintendo 2DS XL Front Buttons Replacement: stap 8, afbeelding 2 van 2
    • Remove the seven 4.4 mm screws using a J00 (or iFixit's Phillips #00) screwdriver bit.

    • Remove the motherboard from the device.

    Vraag FixBot

    Voeg opmerking toe

  9. New Nintendo 2DS XL Front Buttons Replacement, Button Removal: stap 9, afbeelding 1 van 3 New Nintendo 2DS XL Front Buttons Replacement, Button Removal: stap 9, afbeelding 2 van 3 New Nintendo 2DS XL Front Buttons Replacement, Button Removal: stap 9, afbeelding 3 van 3
    Gereedschap gebruikt in deze stap:
    Tweezers
    $4.99
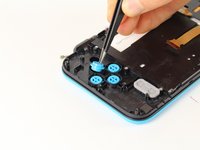
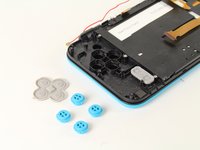
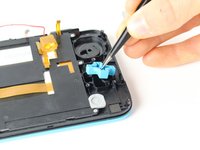
    • Lift off the rubber cover on the A, B, X, and Y buttons.

    • Using tweezers, lift out the buttons.

    Vraag FixBot

    Voeg opmerking toe

  10. New Nintendo 2DS XL Front Buttons Replacement: stap 10, afbeelding 1 van 3 New Nintendo 2DS XL Front Buttons Replacement: stap 10, afbeelding 2 van 3 New Nintendo 2DS XL Front Buttons Replacement: stap 10, afbeelding 3 van 3
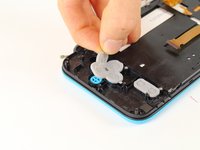
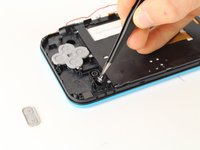
    • Lift off the grey rubber cover on the start and select buttons.

    • Using tweezers, lift out the buttons.

    Vraag FixBot

    Voeg opmerking toe

  11. New Nintendo 2DS XL Front Buttons Replacement: stap 11, afbeelding 1 van 3 New Nintendo 2DS XL Front Buttons Replacement: stap 11, afbeelding 2 van 3 New Nintendo 2DS XL Front Buttons Replacement: stap 11, afbeelding 3 van 3
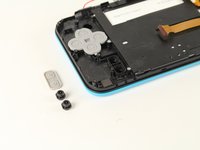
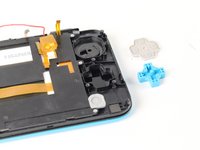
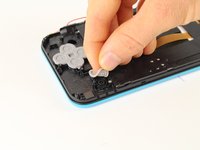
    • Lift off the grey rubber membrane on the D-pad.

    • Using tweezers, lift the D-pad out.

    Vraag FixBot

    Voeg opmerking toe

  12. New Nintendo 2DS XL Front Buttons Replacement: stap 12, afbeelding 1 van 3 New Nintendo 2DS XL Front Buttons Replacement: stap 12, afbeelding 2 van 3 New Nintendo 2DS XL Front Buttons Replacement: stap 12, afbeelding 3 van 3
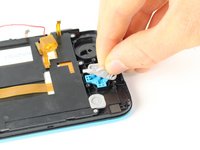
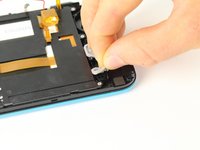
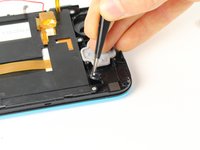
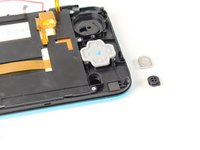
    • Lift off the grey rubber membrane covering the home button.

    • Using tweezers, lift out the button.

    Vraag FixBot

    Voeg opmerking toe

Conclusie

To reassemble your device, follow these instructions in reverse order.

Annuleren: ik heb deze handleiding niet afgemaakt.

6 andere personen hebben deze handleiding voltooid.

Tim Newman

Lid sinds: 09/25/17

2.057 Reputatie

4 handleidingen geschreven

Team

Cal Poly, Team S18-G6, Forte Fall 2017 Lid van Cal Poly, Team S18-G6, Forte Fall 2017

CPSU-FORTE-F17S18G6

5 Leden

24 handleidingen geschreven

4Gids Commentaar

after assembly, pressing ZL causes some kind of an electric short, and the console turns off immediately, help !

mos_boum - Antwoord Deel
This usually occurs when you break the lower screen's power ribbon cable connector. It is not a ZIF connector and "unlatching" it will break it causing a loose fit. The shoulder button presses against the ribbon cable causing it to shift in the connector resulting in the speakers popping and the device turning off.

Mike - Antwoord Deel

OK. Lets say I can now change the buttons for replacement purposes only. My question is :where on the earth i can find buttons to replace??????

Robert - Antwoord Deel

Now there is a full set of keys for 2dsxl. If you can't find it, you can google kasynparts

kasynlife - Antwoord Deel

Voeg opmerking toe

Weergavestatistieken:

Afgelopen 24 uren: 14

Afgelopen 7 dagen: 87

Afgelopen 30 dagen: 389

Altijd: 21,404