Deze versie kan foutieve bewerkingen bevatten. Schakel over naar de recentste gecontroleerde momentopname.
Wat je nodig hebt
-
-
Verwijder de volgende tien schroeven die de onderste behuizing aan de bovenste behuizing bevestigen:
-
Twee 2.3 mm lange P5 Pentalobe-schroeven
-
Acht 3.0 mm lange P5 Pentalobe-schroeven
-
-
-
Verwijder de plastic bescherming die aan het contactbord van de batterij is bevestigd.
-
-
-
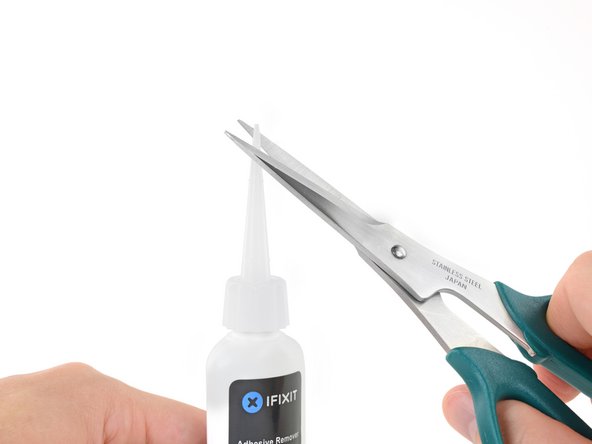
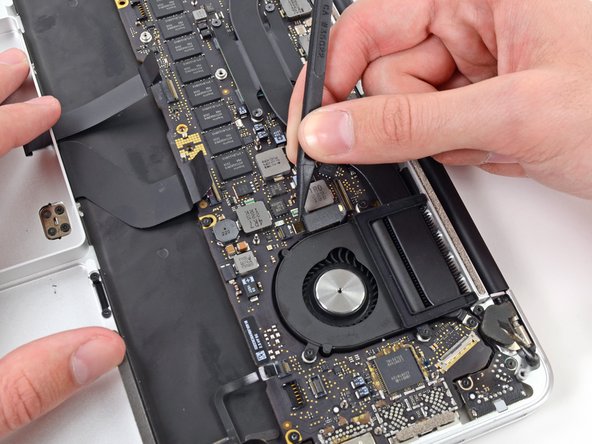
Pak de Interposer met een pincet vast.
-
Til de Interposer van het logic board af en verwijder deze.
-
-
-
Gebruik het platte einde van een spudger om de rechterkant van de datakabelaansluiting van het I/O-bord uit het contact op het I/O-bord omhoog te duwen.
-
-
-
Gebruik het platte einde van een spudger om de kabelaansluiting van de SSD uit het contact op het logic board omhoog te duwen.
-
Haal de SSD-kabelaansluiting uit de weg.
-
-
-
Gebruik het platte einde van een spudger om de kabelaansluiting van de hoofdtelefoonjack in een rechte beweging uit het contact op het logic board omhoog te duwen.
-
-
-
Gebruik je duim of je vinger om de plastic veerbeugel bij de SSD-kaart te buigen en zo de twee klemmen aan de voorkant van het toestel los te maken.
-
Kantel de SSD-module, terwijl je de veerbeugel ingedrukt houdt, uit de inkeping.
-
-
-
Verwijder de drie 2.2 mm lange T5 Torx-schroeven aan beide zijden van de batterij (zes in totaal).
-
-
-
-
Nu je MacBook Pro volledig is voorbereid, is het tijd om jezelf voor te bereiden:
-
Draag oogbescherming bij het toedienen van de lijmverwijderaar. (Oogbescherming is toegevoegd in de kit.)
-
Draag geen contactlenzen zonder oogbescherming.
-
Er zitten ook handschoenen in je kit. Als je je zorgen maakt over irritaties van de huid, kun je nu je handschoenen aantrekken.
-
-
-
Herhaal de vorige stappen om de ernaastliggende batterijcel van de lijm eronder te scheiden:
-
Dien wat druppels lijmverwijderaar toe onder de batterijcel.
-
Wacht ongeveer 2-3 minuten zodat de lijmverwijderaar kan intrekken en haar werk kan doen.
-
Steek een spudger of plastic kaart onder de batterijcel en wees daarbij voorzichtig dat je de batterij niet beschadigt. Scheid de batterijcel van de lijm die het aan je MacBook Pro bevestigt.
-
-
-
Til de batterij als een geheel uit de bovenste behuizing en verwijder deze volledig.
-
Met een beetje geluk kun je alle lijmstrips met je vingers uit de MacBook trekken.
-
Als dat niet lukt, dien je bij ieder batterijgebied wat lijmverwijderaar voor 2-3 minuten toe en schraap je het vervolgens met een openingsplectrum of een andere tool uit je kit weg van de behuizing. Dit kan wat werk vereisten, dus wees geduldig.
-
Haal tot slot alle lijmverwijderaar weg en geef je MacBook Pro wat tijd om te drogen.
-
Kalibreer je vers geïnstalleerde batterij: laad deze op tot 100% en laat deze nog minstens twee uur doorladen. Haal 'm dan van de oplader af en gebruik je laptop totdat deze uitvalt vanwege een lege batterij. Wacht vervolgens minstens 5 uur en laad je batterij tot slot nog een keer ononderbroken op tot 100%.
-
-
Deze stap is niet vertaald. Help het te vertalen
-
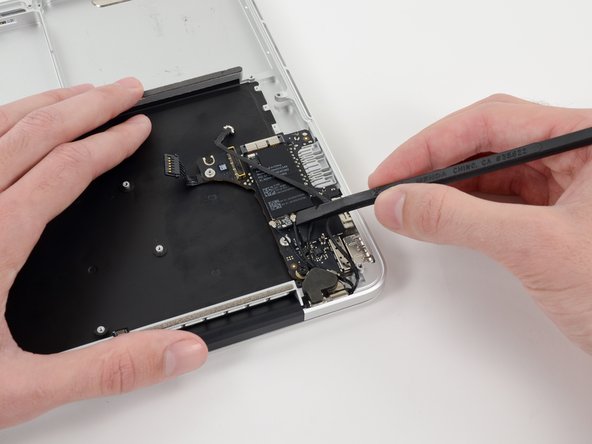
Use the tip of a spudger to push the edges of the I/O board connector straight out of its socket on the logic board.
-
-
Deze stap is niet vertaald. Help het te vertalen
-
Use the tip of a spudger to push the iSight camera cable connector straight away from its socket on the logic board.
-
-
Deze stap is niet vertaald. Help het te vertalen
-
Wedge the flat end of a spudger underneath the keyboard backlight connector and the logic board.
-
Gently twist the flat end of a spudger upwards to pry the keyboard backlight connector up off its socket on the logic board.
-
-
Deze stap is niet vertaald. Help het te vertalen
-
Use the tip of a spudger to flip up the retaining flap on the trackpad ribbon cable ZIF socket.
-
Grasp the plastic pull tab and pull the trackpad ribbon cable out of its socket.
-
-
Deze stap is niet vertaald. Help het te vertalen
-
Use the tip of a spudger to flip up the retaining flap on the keyboard ribbon cable ZIF socket.
-
Grasp the plastic pull tab and pull the keyboard ribbon cable out of its socket.
-
-
Deze stap is niet vertaald. Help het te vertalen
-
Use the tip of a spudger to flip up the retaining flap on the microphone ribbon cable ZIF socket.
-
Grasp the plastic pull tab and pull the microphone ribbon cable out of its socket.
-
-
Deze stap is niet vertaald. Help het te vertalen
-
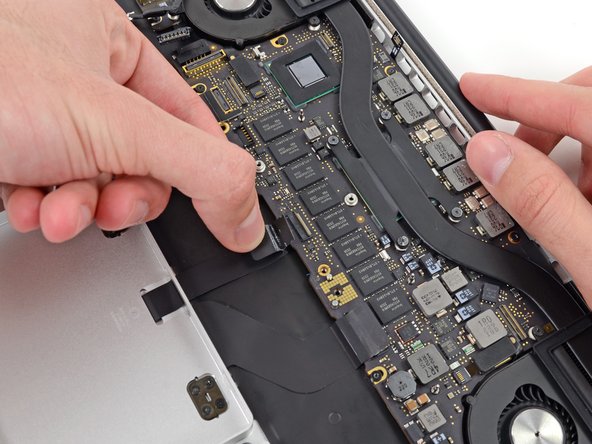
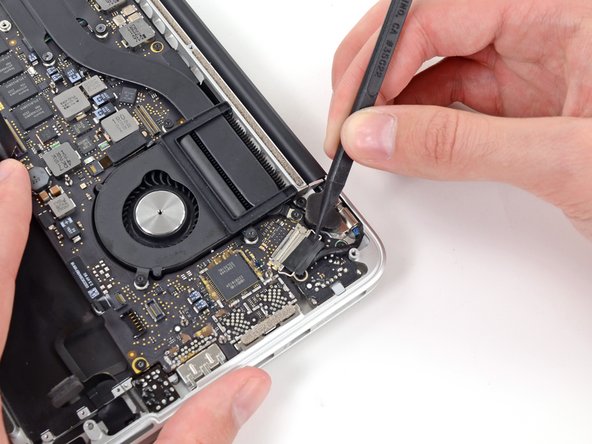
Use the tip of a spudger to rotate the pull tab secured to the display data cable lock toward the DC-In side of the computer.
-
-
Deze stap is niet vertaald. Help het te vertalen
-
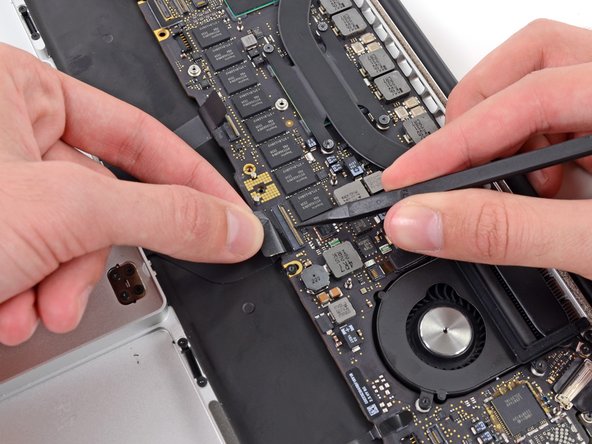
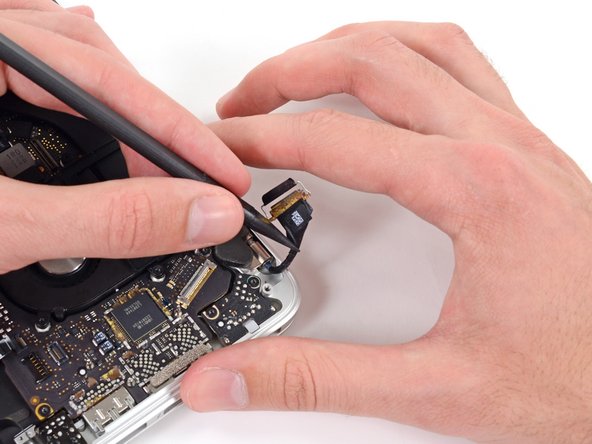
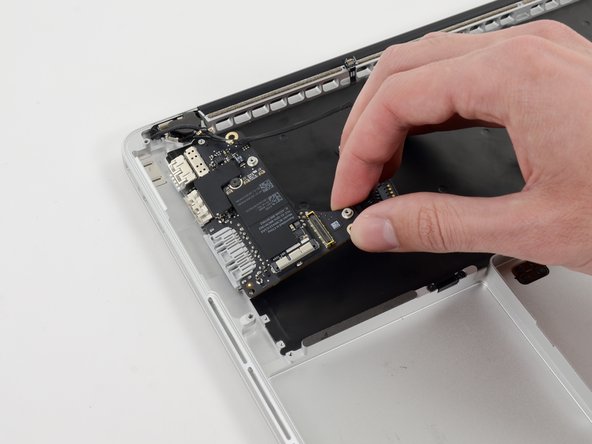
Gently push the edges of the display data cable connector away from its socket on the logic board.
-
Pull, but do not remove, the display data cable connector out of its socket and carefully move it out of the way.
-
-
Deze stap is niet vertaald. Help het te vertalen
-
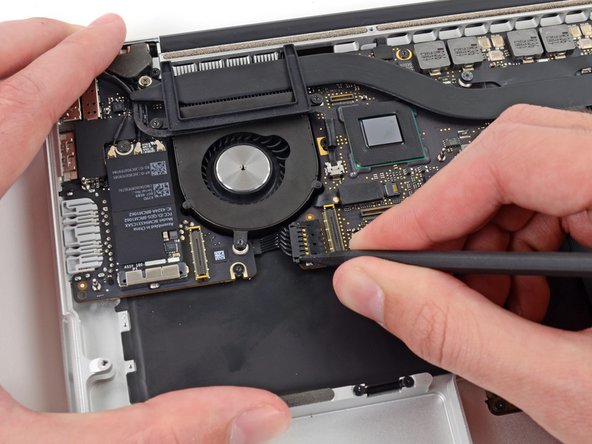
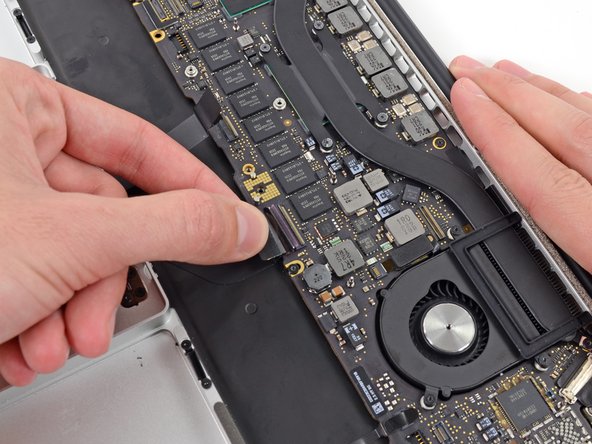
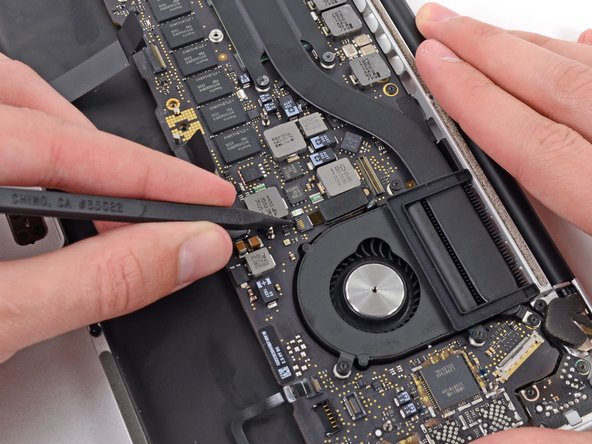
Use the tip of a spudger to flip up the retaining flap on the left fan ribbon cable ZIF socket.
-
Carefully pull the left fan ribbon cable out of its socket.
-
-
Deze stap is niet vertaald. Help het te vertalen
-
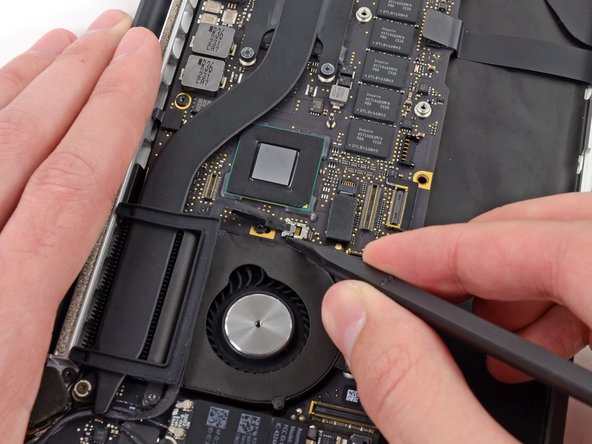
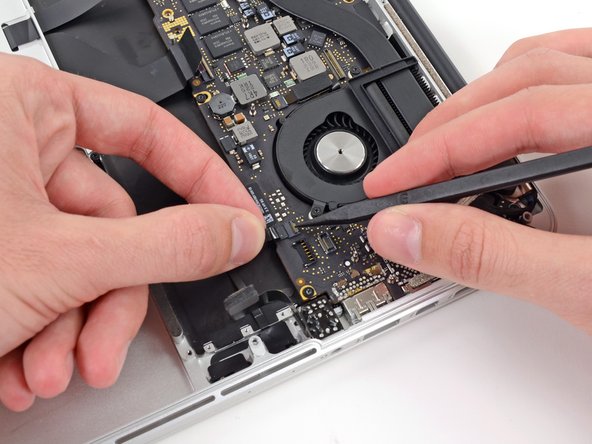
Move the left fan ribbon cable aside to reveal a hidden screw securing the logic board assembly to the upper case.
-
-
Deze stap is niet vertaald. Help het te vertalen
-
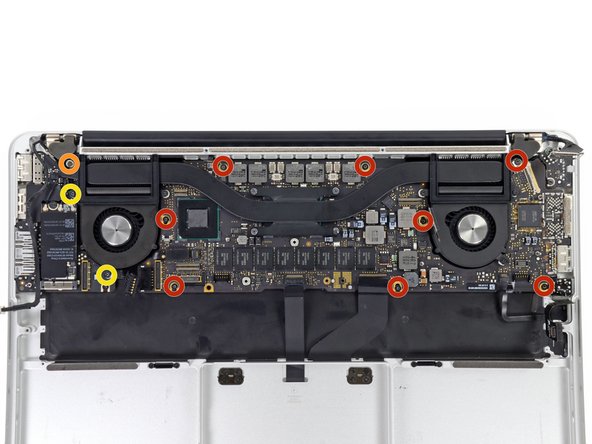
Remove the following screws securing the logic board to the upper case:
-
Eight 3.3 mm T5 Torx screws
-
One Phillips #00 screw
-
Two 3.1 mm T5 Torx screws
-
Remove two more screws, from the MagSafe DC-In board in the upper right corner (second image).
-
Two 3.4 mm T5 Torx screws
-
-
Deze stap is niet vertaald. Help het te vertalen
-
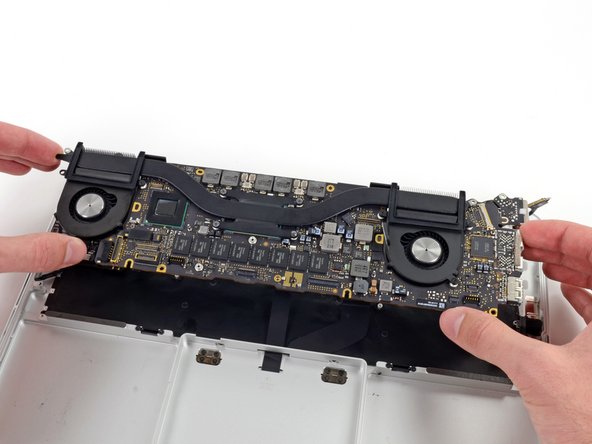
Carefully lift the logic board assembly from its left side and work it out of the upper case, minding any cables and the I/O ports that may get caught during removal.
-
Pull the right I/O port side of the logic board away from the side of the upper case and remove the logic board assembly.
-
-
Deze stap is niet vertaald. Help het te vertalen
-
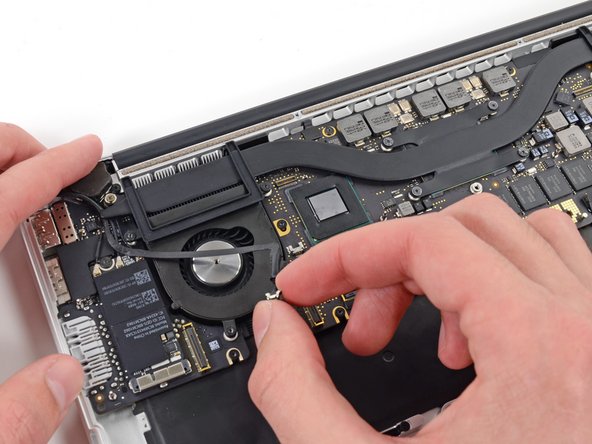
Use the flat end of a spudger to pry and disconnect the three antenna cable connectors from the AirPort board.
-
Connect the long-sleeved cable to the center socket.
-
The short-sleeved cable connects next to the screw.
-
The remaining cable has no sleeve, and connects in the last empty socket, next to the fan.
-
-
Deze stap is niet vertaald. Help het te vertalen
-
Remove the following two screws securing the I/O board to the upper case:
-
One 3.53 mm T5 Torx screw
-
One 4.89 mm T8 Torx standoff screw
-
-
Deze stap is niet vertaald. Help het te vertalen
-
Carefully pull and remove the I/O board away from its recess in the upper case.
-
-
Deze stap is niet vertaald. Help het te vertalen
-
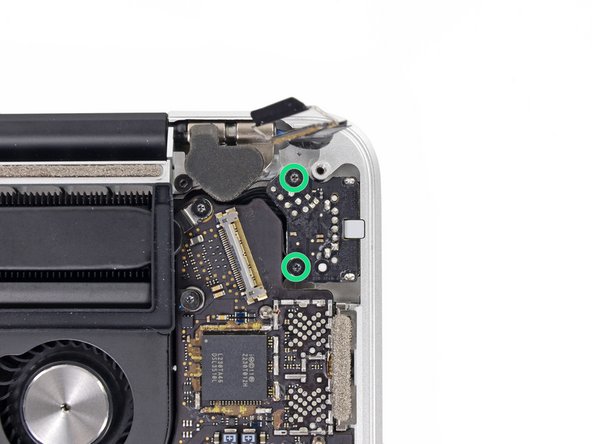
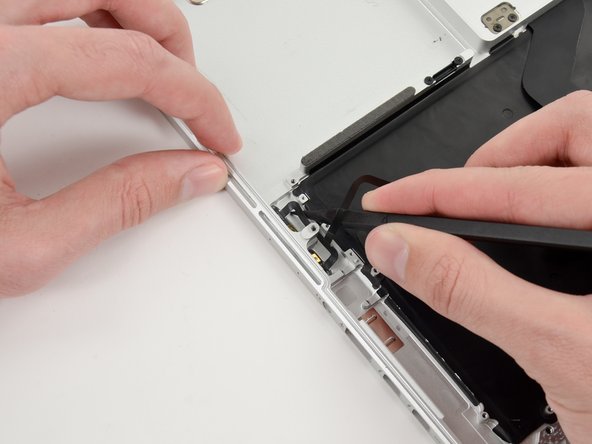
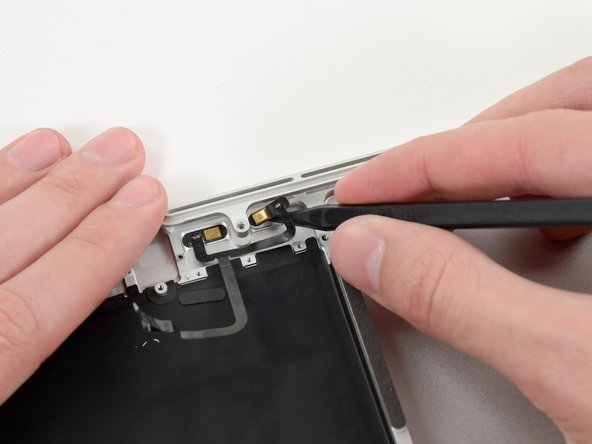
Remove the two 3.4 mm T5 Torx screws securing the headphone jack to the upper case.
-
-
Deze stap is niet vertaald. Help het te vertalen
-
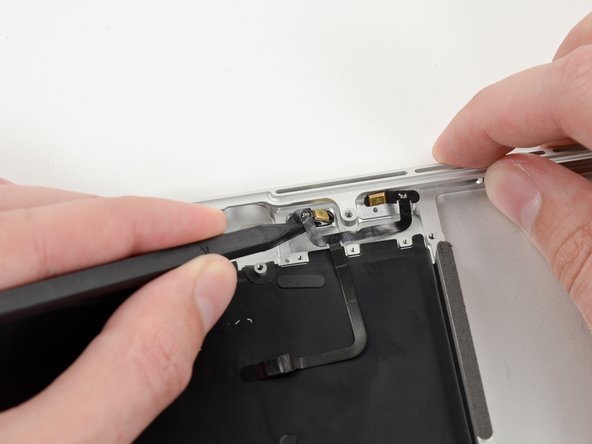
Lift and remove the headphone jack out of the upper case.
-
-
Deze stap is niet vertaald. Help het te vertalen
-
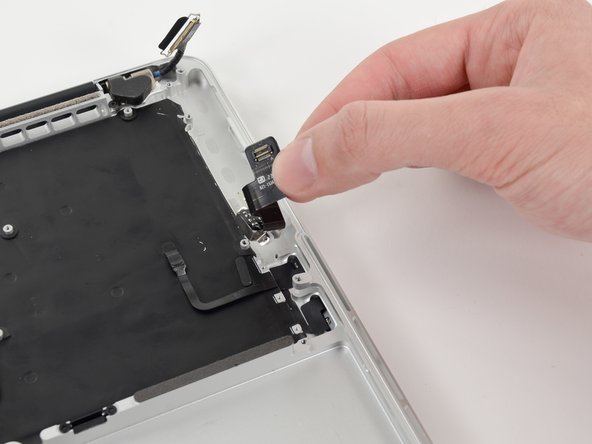
Use a pair of tweezers to lift the rubber hinge covers up off the right and left display hinges.
-
-
Deze stap is niet vertaald. Help het te vertalen
-
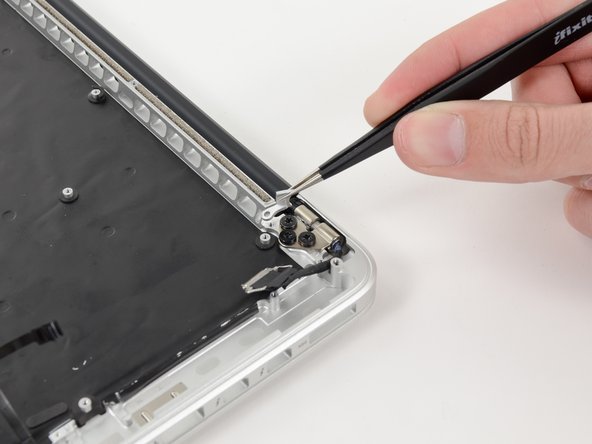
Remove the 3.2 mm T5 Torx screws (one on each side) securing the aluminum hinge brackets to the upper case.
-
-
Deze stap is niet vertaald. Help het te vertalen
-
Use a pair of tweezers to lift aluminum hinge brackets off the right and left display hinges.
-
-
Deze stap is niet vertaald. Help het te vertalen
-
Remove the four inner 5.3 mm T8 Torx screws (two on each side) securing the display to the upper case.
-
-
Deze stap is niet vertaald. Help het te vertalen
-
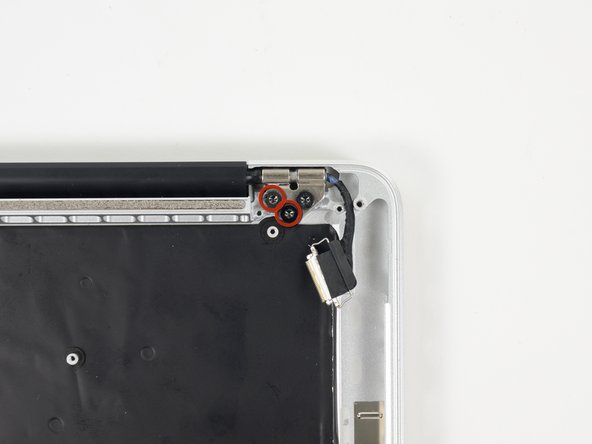
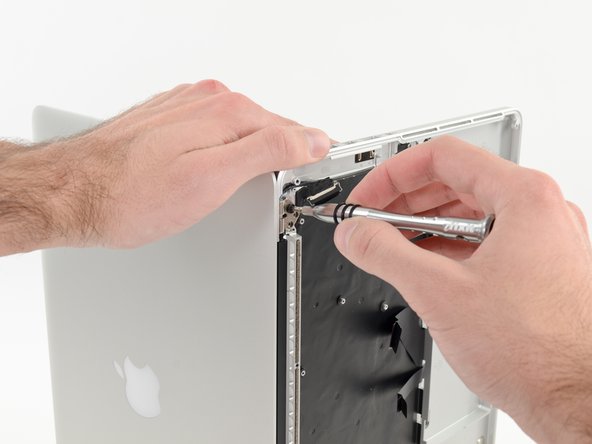
While holding the display and upper case together with your left hand, remove the remaining T8 Torx screw from the lower display bracket.
-
Remove the last remaining T8 Torx screw securing the display to the upper case.
-
-
Deze stap is niet vertaald. Help het te vertalen
-
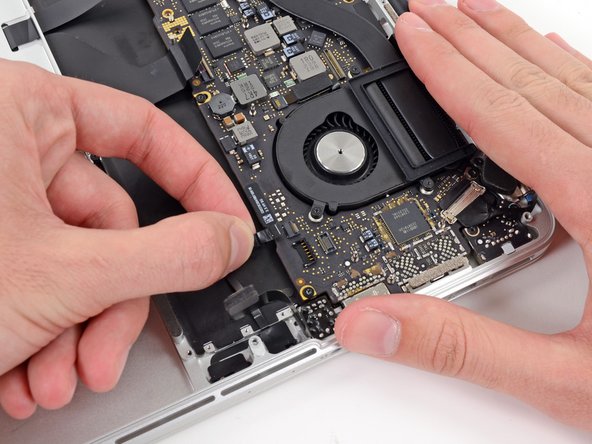
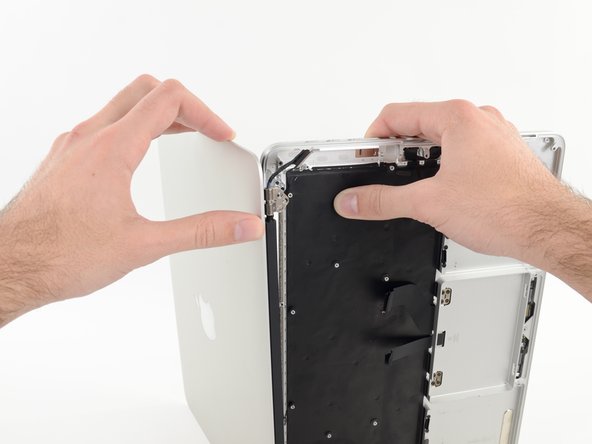
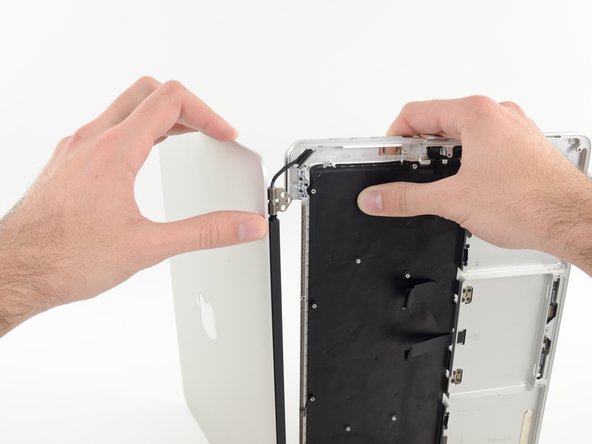
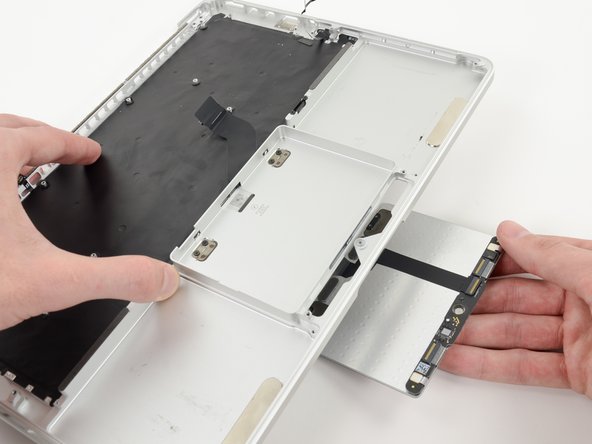
Grip both halves of the device, one in each hand.
-
Gently push forward on the bottom half of the device to detach it from the display assembly.
-
Carefully set each component aside, making sure to set down the lower half keyboard-side down.
-
-
Deze stap is niet vertaald. Help het te vertalen
-
Remove the following screws securing the trackpad to the upper case:
-
Four 1.4 mm Phillips #000 screws
-
-
Deze stap is niet vertaald. Help het te vertalen
-
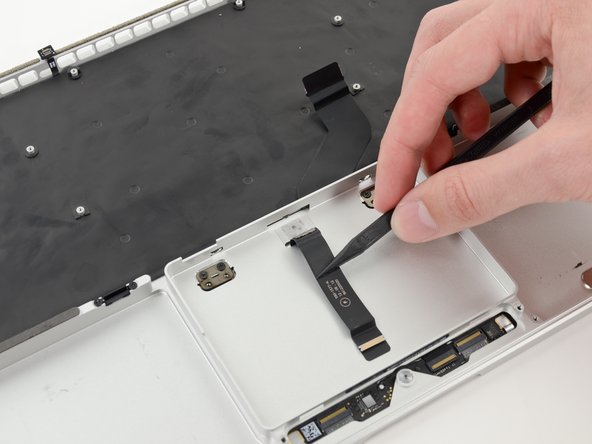
Wedge the spudger between the trackpad ribbon cable and the upper case.
-
Run the spudger along the bottom to release the trackpad ribbon cable from the adhesive securing it to the upper case.
-
-
Deze stap is niet vertaald. Help het te vertalen
-
Insert the tip of a spudger in between the trackpad ribbon cable and the upper case.
-
Carefully thread the trackpad ribbon cable out of the notch near the top of the SSD assembly cavity.
-
-
Deze stap is niet vertaald. Help het te vertalen
-
Once the trackpad is free of the upper case, guide the trackpad ribbon cable through the slot cut in the upper case.
-
Remove the trackpad from the upper case.
-
-
Deze stap is niet vertaald. Help het te vertalen
-
For this step, it is recommended to use a heat gun or hair dryer to soften the adhesive securing the microphone assembly to the upper case. You may be able to remove it without doing so, but will risk damaging the microphone cable.
-
With the heat gun set to low, heat the microphone assembly to loosen the adhesive attaching it to the upper case.
-
-
Deze stap is niet vertaald. Help het te vertalen
-
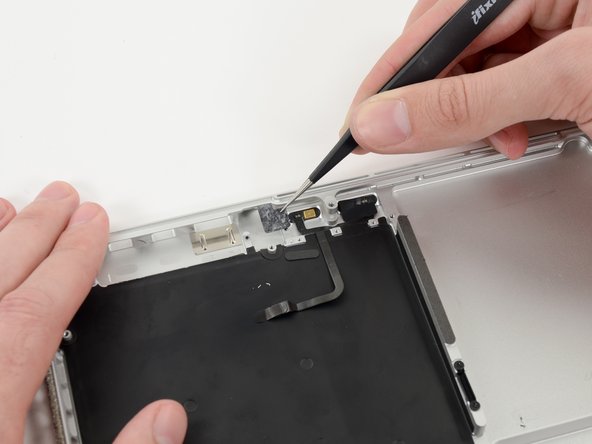
Use the tip of a spudger to remove the piece of tape covering one of two microphones.
-
Grasp the piece of tape with a pair of tweezers and remove it.
-
-
Deze stap is niet vertaald. Help het te vertalen
-
Repeat the same procedure as the previous step to remove the tape covering the second microphone.
-
-
Deze stap is niet vertaald. Help het te vertalen
-
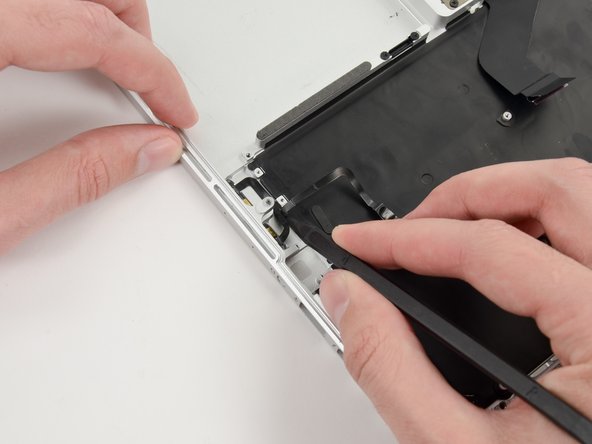
Wedge the tip of a spudger underneath the microphone assembly cable.
-
Run the spudger up along the bottom of the microphone assembly cable to separate it from the upper case.
-
-
Deze stap is niet vertaald. Help het te vertalen
-
Gently wedge the tip of a spudger underneath the second microphone and push inwards to loosen the adhesive.
-
-
Deze stap is niet vertaald. Help het te vertalen
-
Carefully pry the first microphone up off the upper case.
-
-
Deze stap is niet vertaald. Help het te vertalen
-
Lift and remove the microphone assembly out of the upper case.
-


Annuleren: ik heb deze handleiding niet afgemaakt.
14 andere personen hebben deze handleiding voltooid.

2 opmerkingen
If uppercase Assembly(Includes Trackpad, keyboard, Palmrest & BATTERY) is being replaced, there is no need to remove battery from old uppercase assembly.