Inleiding
Use this guide to upgrade or replace the solid-state drive in a MacBook Air 13” Mid 2012. This MacBook Air uses a proprietary storage drive connector, and is therefore not compatible with common M.2 and mSATA drives without the use of an adapter.
Before you perform this repair, if at all possible, back up your existing SSD. Then, either familiarize yourself with internet recovery or create a bootable external drive so you’ll be ready to install macOS onto your new drive and migrate your data to the new SSD.
Finally, we strongly recommend installing macOS 10.13 High Sierra (or a later macOS) before replacing the original SSD from your MacBook Air. Most new SSDs require updated storage drivers not found in versions of macOS prior to High Sierra.
Wat je nodig hebt
-
Gereedschap gebruikt in deze stap:P5 Pentalobe Screwdriver Retina MacBook Pro and Air$5.99
-
Use a P5 Pentalobe driver to remove ten screws securing the lower case, of the following lengths:
-
Two 9 mm screws
-
Eight 2.6 mm screws
-
-
-
-
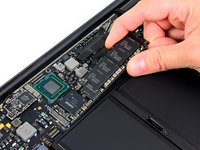
Grab the clear plastic pull tab attached to the battery connector and pull it toward the front edge of the Air to disconnect the battery from the logic board.
-
-
-
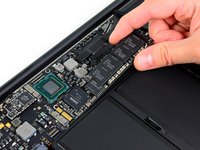
Remove the single 2.9 mm T5 Torx screw securing the SSD to the logic board.
-


To reassemble your device, follow these instructions in reverse order.
Annuleren: ik heb deze handleiding niet afgemaakt.
92 andere personen hebben deze handleiding voltooid.

17Gids Commentaar
I understand this is probably a noob question, but can somebody explain what is preventing anybody from swapping a 128GB SSD for a 256GB?
You should be able to transfer the os installer into an 8+ gb thumb drive via DiskMakerX. You do need a working mac with something that works with the mac app store installed and enough space to download the os from the app store. Afterwards, just boot up your mac with the alt key, and install.
diskmakerx.com
Are you certain it's a P5 pentalobe driver? We found the P5 doesn't fit, and have always used a Wiha 267IPR / 4IPR x 40