Deze vertaling is door een computer gegenereerd en is nog niet door iemand nagekeken. Spreek je deze taal? Bekijk het hier.
Inleiding
Gebruik deze handleiding om de harde schijf van je mini volledig te vervangen. Om deze handleiding te voltooien, heb je rubbercement nodig om de oude thermische sensoren op je nieuwe harde schijf te plakken.
Wat je nodig hebt
-
-
-
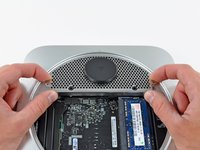
Plaats uw duimen in de uitsparingen in de onderkap.
-
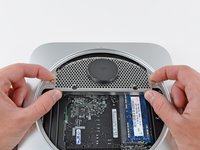
Draai de onderkap tegen de klok in totdat de witte stip op de onderkap is uitgelijnd met de ring op de behuizing.
 Vraag FixBot
-
-
-
Kantel de mini voldoende om de onderklep uit de buitenbehuizing te laten vallen.
-
Verwijder de onderklep en leg deze opzij.
-
-
-
-
-
Verwijder de twee 11,3 mm T6 Torx-schroeven waarmee de ventilator aan het logic board bij de antenneplaat is bevestigd.
-
-
-
Til het oor van de ventilator dat het dichtst bij het RAM-geheugen zit op van de standoff schroef die aan de buitenbehuizing is bevestigd.
-
-
-
Til de ventilator uit de mini voor voldoende ruimte om bij de kabelaansluiting te komen.
-
Trek de ventilatorkabels voorzichtig omhoog om de ventilatorkabelaansluiting uit het stopcontact op het logic board te tillen.
-
Verwijder de ventilator.
-
-
-
-
-
Verwijder de enkele 3,5 mm Torx-schroef (T6) die de behuizing aan het koellichaam bevestigt.
-
-
-
Til de kap op vanaf het uiteinde dat zich het dichtst bij de antenneplaat bevindt.
-
Draai de kap weg van de buitenste behuizing en verwijder deze van de mini.
-
-
-
-
-
Verwijder de volgende schroeven waarmee de antenneplaat aan de mini is bevestigd:
-
Twee 6,6 mm T8- of T9-Torx-schroeven
-
Twee 5,0 mm T8-Torx- of 2,0 mm inbusschroeven (beide werken)
-
-
-
-
Til de antenneplaat iets op vanaf de kant die zich het dichtst bij het RAM-geheugen bevindt.
-
Trek de antenneplaat voorzichtig in een rechte lijn weg van de ronde rand van de buitenbehuizing.
-
-
-
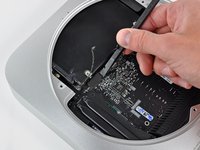
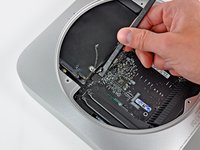
Gebruik de punt van een spudger om de antenne-aansluiting voorzichtig van de AirPort/Bluetooth-kaart te wippen.
-
-
-
-
-
Verwijder de volgende drie schroeven:
-
Eén 5,0 mm T8 Torx- of 2,0 mm inbus-schroef (beide werken)
-
Eén 16,2 mm T6 Torx-schroef
-
Eén 26 mm T6 Torx standoff
-
-
-
Trek de bedrading van beide thermische sensoren van de harde schijf voorzichtig omhoog om hun (kabel)aansluitingen uit hun respectievelijke stopcontacten op het logic board te tillen.
-
-
-
Gebruik de platte kant van een spudger om zowel de harde schijf- als de optische schijf-aansluiting uit hun stopcontacten op het logic board te wippen.
-
-
-
Steek een Mac mini Logic Board Removal Tool in de twee rood gemarkeerde gaten. Zorg ervoor dat deze contact maakt met de buitenste behuizing onder het logic board voordat u verdergaat.
-
Trek het gereedschap voorzichtig naar het I/O bord toe. Het geheel van het logic board en I/O bord zou iets uit de buitenste behuizing moeten schuiven.
-
Stop met wrikken wanneer het I/O bord zichtbaar los van de buitenste behuizing komt. Verwijder de Mac mini Logic Board Removal tool.
-
-
-
Duw gelijktijdig de twee plastic clips aan de uiterst linker- en rechterkant van het I/O bord richting het midden van het I/O bord en trek het I/O bord een klein stukje uit de buitenste behuizing.
-
-
-
Til de harde schijf op aan de rand die het dichtst bij het logic board ligt en verwijder deze uit de mini. Let hierbij op het RAM-stopcontact en eventuele kabels die klem kunnen komen te zitten.
-
-
-
-
-
Verwijder de strook tape die de (kabel)aansluiting van de harde schijf bedekt.
-
-
-
Verwijder de hardeschijfkabel door de (kabel)aansluiting recht van de harde schijf af te trekken.
-
-
-
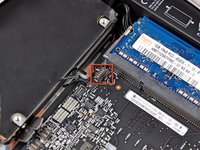
Verwijder het stukje tape dat over de thermische sensor zit die aan de rand van de harde schijf is bevestigd.
-
-
-
Verwijder voorzichtig de thermische sensor van het uiteinde van de harde schijf.
-
-
-
Verwijder de twee 6,2 mm T8 Torx-schroeven aan de zijkant van de harde schijf.
-
-
-
Verwijder voorzichtig de harde-schijfkap van de harde schijf.
-
De harde schijf blijft achter.
-
-












Volg deze instructies in omgekeerde volgorde om je apparaat weer in elkaar te zetten.
Annuleren: ik heb deze handleiding niet afgemaakt.
430 andere personen hebben deze handleiding voltooid.

39Gids Commentaar
These instructions and a little common sense can also be used to replace the lower hard drive in the server version of the Mac Mini. Luckily that was the drive that had failed in my case. Replacing the upper drive looks like a tougher proposition.
Fantastic guide, thank you very much Mr. Bookholt!
As with the above commenter, I accidentally mistook the fan's standoff for a screw and removed it while removing the fan. Also the top right fan screw's standoff came out along with it. I edited the guide with a note on this.
While replacing the antenna, it wasn't immediately clear why the screws weren't lining up, until I realized that two of the screws were in the (otherwise free-floating but for the back grommets) hard drive, I also added a note on that.
STEP 15: If you don't have the time to purchase the Mac Mini Logic Board Removal Tool, the round stock on a large binder clip is PERFECT for the job. It requires a little bending and cutting but it worked perfectly!!
And as jon jon stated, it works like a lever - not a pull. You can feel it kind of click in to the lever points below.
Bravo to ifixit.com for the easy to follow instruction!!
Hey, what about the 2nd harddrive? how does that come out?
This was a superb guide. Thank you very, very much.
Ok, just did here. 1 tera HD working fine. Thanks iFixit, for repacking my tools because the Brazilian mail lost them. So, for those who want to do the same, just have in mind that not ALL things happen just like the how-to. I have to figure out What to do with the logic board removal tool... And, no, I did not fuss with those initial thermal stuff, because they are impossible to unplug. I only fuss with the HD thermal.
